In this tutorial we will try to guide him to create a basic calculator, just as that of MS-Windows. Using the GUI's AutoIt features.
It is assumed that you are already familiar with creating and running AutoIt scripts as shown in the example.
Creation of the GUI dialog - (Design)
In this part we will begin with the creation of GUI dialog. It's good to have the idea of the design based on the utility of our program.
That is to say, how many and that type of controls will need. In this case we will use the same design that Windows Calc.
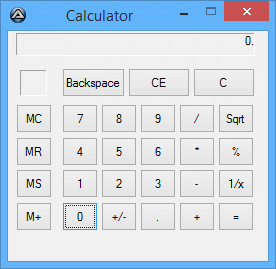
In the Fig. 1, we can see how our calculator will be finished in this part.
Fig. 1
To begin the creation of our dialog, we will begin including some libraries which declare constants we use in our dialog box. These constants contain numeric values of styles and parameters that define the appearance of each control, as well as you value for events and states. (Usually, "GUIConstantsEx.au3" already comes included and it resides in the AutoIt's folder installer). Later on we will see how to apply them, for the time being we will make the inclusion of this library writing in our script the following lines:
#include <EditConstants.au3>
#include <GUIConstantsEx.au3>
#include <StaticConstants.au3>
#include <WindowsConstants.au3>
GUICreate("Calculator", 260, 230)
$idBtn1 = GUICtrlCreateButton("1", 54, 138, 36, 29)
As I mentioned before, this makes that the code to be clearer.
; Digit's buttons
Local $idBtn0 = GUICtrlCreateButton("0", 54, 171, 36, 29)
Local $idBtn1 = GUICtrlCreateButton("1", 54, 138, 36, 29)
Local $idBtn2 = GUICtrlCreateButton("2", 93, 138, 36, 29)
Local $idBtn3 = GUICtrlCreateButton("3", 132, 138, 36, 29)
Local $idBtn4 = GUICtrlCreateButton("4", 54, 106, 36, 29)
Local $idBtn5 = GUICtrlCreateButton("5", 93, 106, 36, 29)
Local $idBtn6 = GUICtrlCreateButton("6", 132, 106, 36, 29)
Local $idBtn7 = GUICtrlCreateButton("7", 54, 73, 36, 29)
Local $idBtn8 = GUICtrlCreateButton("8", 93, 73, 36, 29)
Local $idBtn9 = GUICtrlCreateButton("9", 132, 73, 36, 29)
Local $idBtnPeriod = GUICtrlCreateButton(".", 132, 171, 36, 29)
; Memory's buttons
Local $idBtnMClear = GUICtrlCreateButton("MC", 8, 73, 36, 29)
Local $idBtnMRestore = GUICtrlCreateButton("MR", 8, 106, 36, 29)
Local $idBtnMStore = GUICtrlCreateButton("MS", 8, 138, 36, 29)
Local $idBtnMAdd = GUICtrlCreateButton("M+", 8, 171, 36, 29)
; Operators
Local $idBtnChangeSign = GUICtrlCreateButton("+/-", 93, 171, 36, 29)
Local $idBtnDivision = GUICtrlCreateButton("/", 171, 73, 36, 29)
Local $idBtnMultiplication = GUICtrlCreateButton("*", 171, 106, 36, 29)
Local $idBtnSubtract = GUICtrlCreateButton("-", 171, 138, 36, 29)
Local $idBtnAdd = GUICtrlCreateButton("+", 171, 171, 36, 29)
Local $idBtnAnswer = GUICtrlCreateButton("=", 210, 171, 36, 29)
Local $idBtnInverse = GUICtrlCreateButton("1/x", 210, 138, 36, 29)
Local $idBtnSqrt = GUICtrlCreateButton("Sqrt", 210, 73, 36, 29)
Local $idBtnPercentage = GUICtrlCreateButton("%", 210, 106, 36, 29)
Local $idBtnBackspace = GUICtrlCreateButton("Backspace", 54, 37, 63, 29)
Local $idBtnClearE = GUICtrlCreateButton("CE", 120, 37, 62, 29)
Local $idBtnClear = GUICtrlCreateButton("C", 185, 37, 62, 29)
Local $idEdtScreen = GUICtrlCreateEdit("0.", 8, 2, 239, 23)
Local $idLblMemory = GUICtrlCreateLabel("", 12, 39, 27, 26)
Local $msg
Do
$msg = GUIGetMsg()
Until $msg = $GUI_EVENT_CLOSE
Fig. 2 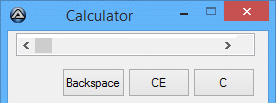
For this part, we only need to modify two lines of our code.
First modification: in the first addition, we will add in the line of the variable $idEdtScreen, a definition for the control (Edit) that is of reading ($ES_READONLY) and that it is justified to the right ($ES_RIGHT), for we join
these two variables with the function BitOR() like it is presented in the line of code below. We will also add $WS_EX_STATICEDGE to the parameter of extended style (exStyle) to give the sunken appearance to the border. For more reference of the styles table for EDIT control, click here. (for
a detailed explanation of each style).
Local $idEdtScreen = GUICtrlCreateEdit("0.", 8, 2, 239, 23, BitOR($ES_READONLY, $ES_RIGHT), $WS_EX_STATICEDGE)
Local $idLblMemory = GUICtrlCreateLabel("", 12, 39, 27, 26, $SS_SUNKEN)
After making these changes try to execute the script. The changes affects the appearance shown in the Fig. 3, now our calculator it looks as the Fig. 1, shown at the beginning. You can also look at the for reference.
Fig. 3 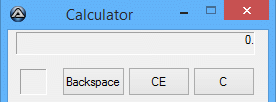
As an exercise for the reader, try adding $BS_FLAT to style parameter in some button, you will look a flat style in the appearance.