GreenCan
-
Posts
364 -
Joined
-
Last visited
-
Days Won
2
Recent Profile Visitors
974 profile views


GreenCan's Achievements
-
 robertocm reacted to a post in a topic:
Visual Image Crop (GUI)
robertocm reacted to a post in a topic:
Visual Image Crop (GUI)
-
robertocm reacted to a post in a topic:
SQLite Report Generator
-
Draygoes reacted to a post in a topic:
Input masks (for GUI dynamic input validation)
-
robertocm reacted to a post in a topic:
presentation manager (with demo)
-
robertocm reacted to a post in a topic:
ActiveX Data Objects - DSN-Less Database connection demo
-
robertocm reacted to a post in a topic:
Universal Date Format Conversion
-
ModemJunki reacted to a post in a topic:
Small tools to help you with USB drive management
-
Zedna reacted to a post in a topic:
Listview displaying Multiline text cells
-
faldo reacted to a post in a topic:
UDF to support SFTP protocol using PSFTP
-
Gianni reacted to a post in a topic:
SQLite demonstration of native recognition of BLOB object in Listview
-
V 1.0.0.1 already implemented. Now possible to Undo filter step by step backward (Photoshop alike undo) Fixed an issue with resetting filter values.
-
The two scripts are way too different to be integrated into one GUI, I don't know how I would manage the cursors, crosshair and shading if using while combing the functions of this script. But I can add a 'Crop' button in this script calling the Crop tool for the current image, that would be no issue and is even a good idea. Before you ask, I have no intention to rewrite Photoshop
-
Not sure what you mean.. , the whole GUI is a preview already, when you move the sliders, you see the effect of your change immediately. What i will add in the next version is an undo panel (a bit like Photoshop). because I keep an history of all the changes, I can easily rebuild the effect from step one to the last step. As you know most of the effects are destructive but with the history stack, it's easy to workaround the issue. Example of stack: Row|Col 0|Col 1|Col 2|Col 3 [0]|8||| [1]|Tint|-76|-54| [2]|Sharpen|13|47| [3]|Levels|87|-11|0 [4]|Blur|8|| [5]|HSL|-11|11|0 [6]|Blur|12|| [7]|BC|16|7| [8]|ColBal|-2|8|0
-
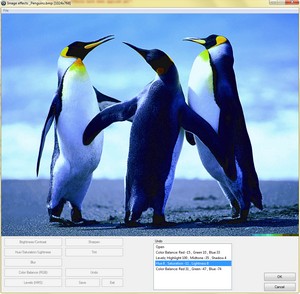
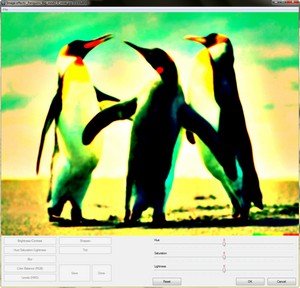
Following to my Image Crop Tool, this is a new function to visually apply effects on an image Version 1.0.0.1 Visual Image Effect UDF 1.0.0.1.au3 Features: Brightness/ContrastHue/Saturation/LightnessBlurColor Balance (RGB)Levels (HMS)SharpenTintUndo (New)Similarly to _CropImage(), _ImageEffects(() will scale the image down to get it visible on screen, all effects are implemented and stacked into an Effects History array, and replicated to the original image while saving. Clicking the OK button after having moved the sliders, implements the filter! Some particularities: Blur and Sharpen effects give different results with the same radius, this issue has been taken into account. The maximum radius of 255 will therefore be limited if using a scaled image, so that the final effect is guaranteed the same on screen as on the bigger sized image file. (see $h_Blur_Btn and $h_Sharpen_Btn and in _SaveLossless() how I rescale the Radius to get it right in the big image) The function saves to images for demo purpose _SaveClone() will save the image displayed into the GUI (You can remove this line as only for demo purpose)_SaveLossless() will save the original sized image with all applied effectsYou will see that the result is identical on both created image files. BugFixes: After applying a filter, I forgot to reset the filter values, fixedEnjoy PS as from tomorrow, I will be offline for a week... Related:

-
GreenCan reacted to a post in a topic:
Pic2Vector 1.0.1.4 Convert bitmap to vector graphics update of 02 july 2014
-
issue with _Excel_RangeFind ?
GreenCan replied to GreenCan's topic in AutoIt General Help and Support
Don't worry. I will be on my bike the whole next week, touring around in France, scheduled 1.000 km at tourist speed... Cheers -
Input masks (for GUI dynamic input validation)
GreenCan replied to GreenCan's topic in AutoIt Example Scripts
Well, I have also issues with regex, real hard stuff to get grip on. May I ask you why you would bother creating an input mask for a date input, while you can use GUICtrlCreateDate? -
issue with _Excel_RangeFind ?
GreenCan replied to GreenCan's topic in AutoIt General Help and Support
Water, your vacation must have been pretty long... -
Input masks (for GUI dynamic input validation)
GreenCan replied to GreenCan's topic in AutoIt Example Scripts
Sorry, I missed this one because I didn't mark to follow the topic. have you found a way to solve your problem? -
MsgBox_CountDown() - MsgBox with visual countdown
GreenCan replied to GreenCan's topic in AutoIt Example Scripts
Yes, of course, Use Shutdown (2) - for other options, see help file A MsgBox doesn't make sense if the user is logged out, but I guess it should be possible, for sure when the script is running and the desktop is locked by the user, the script just continues to run. After the timeout period, the PC will reboot. -
I finally realized the last missing feature, I found a way to obscure the non-crop area by using _GDIPlus_BitmapApplyEffectEx() If you look at the code, you will find the picture tampering hereunder #=====#monochromize unselected area===================== and the reset hereunder #=== reset image (remove monochrome) =================== You may wonder why I repeat the 'monochromize' 2 times and 'reset' 3 times. I did not want to use global variables in the udf. I prefer to have the script a bit longer and avoid the use of globals. Of course if you disapprove, you can always create two functions and declare 10 global variables. Unless bugs are found or someone comes with an interesting idea, ver 1.0.0.5 will be the last edit on this topic. I leave version 1.0.0.4 (no obscuration) for whom is interested. The last version might not be comfortable to use on slower PCs.
-
I uploaded the script again, same version (sorry for the early downloaders) because no major changes.. Inserted UDF descriptionOne extra error checkRemoved all global variables, there are none now.
-
Very nice exercise UEZ, very funny clock. Thanks
-
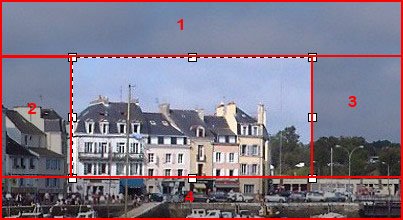
Visual Crop UDF Update version 1.0.0.4 New: Mark crop area in any directionresizing Corner grabbers (use with Ctrl Left Mouse button)Mouse cursor changes over move and resizing areaRedraw when left mouse clicking outside of crop area (restart crop), Right Mouse click, same result.Magnifier (de-)selectable with Ctrl-M or F2.
-
Hi UEZ, yes, I understood what you meant , I am working on a fix, not that crazy to do, but need some time. Concerning the darkening process, I though about overlaying a black png image and alpha blend it, need four squares to darken the surrounding area, I think this is less CPU consuming. However, I tried to do this yesterday evening, did not succeed, I am not able to make the image visible. Stopped my search after 3 hours of frustration, sometimes it just not the right moment...
-
I didn't think about left handed people, sorry. Let me check. Question, do you know by any chance what the best method is to obscure the non selected area of the picture?