Search the Community
Showing results for tags 'Serial'.
Found 12 results
-
Hi here's another UDF for the serial port. It is very similar to CommAPI using kernel32.dll, but all code is packed into a single file without any dependencies, not even using WinAPI.au3. It differs from existing UDF that it doesn't allow a timeout when reading, instead it always returns immediately, either with the requested amount ob bytes read or with a failure status. And of course there is a function provided to query the amount of available bytes in the receive buffer. The reason behind this design decision: You can do 1000 other things in the main loop while checking from time to time if enough data bytes arrived. There's no point to block the program waiting for the serial port. It is currently a work-in-progress, as I didn't test all functions yet. The code was developed and tested on Windows 7 64 bit. The ComUDF-Tests.au3 shows some tests and basic usage of the UDF. Maybe there's no reason to use this UDF, given the existence of the others UDFs, but I did it to get to know DllCall better - I use structs no only to pass but also to get data back (I don't use the array returned by DllCall to read that data, unless required). You're welcome to test it on older and newer Windows versions. Here's a list of the implemented functions: ; _ComListPorts ; _ComOpenPort ; _ComSetTimeouts ; _ComClosePort ; ; _ComSetBreak ; _ComClearBreak ; _ComGetInputcount ; _ComGetOutputcount ; _ComClearOutputBuffer ; _ComClearInputBuffer ; ; _ComSendByte ; _ComReadByte ; _ComSendBinary ; _ComReadBinary ; ; _ComSendChar ; _ComReadChar ; _ComSendCharArray ; _ComReadCharArray ; _ComSendString ; _ComReadString ; ; __ComClearCommError ; __PurgeComm Maze ComUDF.au3 ComUDF-Tests.au3
- 28 replies
-
- 3
-

-

-
- dllcall
- kernel32.dll
- (and 2 more)
-
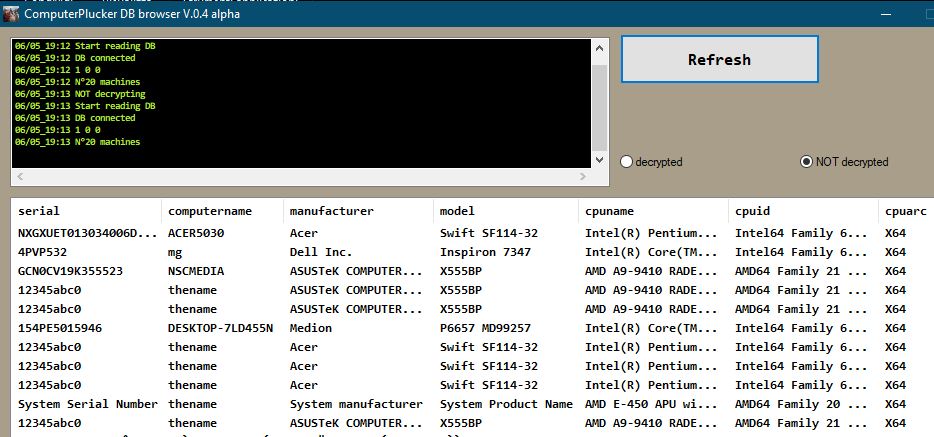
Computer Plucker is a fork and a "restoration" of Computer stats utility by @Rogue5099 (link) You can obtain various data about local machine, as from the screenshot. But my goal is not (only) to provide another PC stats tool, but to develop a very basic remote inventory tool, like (a small subset of) the abandoned Spiceworks or the Microsoft SCCM. So this script can be deployed on a machine as a standalone executable (yes you need only ONE file to distribute) , and launching the .EXE it installs itself to a folder (es. c:\autoit\computerplucker) In tools menù you can set two tasks and not only one for creating every week a file.ini with all the data of the machine. another one for creating every week a file.ini with all the data of the machine PLUS uploading a CRYPTED record of the machine in a free mysql DB online For my needs, I am deploying the .exe and schedule the second task, uploading data one time a week. In tools menù you will find also commands for: manual creating the .ini data file to upload the data in crypted records to upload the data in clear text records (for testing..) total uninstall of ComputerPlucker, with a simple security code. many other tasks in not so logical order.. next version I have to tidy the menù... So my plan is to deploy this on my machines, and have the data in a online DB, this DB will be for me only a "cache" for data records to be downloaded (and deleted) by another script. As today the account of this TEST DB is embedded in code, using the "File to Base64 String' Code Generator" by @UEZ (used also for embedding icons and XML task definitions) Local $mysqlhost = "sql11.freemysqlhosting.net" Local $mysqlport = "3306" Local $mysqldb = "sql11403701" Local $mysqluser = "sql11403701" Local $mysqlpsw = "QtL7T9U5GV" The DB is one table of 30 mysql tinytext fields... very simple indeed... You can try to upload data to this DB and access (phpmyadmin or a random mysql browser app) to see the results. Or you can use my ComputerPluckerDBbrowser (see at the end of this post) a script to collect and manage the data. PRIVACY warning: you are uploading data of your PC account and PC data, test as your risk (or test in another account...) I also created a small post in a blog for not so geek friends, and I have a more advanced version of the data browser, you can have more info lookin' here. 😀 Attached you will find the code, and all the necessary includes are at this >link<. ComputerPlucker.EXE is downloadable >HERE< ComputerPluckerDBbrowser.EXE is downloadable >HERE< ComputerPluckerDBbrowser_LITE.au3 ComputerPlucker.au3


- 18 replies
-
- 2
-
-
- pc
- statistics
- (and 3 more)
-
 Hi All, I didn't know where to put this; my apologies if this is the wrong location. When you plug a Samsung mobile device (phone, tablet, etc.) into the USB of a Windows PC, you can right-click the device in My Computer and select Properties. Here, it will show you the correct serial number of the device. Clearly Windows doesn't use adb to get the SN so I'm stuck at how to get the SN without adb and where the device doesn't have a drive letter assigned to it. When I last picked this up, I tried seemingly everything I could from wmi(?) and winmgmts(?) but either it's hidden cloak-and-dagger style or I can't see the forest for the trees... Does anyone know what API Windows uses when getting the serial number of a device Windows calls a Portable Media Player?
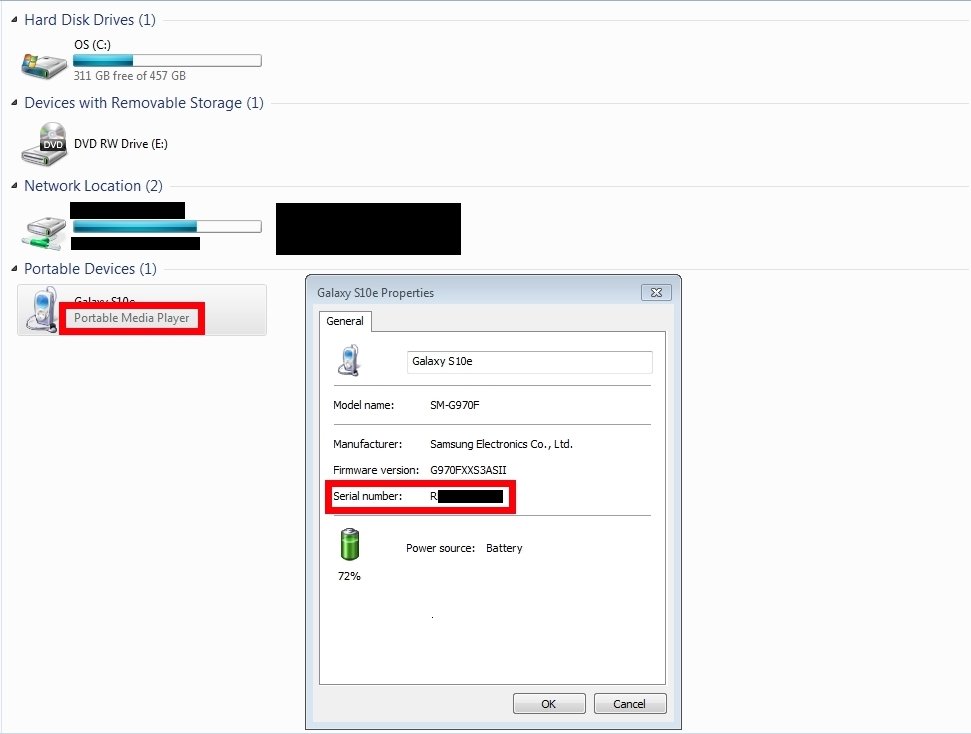
-
Hi I am trying to open a dll using DLLOpen, however everytime i try to do so the function fails and returns -1 result. I have the dll in the same folder as the auto it script. Local $hDLL = DllOpen("C:\Users\310255155\Downloads\COMMGvv2\commg.dll") DllCall($hDLL, "int", "MessageBox", "hwnd", 0, "str", "Some text", "str", "Some title", "int", 0) DllClose($hDLL) MsgBox(0,'result',$hDLL)
-
So I'm trying to send a string of data to Arduino using CommMG UDF. It seems that Arduino is not receiving it. I used Device Monitoring Studio and it shows that the data is sent fine and looks exactly the same as if I sent it from Arduino Serial Monitor. Is CommMG compatible with USB? Global $CMPort = 9 Global $CmBoBaud = 9600 Global $sportSetError = '' Global $CmboDataBits = 8 Global $CmBoParity = "none" Global $CmBoStop = 1 Global $setflow = 2 _CommSetPort($CMPort, $sportSetError, $CmBoBaud, $CmboDataBits, $CmBoParity, $CmBoStop, $setflow) If @error Then MsgBox(16,"Error!","Can't connect to Arduino on port - "&$CMPort) Exit EndIf _CommSetRTS(0) _CommSetDTR(0) _CommSendString("x" & 128 & "y" & 256 & "e", 1)
-
 I was just working on a project that involved decoding a stream of binary data from a serial port in AutoIt. It took me a few hours to figure out how to process the data efficiently in AutoIt and I did not find any helpful examples on how to do so, so I thought I would share my core example and maybe save someone else some time. There may be a more efficient way to do this, but this works well for me. #cs Author: ToasterKing This is an example of a way to parse streaming binary data that follows a strict format with a header and footer. In this example, each frame is 5 bytes with a 2-byte header of 0xD5AA and a 1-byte footer of 0xAD. The _BinaryParse() function accumulates incoming data in a buffer. Once a footer is found, it searches backward for the header, and if it is in the right position, it extracts the remaining 2 bytes in the middle, then moves on to looking for the next frame. #ce ; The data source might be something asynchronous like serial or TCP, but since this is just an example, I'm just putting the data in a variable. Local $fSomeData $fSomeData = Binary("0xD5AA24B1") ; Binary data constituting almost a complete frame. _BinaryParse($fSomeData) ; Call the function with the received data. It isn't a complete frame, so it is just stored in the buffer until more data is received. $fSomeData = Binary("0xAD62D5AA92E7AD") ; Remainder of the previous frame, one garbage byte (0x62) which should be skipped, and a complete additional frame. _BinaryParse($fSomeData) ; The function should be able to parse both frames now. Func _BinaryParse($fNewData) Local Static $fBinaryReceived = Binary("") ; Buffer for received data ConsoleWrite("Hey, the function is called!" & @CRLF) ; Add new data to the buffer. ; This ridiculous monstrosity is the only way I could find to append binary data to binary data in AutoIt. It must be converted to strings first. ; Both, one, or no substrings will begin with "0x" depending on whether they contained binary data. To be converted back to binary properly, only one instance ; of "0x" must exist at the beginning of the string. $fBinaryReceived = Binary("0x" & StringReplace(String($fBinaryReceived) & String($fNewData),"0x","")) ConsoleWrite("Data in the buffer: " & String($fBinaryReceived) & @CRLF) Local $iLength = BinaryLen($fBinaryReceived) ; Count the bytes in the data If $iLength > 0 Then Local $fBinaryReceivedTemp = $fBinaryReceived ; Create temporary copy to work on Local $fByte1,$fByte2 For $i = 1 To $iLength If BinaryMid($fBinaryReceivedTemp,$i,1) = 0xAD Then ; If the 1-byte footer found ConsoleWrite("Footer found at end of " & $i & " of " & $iLength & " bytes!" & @CRLF) If BinaryMid($fBinaryReceivedTemp,$i - 4,1) = 0xD5 And BinaryMid($fBinaryReceivedTemp,$i - 3,1) = 0xAA Then ; and the 2-byte header is found 4 bytes before that ConsoleWrite("Header found before the footer!" & @CRLF) $fByte1 = BinaryMid($fBinaryReceivedTemp,$i - 2,1) ; Get 1st byte in the body (between header and footer) $fByte2 = BinaryMid($fBinaryReceivedTemp,$i - 1,1) ; Get 2nd byte in the body (between header and footer) ConsoleWrite("Here is the critical data: " & String($fByte1) & " " & String($fByte2) & @CRLF) ; Just display the 2 bytes for demonstration purposes. Normally, you'd do something more useful with it here. EndIf $fBinaryReceived = BinaryMid($fBinaryReceivedTemp,$i + 1) ; Truncate the original data to remove all of the bytes just processed, then continue processing $fBinaryReceivedTemp EndIf Next EndIf EndFunc
 -
Local $sAxName Local $oMSComm $sAxName = "MSCOMMLib.MSComm.1" $oMSComm = ObjCreate($sAxName) MsgBox(0, Default, StringFormat("Name: %s, Obj %d, Err %d", $sAxName, IsObj($oMSComm), @error)) I'm talking to serial ports (for Arduino) using the MSComm object. It all runs fine from SciTE or .exe. If I compile to .a3x the object is not created. I could manage without .a3x but I like it because it compiles faster.
-
 Hello, I picked up an older Pressure Floor Mat that use to be connected to a Wyse device and functioned as a auto logon / logoff switch for a kiosk. I have been working with the CommMG UDF's, with no luck. I installed a serial monitor program and still can't seem to communicate with the floor pad. A serial port was a bit difficult to locate, I currently have the floor mat connected to the docking station of the laptop. Project: Play short video when the Pressure Floor Mat is stepped on.
 -
Trying to make a script where it will run a command to show me the model name AND serial tag info on a laptop remotely and copy it to keyboard step by step. I know how to do this via WMIC but I'm curious how to create a CMD script out of it so I can just one click. So it would look something like.... wmic csproduct get name*copy to clipboard* "Press enter to advance"[Enter]wmic csproduct get identifyingnumber*copy to clipboard* "Finished"Any ideas?
-
 I've tried to send 4 byte message via MSComm control VB and in AutoIt. Message is "*A<msb><lsb>". This code works in VB with any value 0 or 1 in msb, and 0 to 255 in lsb. .Output = "*A" & Chr(0) & Chr(ix) In AutoIt this works, but not if either byte is zero, and not if lsb is 1. $sAxName = "MSCOMMLib.MSComm.1" $obj = ObjCreate($sAxName) With $obj .CommPort = 31 .Settings = "9600,N,8,1" .PortOpen = True .NullDiscard = False .NullDiscard = True .HandShaking = 0 .InputMode = 1 .DTREnable = True .EOFEnable = False .RTSEnable = True EndWith For $iCnt = 0 To 15 With $obj .NullDiscard = False $sMsg = "*A" & Chr(0) & Chr(Int($iCnt)) .Output = $sMsg If $iCnt < 3 then MsgBox(0, Default, $iCnt) EndIf EndWith Sleep(200) Next You might expect .NullDiscard to be relevant. The VB works with this true or false, and I've tried both in AutoIt. It's possible that I have some other property different, but I've looked through them all. I wonder if AutoIt is passing the whole string to the control, or stopping at the zero. I can't think how to prove that either way. Chr(Int($iCnt)) works correctly for values > 2, but for 1 it doesn't do the same as Chr(1) - what am I missing here?
 -
-
Hi there, long time not seen. attached you find a little example on how to communicate with a teensy 3.0 via serial com port (USB emulated). the code uses the udf from Martin Gibson which is perfect for this kind of stuff. if you run the example the correct com port is chosen by the driver description and then a connection is opened to the teensy to send text to the device. on the arduino side the text is converted to a {ENTER} delimited string and written to the EEPROM of the device so no other components are necessary. when sending an empty string via the Teensy-Read() Function the device spits back the stored string via serial into the application. this is it. of course this is a POC and has its limitations so currently the buffer size is limited to a 50xChar string. but i find this easy enough to publish. ps: you need the arduino environment 1.0.4, teensydurino in the newest version from pjrc.com, and a teensy to make this work. autoit code: #include "CommMG.au3" $tset = _ComGetPortNames() for $i = 0 to UBound($tset,0) -1 if $tset[$i][1] = "USB Serial (Communication Class, Abstract Control Model)" Then $port = StringTrimLeft($tset[$i][0],3) EndIf Next Teensy_Write("Hallo Welt!",$port) ConsoleWrite(Teensy_Read($port)) Func Teensy_Write($text,$port) Local $result _CommSetport($port, $result, 115200, 8, 'none', 1, 1) _CommSendString($text & @LF) ConsoleWrite(_CommGetString()) _Commcloseport(True) EndFunc ;==>Teensy_Read Func Teensy_Read($port) Local $result _CommSetport($port, $result, 115200, 8, 'none', 1, 1) _CommSendString(@LF) ConsoleWrite(_CommGetString()) _Commcloseport(True) EndFunc ;==>Teensy_Read arduino code: // // EEPROM utility functions with usage example // // This example defines some utility functions // to write byte arrays, integers and strings // to eeprom and read them back. // // Some usage examples are provided. #include <EEPROM.h> // // Absolute min and max eeprom addresses. // Actual values are hardware-dependent. // // These values can be changed e.g. to protect // eeprom cells outside this range. // const int EEPROM_MIN_ADDR = 0; const int EEPROM_MAX_ADDR = 511; // // Initialize eeprom memory with // the specified byte. // Default value is 0xFF. // void eeprom_erase_all(byte b = 0xFF) { int i; for (i = EEPROM_MIN_ADDR; i <= EEPROM_MAX_ADDR; i++) { EEPROM.write(i, b); } } // // Dump eeprom memory contents over serial port. // For each byte, address and value are written. // void eeprom_serial_dump_column() { // counter int i; // byte read from eeprom byte b; // buffer used by sprintf char buf[10]; for (i = EEPROM_MIN_ADDR; i <= EEPROM_MAX_ADDR; i++) { b = EEPROM.read(i); sprintf(buf, "%03X: %02X", i, b); Serial.println(buf); } } // // Dump eeprom memory contents over serial port in tabular form. // Each printed row shows the value of bytesPerRow bytes // (by default 16). // void eeprom_serial_dump_table(int bytesPerRow = 16) { // address counter int i; // row bytes counter int j; // byte read from eeprom byte b; // temporary buffer for sprintf char buf[10]; // initialize row counter j = 0; // go from first to last eeprom address for (i = EEPROM_MIN_ADDR; i <= EEPROM_MAX_ADDR; i++) { // if this is the first byte of the row, // start row by printing the byte address if (j == 0) { sprintf(buf, "%03X: ", i); Serial.print(buf); } // read current byte from eeprom b = EEPROM.read(i); // write byte in hex form sprintf(buf, "%02X ", b); // increment row counter j++; // if this is the last byte of the row, // reset row counter and use println() // to start a new line if (j == bytesPerRow) { j = 0; Serial.println(buf); } // else just print the hex value with print() else { Serial.print(buf); } } } // // Returns true if the address is between the // minimum and maximum allowed values, // false otherwise. // // This function is used by the other, higher-level functions // to prevent bugs and runtime errors due to invalid addresses. // boolean eeprom_is_addr_ok(int addr) { return ((addr >= EEPROM_MIN_ADDR) && (addr <= EEPROM_MAX_ADDR)); } // // Writes a sequence of bytes to eeprom starting at the specified address. // Returns true if the whole array is successfully written. // Returns false if the start or end addresses aren't between // the minimum and maximum allowed values. // When returning false, nothing gets written to eeprom. // boolean eeprom_write_bytes(int startAddr, const byte* array, int numBytes) { // counter int i; // both first byte and last byte addresses must fall within // the allowed range if (!eeprom_is_addr_ok(startAddr) || !eeprom_is_addr_ok(startAddr + numBytes)) { return false; } for (i = 0; i < numBytes; i++) { EEPROM.write(startAddr + i, array[i]); } return true; } // // Reads the specified number of bytes from the specified address into the provided buffer. // Returns true if all the bytes are successfully read. // Returns false if the star or end addresses aren't between // the minimum and maximum allowed values. // When returning false, the provided array is untouched. // // Note: the caller must ensure that array[] has enough space // to store at most numBytes bytes. // boolean eeprom_read_bytes(int startAddr, byte array[], int numBytes) { int i; // both first byte and last byte addresses must fall within // the allowed range if (!eeprom_is_addr_ok(startAddr) || !eeprom_is_addr_ok(startAddr + numBytes)) { return false; } for (i = 0; i < numBytes; i++) { array[i] = EEPROM.read(startAddr + i); } return true; } // // Writes an int variable at the specified address. // Returns true if the variable value is successfully written. // Returns false if the specified address is outside the // allowed range or too close to the maximum value // to store all of the bytes (an int variable requires // more than one byte). // boolean eeprom_write_int(int addr, int value) { byte *ptr; ptr = (byte*)&value; return eeprom_write_bytes(addr, ptr, sizeof(value)); } // // Reads an integer value at the specified address. // Returns true if the variable is successfully read. // Returns false if the specified address is outside the // allowed range or too close to the maximum vlaue // to hold all of the bytes (an int variable requires // more than one byte). // boolean eeprom_read_int(int addr, int* value) { return eeprom_read_bytes(addr, (byte*)value, sizeof(int)); } // // Writes a string starting at the specified address. // Returns true if the whole string is successfully written. // Returns false if the address of one or more bytes // fall outside the allowed range. // If false is returned, nothing gets written to the eeprom. // boolean eeprom_write_string(int addr, const char* string) { // actual number of bytes to be written int numBytes; // we'll need to write the string contents // plus the string terminator byte (0x00) numBytes = strlen(string) + 1; return eeprom_write_bytes(addr, (const byte*)string, numBytes); } // // Reads a string starting from the specified address. // Returns true if at least one byte (even only the // string terminator one) is read. // Returns false if the start address falls outside // or declare buffer size os zero. // the allowed range. // The reading might stop for several reasons: // - no more space in the provided buffer // - last eeprom address reached // - string terminator byte (0x00) encountered. // The last condition is what should normally occur. // boolean eeprom_read_string(int addr, char* buffer, int bufSize) { // byte read from eeprom byte ch; // number of bytes read so far int bytesRead; // check start address if (!eeprom_is_addr_ok(addr)) { return false; } // how can we store bytes in an empty buffer ? if (bufSize == 0) { return false; } // is there is room for the string terminator only, // no reason to go further if (bufSize == 1) { buffer[0] = 0; return true; } // initialize byte counter bytesRead = 0; // read next byte from eeprom ch = EEPROM.read(addr + bytesRead); // store it into the user buffer buffer[bytesRead] = ch; // increment byte counter bytesRead++; // stop conditions: // - the character just read is the string terminator one (0x00) // - we have filled the user buffer // - we have reached the last eeprom address while ( (ch != 0x00) && (bytesRead < bufSize) && ((addr + bytesRead) <= EEPROM_MAX_ADDR) ) { // if no stop condition is met, read the next byte from eeprom ch = EEPROM.read(addr + bytesRead); // store it into the user buffer buffer[bytesRead] = ch; // increment byte counter bytesRead++; } // make sure the user buffer has a string terminator // (0x00) as its last byte if ((ch != 0x00) && (bytesRead >= 1)) { buffer[bytesRead - 1] = 0; } return true; } // // SETUP // const int BUFSIZE = 50; char buf[BUFSIZE]; String name = ""; boolean nameEntered = false; void setup() { int i; delay(5000); Serial.begin(115200); //strcpy(buf, "Arduino eeprom utility functions."); //Serial.println("Saving string to eeprom..."); //eeprom_write_string(100, buf); Serial.println("Reading string from eeprom..."); eeprom_read_string(100, buf, BUFSIZE); Serial.print("String read: '"); Serial.print(buf); Serial.println("'"); } // // LOOP // void loop() { // If new data has been entered, // read each character into the name variable. while (Serial.available()) { char readChar = (char)Serial.read(); // If the next character is a linefeed (enter) // the name is complete. Exit the while() loop. if (readChar == '\n') { nameEntered = true; continue; } // If the character wasn't enter, add it to the name string. name += readChar; } // If a name has been entered (followed by \n) // print "Hello name!" if (nameEntered) { if (name != ""){ name.toCharArray(buf,50); //strcpy(buf, name); eeprom_write_string(100, buf); Serial.print("String: '"); Serial.print(name); Serial.println("' saved to EEPROM!"); } else { eeprom_read_string(100, buf, BUFSIZE); Serial.print("String read: '"); Serial.print(buf); Serial.println("'"); } // Once the name has been printed, erase it and start over. name = ""; nameEntered = false; } }