Search the Community
Showing results for tags 'screen capture'.
Found 6 results
-
 #include <ScreenCapture.au3> Example() Func Example() Local $hBmp ; Capture full screen $hBmp = _ScreenCapture_Capture("") ; Save bitmap to file _ScreenCapture_SaveImage(@MyDocumentsDir & "\GDIPlus_Image.jpg", $hBmp) ShellExecute(@MyDocumentsDir & "\GDIPlus_Image.jpg") EndFunc ;==>Example try to screen capture but it keep pop up the image just want to save the image dont want to open it thank you
 -
 Good morning everyone I was playing a little bit with "Screen Capture" UDF, and I was trying to make a "Window" capture, but, since I made a GUI which through I fire the event "Capture", my GUI is captured as well, and I don't want to This is the line of code that makes the capture: _ScreenCapture_CaptureWnd($strScreenCaptureFileName, $objActiveWindow, 0, 0, -1, -1, False) And these are the lines of code which select the "active" window: Local $objCurrentWindow = 9999 If _IsPressed("01") Then $objCurrentWindow = WinGetHandle("[ACTIVE]") If $objCurrentWindow <> $objMyGUI Then $objActiveWindow = $objCurrentWindow EndIf EndIf Sorry If I made stupid mistakes Thanks in advance. Francesco
 -
 Is there a way to create a contact sheet of pictures from a folder? For example, i have a folder of 12 pictures. I would like to place 4 pictures on one page until i reach 12 pictures total. In this case there would be three separate jpgs. Is this possible? Thanks!
 -
GreenShot (http://getgreenshot.org/) is a nice, free for personal use, screen capture utility. It is designed to be running all the time (in the system notification tray) and triggered with a Global Hotkey (Print Scrn). I prefer to only run it when I need it and have it exit when I'm done, so I wrote this simple script. It starts the utility (if it's not already running), triggers a capture operation, waits for me to finish editing/saving the image, and then closes the utility. The only tricky part was determining when it was ready to accept a HotKey to start the capture. My solution was to monitor it's IO count. The only downside is that it leaves the tray icon visable until the next tray refresh, because I killed it instead of closing it down normally. (Known problem). - Alan G - GreenShot_Auto_X86_V1.0.zip ; ===================================================================== ; Start GreenShot ; Send it a PrintScreen keyboard commnad ; Wait for a capture ; Shut it down ; ===================================================================== Global $ProcessName = "Greenshot.exe" ; Process Name Global $WindowTitle = "Greenshot image editor" ; Image Editor Window Title Global $RunCmd = "C:\Program Files (x86)\Greenshot\Greenshot.exe" ; Program run Command Global $WorkingDir = "" ; Working Directory ; If GreenShot is not already running If NOT ProcessExists( $ProcessName ) Then ; Execute GreenShot If NOT ShellExecute( $RunCmd, "", $WorkingDir ) Then MsgBox( 16, @ScriptFullPath & " - Error", _ "Program failed to execute. $RunCmd = '" & $RunCmd & "'." ) Exit( 1 ) Else ; Wait for the GreenShot process to exist If NOT ProcessWait( $ProcessName, 5 ) Then MsgBox( 16, @ScriptFullPath & " - Error", _ "Process did not start. $ProcessName = '" & $ProcessName & "'." ) Exit( 1 ) Else ; Wait for a minimum number of IO (So we know it's ready) Global $Ready = False For $i = 1 To 20 Global $IOStats = ProcessGetStats( $ProcessName, 1 ) If $IOStats[1] > 4 Then $Ready = True ExitLoop EndIf Sleep( 250 ) Next ; $i If NOT $Ready Then MsgBox( 16, @ScriptFullPath & " - Error", _ "Process IO Reads not > 700. $ProcessName = '" & $ProcessName & "', $IOStats[1] = '" & $IOStats[1] & "'." ) Exit( 1 ) EndIf EndIf ; NOT ProcessWait EndIf ; NOT ShellExecute EndIf ; NOT ProcessExists ; Send GreenShot a PrintScreen Keyboard command to ; initiate a Capture Send( "{PRINTSCREEN}" ) ; Wait for the Greenshot Image Editor Window to Open ; after I take a shot If NOT WinWaitActive( $WindowTitle, "", 300 ) Then MsgBox( 16, @ScriptFullPath & " - Error", _ "Image Editor Window did not open. $WindowTitle = '" & $WindowTitle & "'." ) Exit( 1 ) EndIf ; Wait for the Greenshot Image Editor Window to Close ; then kill the process WinWaitClose( $WindowTitle ) ProcessClose( $ProcessName ) If NOT ProcessWaitClose( $ProcessName, 5 ) Then MsgBox( 16, @ScriptFullPath & " - Error", _ "Process failed to close. $ProcessName = '" & $ProcessName & "'." ) Exit( 1 ) EndIf ; All done Exit( 0 )
-
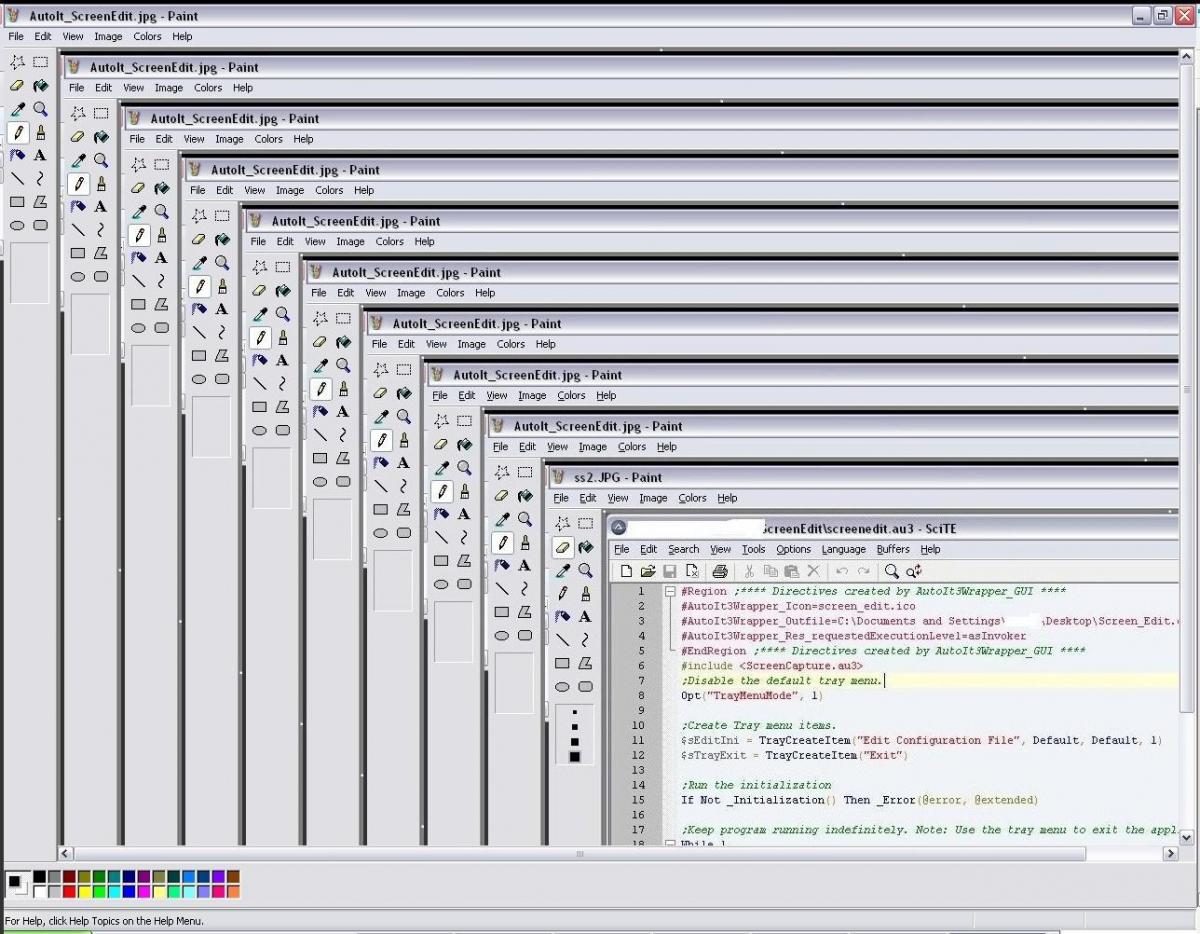
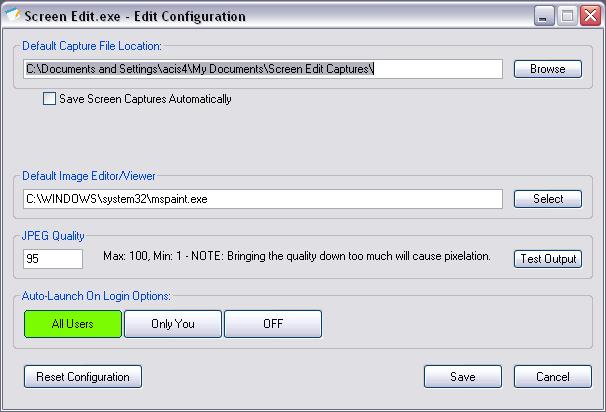
Updated: 7/30/12 OLD CONTENT BELOW Intro: When working on multiple projects and building documentation, taking screenshots, editing them, and then inserting them into files eats up some time. This little program helps to reduce some of that time by auto-opening your screen capture in the editor of your choice while having the ability to auto-save the captures in a sequenced file naming pattern. Installation: Run the Screen Edit vx.x.exe installer. You are given a few different options for installation including setting up the shortcuts and the auto-start on login.After the installation is complete, you can either have it start right away, or manually start it via the program menu or shortcuts if applicable. Comes packed with an uninstaller. Instructions: Use your 'Print Screen' button to capture anything on your desktop. If a specific window has focus (you're actively using it), it will capture that window. If no window has focus, it will capture all of your desktops. To do this, just left-click in some empty space on your desktop and it will remove focus from all windows. This also works on multi-monitor setups. Alternatively, you can use 'ALT + Print Screen' to capture your entire default desktop (from your Default monitor).Upon performing either action, your captured image will automatically open in your editor (by default, this will be Microsoft Paint).If you have the save feature enabled in the configuration, a numbered file will be created. Every subsequent capture will create a new file in sequential order. You can also change the naming scheme of the files in the configuration as well. This is great when you're working on documentation for multiple projects and need a sequence of screenshots. To access the configuration, click on the tray icon for Screen Edit.exe and click 'Edit Configuration File'. The configuration settings include: Changing the default capture file location Auto-Save screen captures Changing the file name scheme Changing your default editor/viewer Changing the JPEG quality of the captured image Testing the output of the captured image with the current configuration Changing the Auto-Launch options To exit the application, click on the tray menu for Screen Edit.exe and click 'Exit'. Changes in version 1.1 Download Links:


-
Version 1.1
1,412 downloads
Easily capture, edit, and save images from your desktop. When working on multiple projects and building documentation, taking screenshots, editing them, and then inserting them into files eats up some time. This little program helps to reduce some of that time by auto-opening your screen capture in the editor of your choice while having the ability to auto-save the captures in a sequenced file naming pattern. See the for some detailed information.