Leaderboard
Popular Content
Showing content with the highest reputation on 12/13/2018 in Posts
-

Detect Input Box changes
libelle62 and 2 others reacted to FrancescoDiMuro for a topic
Hi @OzoneB, and welcome to the AutoIt forums You have to "capture" the event "change" sent from the Input box To do this, you use a WM_COMMAND Windows Message, capturing the EN_CHANGE Event/Notification code. A little sample for the welcome #include <Date.au3> #include <EditConstants.au3> #include <GUIConstantsEx.au3> #include <WindowsConstants.au3> Opt("GUIOnEventMode", 1) #Region ### START Koda GUI section ### Form= Global $frmMainForm = GUICreate("A Form", 235, 62, -1, -1) GUISetOnEvent($GUI_EVENT_CLOSE, "ExitApplication") Global $txtInput = GUICtrlCreateInput("", 19, 22, 201, 21) GUICtrlSetFont(-1, 10, 400) GUISetState(@SW_SHOW, $frmMainForm) #EndRegion ### END Koda GUI section ### GUIRegisterMsg($WM_COMMAND, "WM_COMMAND") While 1 Sleep(100) WEnd Func ExitApplication() Exit EndFunc Func WM_COMMAND($hWnd, $iMsg, $wParam, $lParam) Local $hdlWindowFrom, _ $intMessageCode, _ $intControlID_From $intControlID_From = BitAND($wParam, 0xFFFF) $intMessageCode = BitShift($wParam, 16) Switch $intControlID_From Case $txtInput Switch $intMessageCode Case $EN_CHANGE ConsoleWrite("[" & _Now() & "] - The text in the $txtInput control has changed! Text = " & GUICtrlRead($txtInput) & @CRLF) EndSwitch EndSwitch Return $GUI_RUNDEFMSG EndFunc3 points -
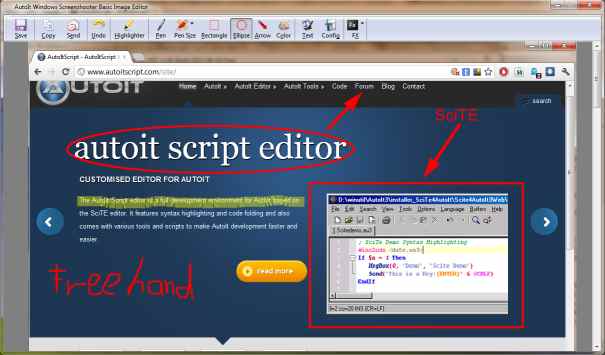
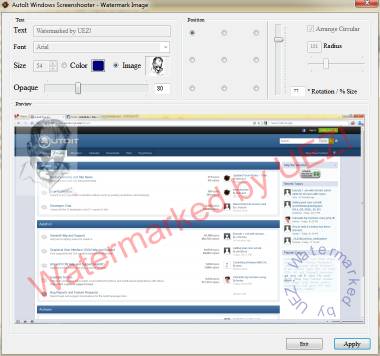
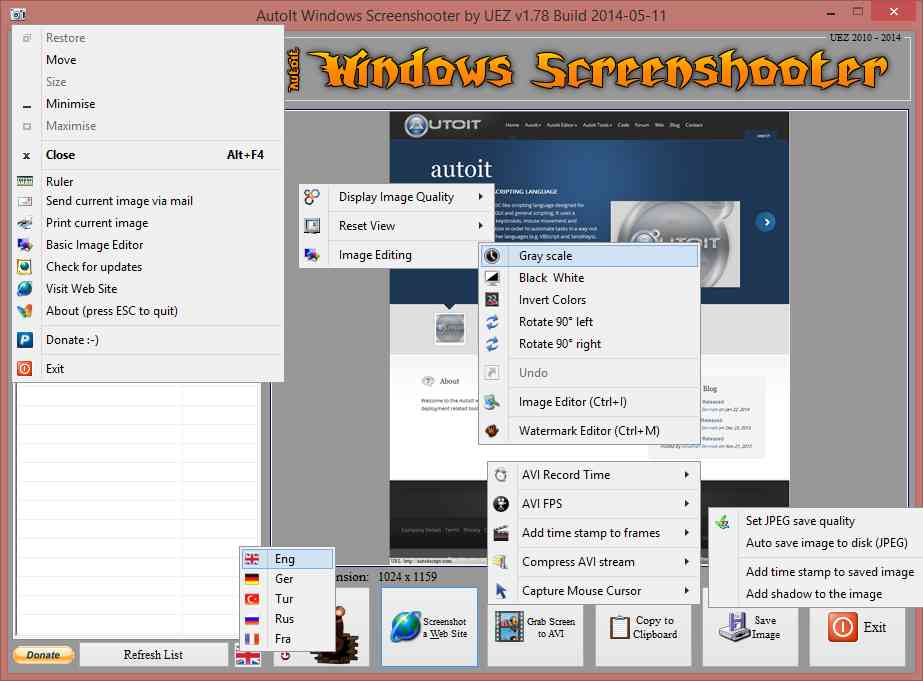
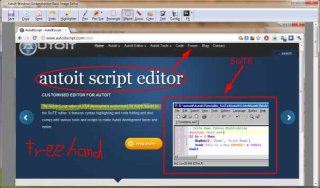
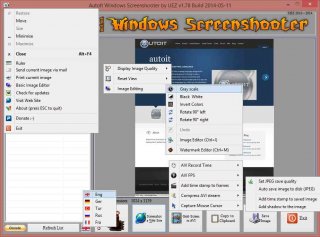
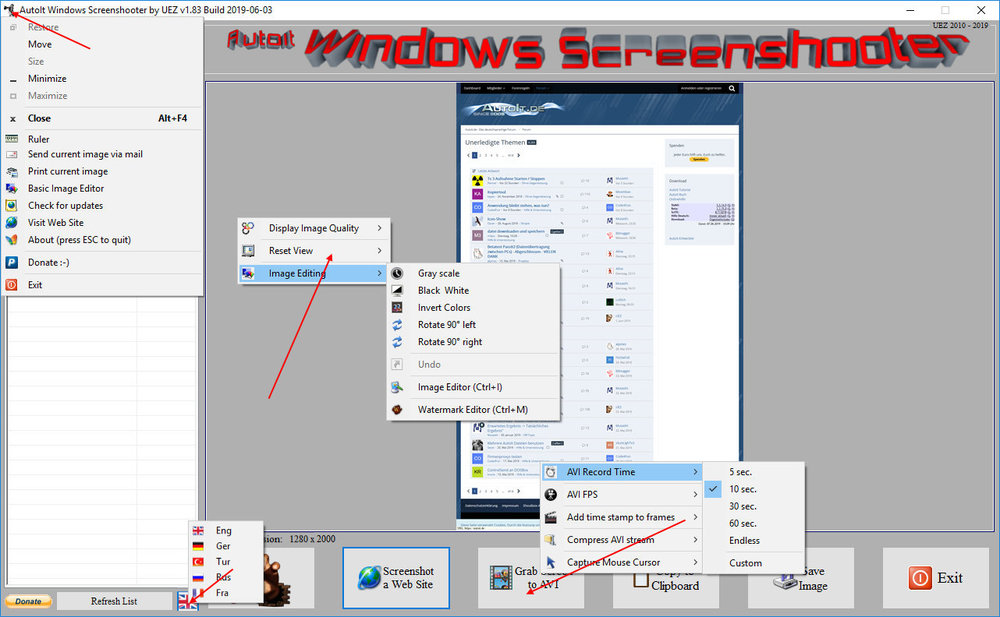
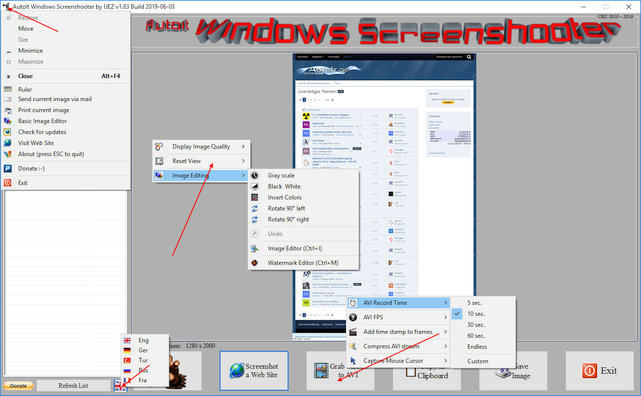
AutoIt Windows Screenshooter Key Features: takes easily a screenshot from any visible window capture any region of the desktop incl. freehand capturing capture GUI controls and GUI menus separately capture a marked area every x seconds for a duration of y seconds create a GIF animation from saved frames (Vista or higher os required) capture to AVI file (without audio!) takes a screenshot from web sites (available only on Win7+ os and when Aero is enabled) put images to clipboard to paste to other applications easily color picker save image in different formats and also to PDF! add timestamp to saved images simple image editing options: greyscale, b&w, invert, rotate +-90° send image to printer and default email client preview of captured screens incl. zoom option multi monitor support display pixel color under mouse ruler basic image editor (paint, highlight, ellipse, rectangle, text and some graphic FX) watermark captured image no 3rd party tools or DLLs used - pure AutoIt! fully portable - no installation is needed multi language feature (Eng, Ger, Tur, Fra and Rus only) drag'n'drop an image to the app for editing To do: capture content of scrollable window/control capture cascaded menus Due to DllCall("User32.dll", "int", "PrintWindow", "hwnd", $hWnd, "handle", $hMemDC, "int", 0) limitation some windows cannot be captured properly (GDI+, ProgDVB, etc.) but can take screenshots of hidden windows. One workaround is to use full screen capturing (F11/F12) or "Grab Screen" function! Or try double click with rmb on listview items (beta). Download source code (10489 downloads previously): AutoIt Windows Screenshooter v1.84 Build 2019-08-18.7z (version 3.3.12.0+ needed!) You are not allowed to sell this code or just parts of it in a commercial project or modify it and distribute it with a different name! Download compiled Exe only: 4shared / Media Fire / Softpedia (1.58mb) Distributing copies of the program in compiled format (exe) must be free of any fee! -----> click here to Donate! (Current donators: 1. Cuong N.) It is designed for Win7+ operating systems with AERO enabled! E.g. on WinXP machines some functions are not working properly and might crash the application! AV scanners may have a negative impact the execution of compiled exe and might report any malware. I guarantee that there is no malicious code in the source code / exe!!! Main GUI: About Intro: Basic Image Editor: Watermark: Click link for an enhanced version of Watermark Image. Credits: main code by UEZ additional code (alphabetical order) by Authenticity, AutoItObject Team, Eemuli, Eukalyptus, funkey, _Kurt, martin, monoceres, ProgAndy, taietel, trancexx, Ward, wolf9228 and Yashied! mesale0077 for turkish translation wakillon for french translation AZJIO for russian translation Keys: Main GUI: User your mouse to scroll preview window or Numpad 8: Scroll preview window up Numpad 2: Scroll preview window down Numpad 4: Scroll preview window left Numpad 6: Scroll preview window right Numpad +: zoom in preview window or mouse wheel down Numpad -: zoom out preview window or mouse wheel up F1: capture again on last position F5: refresh Windows Name list PRINTSCREEN: take screenshot from whole screen ALT+PRINTSCR: take a screenshot from active window F10: Undo made changes with Image Editing function F11: take screenshot from whole screen incl mouse cursor F12: take screenshot from whole screen Ctrl+Alt+F9 start "Grab Screen" mode Ctrl+Alt+F12: take a screenshot from active window using alternative screenshot functionality (beta)! Ctrl+r: call ruler Ctrl+s: save current displayed image Ctrl+x: exit program ctrl+w: call web grab input field (available only when Aero is enabled) Ctrl+i: call image editor Ctrl+m: call watermark editor Ctrl+z: undo Only available on Vista+ os: double click with rmb on list items to use alternative screenshot functionality (beta)! When 'Grab Screen' is clicked you can hold down the ctrl key to switch to 'grab controls' mode. Control under mouse will be framed red. ctrl + shift will take the screenshot of appropriate control. To capture GUI menus you can press rmb which simulates the lmb. When a menu is opened press shift additionally to capture it. Press and hold only the shift key to capture any region on the desktop using freehand capturing - release it so capture marked regions! Or just mark resize able area which you want to grab. Press CTRL key to grab marked area or right mouse button to capture the marked area every x seconds for a duration of y seconds. When saving the image just enter the extension you wish to use (*.jpg;*.png;*.bmp;*.gif;*.tif;*.pdf). Big thanks to taietel for his PDF UDF! Image Editor: s: save 😄 copy n: send h: highlighter p: pen r: rectangle e: ellipse a: arrow o: color t: text g: text config Ctrl+z: undo Watermark editor: Ctrl+z: undo To start the app minimized just call it "Windows Screenshooter.exe /min" Maybe it is useful for someone... Any kind of comment is welcome. Br, UEZ Change log:


 2 points
 -

AutoIt Windows Screenshooter v1.84 Build 2019-08-18
Stormgrade and one other reacted to UEZ for a topic
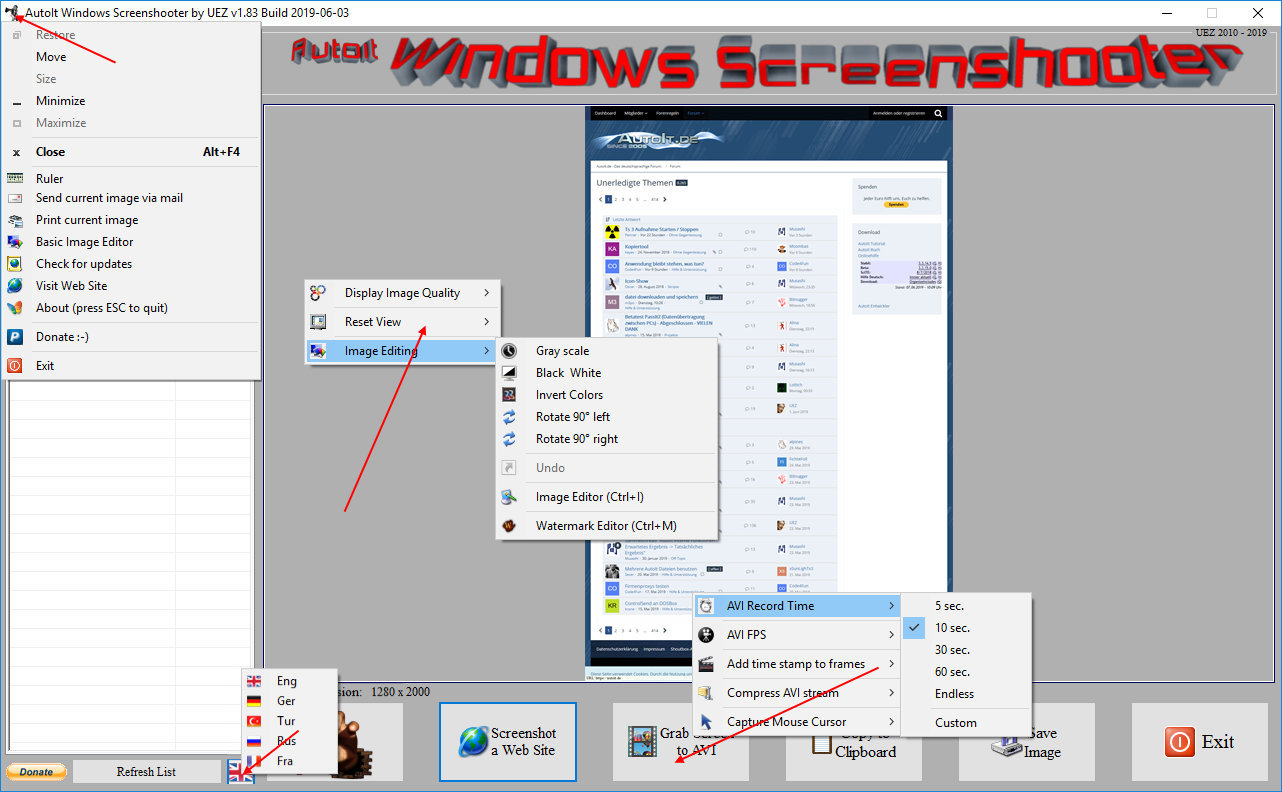
Thanks for your feedback. Btw, I released a new version -> see post#1 for more details.2 points -

Suggested modification to ArrayDisplayInternals.au3
argumentum reacted to Tippex for a topic
Adding back the depreciated features for _DebugArrayDisplay() and other enhancements The latest AutoIT release removed (depreciated) the copy button options that were in _ArrayDisplay() but they are now in _DebugArrayDisplay(). However, _ArrayDisplay() now always has a "data label" which may not always be wanted and _DebugArrayDisplay() has an "Exit Script" button that again may not always be wanted. I appreciate that we can all just customise these to our own needs but I wish to put forward a suggestion that ArrayDisplayInternals.au3 is modified to allow _DebugArrayDisplay() to have a couple of additional iFlags: $ARRAYDISPLAY_ONLYCOPYBUTTONS = 16 ; Only 'Copy' buttons displayed ... this used to be in the last version as: "16 = Only 'Copy' buttons displayed" $ARRAYDISPLAY_NODATALABELDISPLAY = 128 ; No data label displayed _ArrayDisplay() can perhaps be left as is for whatever the reason was that it was changed initially? For my own purposes, I've made this (minor) modification to Melba23 & JPM's UDF which I wish to suggest; it includes the bugfix found by Melba23 194070-bug-report ... ; #CONSTANTS# =================================================================================================================== Global Const $ARRAYDISPLAY_COLALIGNLEFT = 0 ; (default) Column text alignment - left Global Const $ARRAYDISPLAY_TRANSPOSE = 1 ; Transposes the array (2D only) Global Const $ARRAYDISPLAY_COLALIGNRIGHT = 2 ; Column text alignment - right Global Const $ARRAYDISPLAY_COLALIGNCENTER = 4 ; Column text alignment - center Global Const $ARRAYDISPLAY_VERBOSE = 8 ; Verbose - display MsgBox on error and splash screens during processing of large arrays Global Const $ARRAYDISPLAY_ONLYCOPYBUTTONS = 16 ; Only 'Copy' buttons displayed Global Const $ARRAYDISPLAY_NOBUTTONSDISPLAY = 32 ; No buttons displayed Global Const $ARRAYDISPLAY_NOROW = 64 ; No 'Row' column displayed Global Const $ARRAYDISPLAY_CHECKERROR = 128 ; return if @error <> 0 (avoid display after _Array*() errors) Global Const $ARRAYDISPLAY_NODATALABELDISPLAY = 256 ; No data label displayed Global Const $ARRAYDISPLAY_NORIGHTCLICK = 512 ; Disables ability to right-click a cell to copy its content Global Const $ARRAYDISPLAY_SUBTITLECOLOUR = 1024 ; Contrasts the subtitle with a light grey background Global Const $ARRAYDISPLAY_MAXTITLE = 2048 ; Maximize title width regardless of array width Global Const $_ARRAYCONSTANT_tagLVITEM = "struct;uint Mask;int Item;int SubItem;uint State;uint StateMask;ptr Text;int TextMax;int Image;lparam Param;" & _ "int Indent;int GroupID;uint Columns;ptr pColumns;ptr piColFmt;int iGroup;endstruct" ; =============================================================================================================================== ... ArrayDisplayInternals.au31 point -

Arrays 101: All you need to know about them!
BlackLumiere reacted to TheDcoder for a topic
Hello Guys! I wanted to share all my knowledge on arrays! Hope may enjoy the article , Lets start! Declaring arrays! Declaring arrays is a little different than other variables: ; Rules to follow while declaring arrays: ; ; Rule #1: You must have a declarative keyword like Dim/Global/Local before the declaration unless the array is assigned a value from a functions return (Ex: StringSplit) ; Rule #2: You must declare the number of dimensions but not necessarily the size of the dimension if you are gonna assign the values at the time of declaration. #include <Array.au3> Local $aEmptyArray[0] ; Creates an Array with 0 elements (aka an Empty Array). Local $aArrayWithData[1] = ["Data"] _ArrayDisplay($aEmptyArray) _ArrayDisplay($aArrayWithData) That's it Resizing Arrays Its easy! Just like declaring an empty array! ReDim is our friend here: #include <Array.au3> Local $aArrayWithData[1] = ["Data1"] ReDim $aArrayWithData[2] ; Change the number of elements in the array, I have added an extra element! $aArrayWithData[1] = "Data2" _ArrayDisplay($aArrayWithData) Just make sure that you don't use ReDim too often (especially don't use it in loops!), it can slow down you program. Best practice of using "Enum" You might be wondering what they might be... Do you know the Const keyword which you use after Global/Local keyword? Global/Local are declarative keywords which are used to declare variables, of course, you would know that already by now , If you check the documentation for Global/Local there is a optional parameter called Const which willl allow you to "create a constant rather than a variable"... Enum is similar to Const, it declares Integers (ONLY Integers): Global Enum $ZERO, $ONE, $TWO, $THREE, $FOUR, $FIVE, $SIX, $SEVEN, $EIGHT, $NINE ; And so on... ; $ZERO will evaluate to 0 ; $ONE will evaluate to 1 ; You get the idea :P ; Enum is very useful to declare Constants each containing a number (starting from 0) This script will demonstrate the usefulness and neatness of Enums : ; We will create an array which will contain details of the OS Global Enum $ARCH, $TYPE, $LANG, $VERSION, $BUILD, $SERVICE_PACK Global $aOS[6] = [@OSArch, @OSType, @OSLang, @OSVersion, @OSBuild, @OSServicePack] ; Now, if you want to access anything related to the OS, you would do this: ConsoleWrite(@CRLF) ConsoleWrite('+>' & "Architecture: " & $aOS[$ARCH] & @CRLF) ConsoleWrite('+>' & "Type: " & $aOS[$TYPE] & @CRLF) ConsoleWrite('+>' & "Langauge: " & $aOS[$LANG] & @CRLF) ConsoleWrite('+>' & "Version: " & $aOS[$VERSION] & @CRLF) ConsoleWrite('+>' & "Build: " & $aOS[$BUILD] & @CRLF) ConsoleWrite('+>' & "Service Pack: " & $aOS[$SERVICE_PACK] & @CRLF) ConsoleWrite(@CRLF) ; Isn't it cool? XD You can use this in your UDF(s) or Program(s), it will look very neat! Looping through an Array Looping through an array is very easy! . There are 2 ways to loop an array in AutoIt! Simple Way: ; This is a very basic way to loop through an array ; In this way we use a For...In...Next Loop! Global $aArray[2] = ["Foo", "Bar"] ; Create an array ; This loop will loop 2 times because our $aArray contains 2 elements. For $vElement In $aArray ; $vElement will contain the value of the elements in the $aArray... one element at a time. ConsoleWrite($vElement & @CRLF) ; Prints the element out to the console Next ; And that's it! Advanced Way: ; This is an advanced way to loop through an array ; In this way we use a For...To...Next Loop! Global $aArray[4] = ["Foo", "Bar", "Baz", "Quack"] ; Create an array ; This loop will loop 2 times because our $aArray contains 2 elements. For $i = 0 To UBound($aArray) - 1 ; $i is automatically created and is set to zero, UBound($aArray) returns the no. of elements in the $aArray. ConsoleWrite($aArray[$i] & @CRLF) ; Prints the element out to the console. Next ; This is the advanced way, we use $i to access the elements! ; With the advanced method you can also use the Step keyword to increase the offset in each "step" of the loop: ; This will only print every 2nd element starting from 0 ConsoleWrite(@CRLF & "Every 2nd element: " & @CRLF) For $i = 0 To UBound($aArray) - 1 Step 2 ConsoleWrite($aArray[$i] & @CRLF) Next ; This will print the elements in reverse order! ConsoleWrite(@CRLF & "In reverse: " & @CRLF) For $i = UBound($aArray) - 1 To 0 Step -1 ConsoleWrite($aArray[$i] & @CRLF) Next ; And that ends this section! For some reason, many people use the advance way more than the simple way . For more examples of loops see this post by @FrancescoDiMuro! Interpreting Multi-Dimensional Arrays Yeah, its the most brain squeezing problem for newbies, Imagining an 3D Array... I will explain it in a very simple way for ya, so stop straining you brain now! . This way will work for any array regardless of its dimensions... Ok, Lets start... You can imagine an array as a (data) mine of information: ; Note that: ; Dimension = Level (except the ground level :P) ; Element in a Dimension = Path ; Level 2 ----------\ ; Level 1 -------\ | ; Level 0 ----\ | | ; v v v Local $aArray[2][2][2] ; \-----/ ; | ; v ; Ground Level ; As you can see that $aArray is the Ground Level ; All the elements start after the ground level, i.e from level 0 ; Level 0 Contains 2 different paths ; Level 1 Contains 4 different paths ; Level 2 Contains 8 different paths ; When you want too fill some data in the data mine, ; You can do that like this: $aArray[0][0][0] = 1 $aArray[0][0][1] = 2 $aArray[0][1][0] = 3 $aArray[0][1][1] = 4 $aArray[1][0][0] = 5 $aArray[1][0][1] = 6 $aArray[1][1][0] = 7 $aArray[1][1][1] = 8 ; Don't get confused with the 0s & 1s, Its just tracing the path! ; Try to trace the path of a number with the help of the image! Its super easy! :D I hope you might have understand how an array looks, Mapping your way through is the key in Multi-Dimensional arrays, You take the help of notepad if you want! Don't be shy! Frequently Asked Questions (FAQs) & Their answers Q #1. What are Arrays? A. An Array is an datatype of an variable (AutoIt has many datatypes of variables like "strings", "integers" etc. Array is one of them). An Array can store information in a orderly manner. An Array consist of elements, each element can be considered as a variable (and yes, each element has its own datatype!). AutoIt can handle 16,777,216 elements in an Array, If you have an Array with 16,777,217 elements then AutoIt crashes. Q #2. Help! I get an error while declaring an Array!? A. You tried to declare an array like this: $aArray[1] = ["Data"] That is not the right way, Array is a special datatype, since its elements can be considered as individual variables you must have an declarative keyword like Dim/Global/Local before the declaration, So this would work: Local $aArray[1] = ["Data"] Q #3. How can I calculate the no. of elements in an array? A. The UBound function is your answer, Its what exactly does! If you have an multi-dimensional Array you can calculate the total no. of elements in that dimension by specifying the dimension in the second parameter of UBound Q #4. Why is my For...Next loop throwing an error while processing an Array? A. You might have done something like this: #include <MsgBoxConstants.au3> Local $aArray[10] = [1, 2, 3, 4, 5, 6, 7, 8, 9, 10] Local $iMyNumber = 0 For $i = 0 To UBound($aArray) ; Concentrate here! $iMyNumber += $aArray[$i] Next MsgBox($MB_OK, "Sum of all Numbers!", $iMyNumber) Did you notice the mistake? UBound returns the no. of elements in an array with the index starting from 1! That's right, you need to remove 1 from the total no. of elements in order to process the array because the index of an array starts with 0! So append a simple - 1 to the statment: #include <MsgBoxConstants.au3> Local $aArray[10] = [1, 2, 3, 4, 5, 6, 7, 8, 9, 10] Local $iMyNumber = 0 For $i = 0 To UBound($aArray) - 1 $iMyNumber += $aArray[$i] Next MsgBox($MB_OK, "Sum of all Numbers!", $iMyNumber) Q #5. Can an Array contain an Array? How do I access an Array within an Array? A. Yes! It is possible that an Array can contain another Array! Here is an example of an Array within an Array: ; An Array can contain another Array in one of its elements ; Let me show you an example of what I mean ;) #include <Array.au3> Global $aArray[2] $aArray[0] = "Foo" Global $aChildArray[1] = ["Bar"] $aArray[1] = $aChildArray _ArrayDisplay($aArray) ; Did you see that!? The 2nd element is an {Array} :O ; But how do we access it??? ; You almost guessed it, like this: ; Just envolope the element which contains the {Array} (as shown in _ArrayDisplay) with brackets (or parentheses)! :D ConsoleWrite(($aArray[1])[0]) ; NOTE the brackets () around $aArray[1]!!! They are required or you would get an syntax error! ; So this: $aArray[1][0] wont work! More FAQs coming soon!1 point -
Arrays 101: All you need to know about them!
BrewManNH reacted to FrancescoDiMuro for a topic
@BrewManNH It was just to "complete" the "Loop through array" section But yes, you're right1 point -

Detect if Mouse is pushed (mouse move) on screen top corner
FrancescoDiMuro reacted to pixelsearch for a topic
#include <GUIConstants.au3> $gui = GUICreate("", 100, 100, -1, -1, $WS_POPUP, BitOR($WS_EX_TOPMOST, $WS_EX_NOACTIVATE, $WS_EX_TOOLWINDOW)) GUISetBkColor(0xffff00) WinSetTrans($gui,"",0) GUISetState(@SW_SHOWNOACTIVATE, $gui) $Show=0 While 1 Sleep(64) $bLeft_click = False $aInfo = GUIGetCursorInfo($gui) If IsArray($aInfo) And $aInfo[2] = 1 Then $bLeft_click = True EndIf If $bLeft_click And MouseGetPos()[1] = 0 Then If Not $Show Then WinSetTrans($gui,"",255) $Show=1 EndIf Else If $Show Then WinSetTrans($gui,"",0) $Show=0 EndIf EndIf WEnd Next comment should be Func WM_NOTIFY() with test on $NM_CLICK, let's complicate it1 point -

Arrays 101: All you need to know about them!
FrancescoDiMuro reacted to BrewManNH for a topic
It's described already, it's in the help file. That's not an array specific function For/Next/Step is in the there with a good enough explanation that should enable anyone with the will to learn how to use it.1 point -
The arrays in AutoIt are the same as in C/C++ and PHP, they're just called arrays in arrays, even though they're the same as in AutoIt. An array of arrays, by the description we use, is putting another array into a single element of an array, not the row/column concept that we generally use around here for 2D arrays, which is how other languages generally refer to as an array in an array.1 point
-

Internal Clipboard
coffeeturtle reacted to caramen for a topic
yeah i did it. I have 5 version with improvements. My Goal is to promote AutoIT with public Free distribution of this. For me it a genius tool. I do 1400 copy paste / day i know that since i indexed each copy paste in that tool ^^ May you want contribute into my project ? Or if you want to get some code PM me. I got 2 major improvement left to get it pefect. I have to know how to delete a line from my log after deleting it in my listview. I have to replace the _Ispressed and put a VM_Input Register In stead. after that this tool will be perfect. But i have no time actualy to dev. HArd time at work. You have to be aware if you do somthing like this in addition of a software it will be hard to do without VM_Input becose if you dont got a perfect loop you wont regiter properly a CTRL + C corectly. And i think you cannot get help about this in the forum because the code to do this can make powerfull malicius thing. (No keyword spent) FYI, Windows dev team is working also on somthing similar. They Noticed how Copy paste is lake of improvement in Windows history. I documented myself on this a lot. Also there is a looot of similar tool. https://windowsreport.com/clipboard-managers-windows-10/1 point -
Internal Clipboard
coffeeturtle reacted to FrancescoDiMuro for a topic
Someone called @caramen was working on something similiar1 point -

Internal Clipboard
coffeeturtle reacted to Deye for a topic
@coffeeturtle Check out the example for _WinAPI_AddClipboardFormatListener Deye1 point -
A bit late but FYI this could also be done using ... guess what ? $txt = "[FirstSection]" & @crlf & _ "AutoInsertBasedOnCategory = true" & @crlf & _ "DeletingSectionPart = true" & @crlf & _ "AppendTextInLine = true" & @crlf & _ "RemoveSpacing = false" & @crlf & _ @crlf & _ "[SecondSection]" & @crlf & _ "CleanUpFile = true" & @crlf & _ "HideInvalidChar = false" & @crlf & _ "ChangeSentenceCase = true" & @crlf & _ "ChangeTitleCase = fale" Msgbox(0,"", $txt) $txt = _Example3($txt, "SecondSection", "; <== Example 3 this is the new line to be inserted =>") Msgbox(0,"", $txt) Func _Example3($txt, $section, $comment) Return StringRegExpReplace($txt, '\[' & $section & '\]\h*\R\K', $comment & @crlf) EndFunc1 point
-

Arrays 101: All you need to know about them!
FrancescoDiMuro reacted to czardas for a topic
You can also do this: Local $aArray = [0, 1, 2, 3]1 point -
[Sloved] Set Resizing for a RichEdit control?
pixelsearch reacted to TheDcoder for a topic
I figured it out, Thanks to Mat #include <GUIConstantsEx.au3> #include <WindowsConstants.au3> #include <GuiRichEdit.au3> Global $hGUI = GUICreate("Test GUI", 500, 300, -1, -1, BitOR($WS_SIZEBOX, $WS_SYSMENU, $WS_VISIBLE)) Global $hRichEdit = _GUICtrlRichEdit_Create($hGUI, "", 0, 0, 500, 300) ; GUICtrlSetResizing($hRichEdit, $GUI_DOCKAUTO) ; Don't even think of trying this GUIRegisterMsg($WM_SIZE, "WM_SIZE") ; Register the function While 1 $nMsg = GUIGetMsg() Switch $nMsg Case $GUI_EVENT_CLOSE Exit EndSwitch WEnd Func WM_SIZE($hWnd, $iMsg, $wParam, $lParam) Local $iWidth = _WinAPI_LoWord($lParam) Local $iHeight = _WinAPI_HiWord($lParam) _WinAPI_MoveWindow($hRichEdit, 2, 2, $iWidth - 4, $iHeight - 4) Return 0 EndFunc ;==>WM_SIZE, Thanks Mat :)TD1 point -

Arrays 101: All you need to know about them!
FrancescoDiMuro reacted to Melba23 for a topic
TheDcoder, No, they are much more versatile then that - take a look here. M231 point -
You have to handle the WM_SIZE message yourself unfortunately, and then use ControlMove (Or MoveWindow as I have). This means doing all the maths yourself as well, as you don't get the easy to use resizing flags. This is a simple case with a 2px border on all sides, so the maths wasn't hard. #include<GUIRichEdit.au3> #include<WindowsConstants.au3> #include<EditConstants.au3> #include<WinAPI.au3> Global $hGUI = GUICreate("Testing WM_SIZE", 350, 250, -1, -1, BitOR($WS_THICKFRAME, $WS_POPUP, $WS_CAPTION, $WS_SYSMENU)) Global $hRichEdit = _GUICtrlRichEdit_Create($hGUI, "This is a test.", 2, 2, 346, 246, BitOR($ES_MULTILINE, $WS_VSCROLL, $ES_AUTOVSCROLL)) GUIRegisterMsg($WM_SIZE, "WM_SIZE") GUISetState() While True $iMsg = GUIGetMsg() Select Case $iMsg = -3 _GUICtrlRichEdit_Destroy($hRichEdit) GUIDelete() Exit EndSelect WEnd Func WM_SIZE($hWnd, $iMsg, $wParam, $lParam) Local $iWidth = _WinAPI_LoWord($lParam) Local $iHeight = _WinAPI_HiWord($lParam) _WinAPI_MoveWindow($hRichEdit, 2, 2, $iWidth - 4, $iHeight - 4) Return 0 EndFunc ;==>WM_SIZE1 point
-

Latest file in a folder
AnonymousX reacted to monoceres for a topic
Since the function is pretty easy to write, I made it for you. #include <File.au3> MsgBox(0, "", _FindLatest(@ScriptDir)) Func _FindLatest($dir) Local $latest[2] $files = _FileListToArray($dir, "*", 1) For $i = 1 To UBound($files) - 1 If FileGetTime($files[$i], 1, 1) > $latest[0] Or $i = 1 Then $latest[0] = FileGetTime($files[$i], 1, 1) $latest[1] = $i EndIf Next Return $files[$latest[1]] EndFunc ;==>_FindLatest1 point -
Introduce a check for UBound($myArray). If the element number you want to access is larger than UBound($myArray)-1, it doesn't exist in the array. (FYI: the -1 because UBound always returns one more than the last element number since arrays are 0-based and the [0]'th element also counts.) Something like: If _elementExists($avArray, 11) Then _ArrayAdd($parArray, $avArray[11]) EndIf Func _elementExists($array, $element) If $element > UBound($array)-1 Then Return False ; element is out of the array bounds Return True ; element is in array bounds EndFunc1 point