Leaderboard


Popular Content
Showing content with the highest reputation on 02/22/2023 in Posts
-

Change titlebar colors of AutoIt gui
taurus905 and one other reacted to SOLVE-SMART for a topic
There seems to be many way to achieve something like you're looking for, thanks to this nice and experienced community 👍 . Nevertheless I want to show you @taurus905 a quick example of a custom title bar which I created out of GUI snippets that I used in other projects before. 💡 Please keep in mind, I usually would modularize the code into separate files (depending on the duties), but in this case I just did it in a single script file. #AutoIt3Wrapper_AU3Check_Parameters=-d -w 1 -w 2 -w 3 -w 4 -w 5 -w 6 -w 7 #AutoIt3Wrapper_AU3Check_Stop_OnWarning=y #AutoIt3Wrapper_Run_Au3Stripper=y #AutoIt3Wrapper_UseUpx=n #Au3Stripper_Parameters=/sf /sv /mo /rm /rsln #include-once #include <GUIConstants.au3> #include <Misc.au3> Global $mGui[], $mTitleBar[] Global $mClosingCrossIcon[], $mMinimizeIcon[] Global $mTitleBarColor[] $mTitleBarColor.background = 0xD9534F $mTitleBarColor.font = 0xFBEDED $mTitleBarColor.faviconIcon = $GUI_BKCOLOR_TRANSPARENT $mTitleBarColor.hoverMinimize = 0xE5E5E5 $mTitleBarColor.hoverClose = 0xE81123 _Actions() Func _Actions() _CreateGui() _CreateTitleBar() _AddTitleBarButtons() _ShowGui() _GuiEventListener() EndFunc Func _CreateGui() $mGui.Width = 600 $mGui.Height = 350 $mGui.Style = $WS_POPUP $mGui.Handle = GUICreate('', $mGui.Width, $mGui.Height, Default, Default, $mGui.Style) EndFunc Func _CreateTitleBar() ; background $mTitleBar.X = 0 $mTitleBar.Y = 0 $mTitleBar.W = ($mGui.Width - 137) $mTitleBar.H = 26 $mTitleBar.ButtonWidth = 25 $mTitleBar.ButtonHeight = $mTitleBar.ButtonWidth $mTitleBar.cId = GUICtrlCreateLabel('', $mTitleBar.X, $mTitleBar.Y, $mTitleBar.W, $mTitleBar.H) GUICtrlSetBkColor($mTitleBar.cId, $mTitleBarColor.background) GUICtrlSetStyle($mTitleBar.cId, -1, $GUI_WS_EX_PARENTDRAG) ; favicon icon GUICtrlCreateLabel('🎲', 4, 5.5) ; I used the cube icon as example which can be pasted in by pressing [WIN] + [.] GUICtrlSetBkColor(-1, $mTitleBarColor.faviconIcon) GUICtrlSetFont(-1, 11) ; title GUICtrlCreateLabel('GUI with custom title bar', 24, 5.5, ($mGui.Width / 2)) GUICtrlSetColor(-1, $mTitleBarColor.font) GUICtrlSetBkColor(-1, $GUI_BKCOLOR_TRANSPARENT) GUICtrlSetFont(-1, 9) EndFunc Func _AddTitleBarButtons() _AddClosingCrossIcon() _AddMaximizeIcon() _AddMinimizeIcon() EndFunc Func _AddClosingCrossIcon() ; background $mClosingCrossIcon.X = ($mGui.Width - 45) $mClosingCrossIcon.Y = 0 $mClosingCrossIcon.W = $mTitleBar.ButtonWidth + 20 $mClosingCrossIcon.H = $mTitleBar.ButtonHeight + 1 $mClosingCrossIcon.cId = GUICtrlCreateLabel('', $mClosingCrossIcon.X, $mClosingCrossIcon.Y, $mClosingCrossIcon.W, $mClosingCrossIcon.H) GUICtrlSetBkColor($mClosingCrossIcon.cId, $mTitleBarColor.background) ; icon GUICtrlCreateLabel(ChrW(0xCD), ($mGui.Width - 31), 5.5, $mTitleBar.ButtonWidth, $mTitleBar.ButtonHeight) GUICtrlSetFont(-1, 14, 100, Default, 'Wingdings 2') GUICtrlSetBkColor(-1, $GUI_BKCOLOR_TRANSPARENT) EndFunc Func _AddMaximizeIcon() ; background GUICtrlCreateLabel('', ($mGui.Width - 92), 0, $mTitleBar.ButtonWidth + 22, $mTitleBar.ButtonHeight + 1) GUICtrlSetBkColor(-1, $mTitleBarColor.background) ; icon GUICtrlCreateLabel(ChrW(0xA3), ($mGui.Width - 75), 6.5, $mTitleBar.ButtonWidth, $mTitleBar.ButtonHeight) GUICtrlSetFont(-1, 11, 100, Default, 'Wingdings 2') GUICtrlSetBkColor(-1, $GUI_BKCOLOR_TRANSPARENT) GUICtrlSetColor(-1, 0xCCCCCC) EndFunc Func _AddMinimizeIcon() ; background $mMinimizeIcon.X = ($mGui.Width - 137) $mMinimizeIcon.Y = 0 $mMinimizeIcon.W = $mTitleBar.ButtonWidth + 20 $mMinimizeIcon.H = $mTitleBar.ButtonHeight + 1 $mMinimizeIcon.cId = GUICtrlCreateLabel('', $mMinimizeIcon.X, $mMinimizeIcon.Y, $mMinimizeIcon.W, $mMinimizeIcon.H) GUICtrlSetBkColor($mMinimizeIcon.cId, $mTitleBarColor.background) ; icon GUICtrlCreateLabel(ChrW(0x2015), ($mGui.Width - 119), 6.5, $mTitleBar.ButtonWidth, $mTitleBar.ButtonHeight) GUICtrlSetFont(-1, 8, 100, Default, 'Segoe UI') GUICtrlSetBkColor(-1, $GUI_BKCOLOR_TRANSPARENT) EndFunc Func _ShowGui() GUISetState(@SW_SHOW, $mGui.Handle) EndFunc Func _GuiEventListener() AdlibRegister('_HoverActions', 100) Local Const $iGuiEventClose = -3 While True Switch GUIGetMsg() Case $iGuiEventClose, $mClosingCrossIcon.cId ExitLoop Case $mMinimizeIcon.cId GUISetState(@SW_MINIMIZE, $mGui.Handle) EndSwitch WEnd _GuiDisposeAndExit() EndFunc Func _GuiDisposeAndExit() AdlibUnRegister('_HoverActions') GUIDelete($mGui.Handle) Exit EndFunc Func _HoverActions() Local $aMouseData = MouseGetPos() Local $aGuiData = WinGetPos($mGui.Handle) If Not _HoverTitleBar($aMouseData, $aGuiData) Then _ResetHoverColor() Return EndIf Select Case _HoverMinimizeIcon($aMouseData, $aGuiData) GUICtrlSetBkColor($mMinimizeIcon.cId, $mTitleBarColor.hoverMinimize) GUICtrlSetBkColor($mClosingCrossIcon.cId, $mTitleBarColor.background) Case _HoverClosingCrossIcon($aMouseData, $aGuiData) GUICtrlSetBkColor($mClosingCrossIcon.cId, $mTitleBarColor.hoverClose) GUICtrlSetBkColor($mMinimizeIcon.cId, $mTitleBarColor.background) Case Else _ResetHoverColor() EndSelect EndFunc Func _ResetHoverColor() GUICtrlSetBkColor($mClosingCrossIcon.cId, $mTitleBarColor.background) GUICtrlSetBkColor($mMinimizeIcon.cId, $mTitleBarColor.background) EndFunc Func _HoverTitleBar($aMouseData, $aGuiData) Return _IsMouseOnControl( _ $aMouseData[0] - $aGuiData[0], _ $aMouseData[1] - $aGuiData[1], _ $mTitleBar.X, $mTitleBar.Y, $mGui.Width, $mTitleBar.H) EndFunc Func _HoverMinimizeIcon($aMouseData, $aGuiData) Return _IsMouseOnControl( _ $aMouseData[0] - $aGuiData[0], _ $aMouseData[1] - $aGuiData[1], _ $mMinimizeIcon.X, $mMinimizeIcon.Y, $mMinimizeIcon.W, $mMinimizeIcon.H) EndFunc Func _HoverClosingCrossIcon($aMouseData, $aGuiData) Return _IsMouseOnControl( _ $aMouseData[0] - $aGuiData[0], _ $aMouseData[1] - $aGuiData[1], _ $mClosingCrossIcon.X, $mClosingCrossIcon.Y, $mClosingCrossIcon.W, $mClosingCrossIcon.H) EndFunc Func _IsMouseOnControl($iXMouse, $iYMouse, $iXControl, $iYControl, $iWidthControl, $iHeightControl) If $iXMouse >= $iXControl And _ $iYMouse >= $iYControl And _ $iXMouse <= $iXControl + $iWidthControl And _ $iYMouse <= $iYControl + $iHeightControl Then Return True Else Return False EndIf EndFunc It was more complex than I thought, but as a proof of concept I enjoyed it 😅 . Please notice that you can minimize or close the GUI like you would expect it. Also the GUI is draggable by the title bar. 👓 Open the spoiler box to see the example: Best regards Sven2 points -
They should read the cheat sheet about web development. 🤣🤣🤣2 points
-

RegExpQuickTester 2.5r
CYCho reacted to pixelsearch for a topic
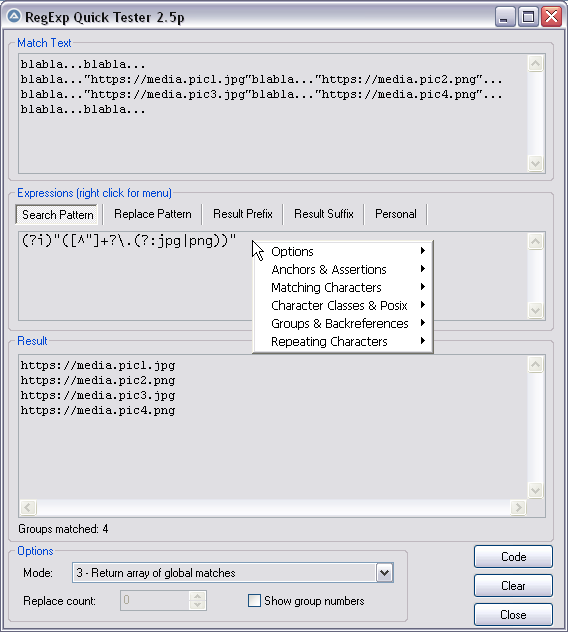
Hi everybody Here is the script I use to test RegEx patterns offline, it's handy. Credits go to Lazycat, who scripted it initially many years ago and thanked "w0uter for ideas and parts of code". I added some modifications (listed in next post) and would like to thank @jchd @mLipok @mikell @Nine @mistersquirrle @taurus905 and @ioa747 for their contribution. Below are the match text & patterns corresponding to the pic above. For a start, you can copy and paste them in their respective edit control. After you choose the corresponding RegExp mode from the ComboBox at the bottom of the screen (mode 3 = return array of global matches) then you'll have the same results as displayed in the pic above. Match Text : blabla...blabla... blabla..."https://media.pic1.jpg"blabla..."https://media.pic2.png"... blabla..."https://media.pic3.jpg"blabla..."https://media.pic4.png"... blabla...blabla... Pattern : (?i)"([^"]+?\.(?:jpg|png))" When you end the script, 2 files will be created in the same directory of the script. Assuming your script is named "RegExpQuickTester 2.5p.au3", the 2 files created will be : * "RegExpQuickTester 2.5p.txt" which contains the saved Match Text that will be reused when you run the script. * "RegExpQuickTester 2.5p.ini" which contains the saved options that will be reused when you run the script. A right click while hovering over the Edit control of the Search Pattern will display a helpful context menu, with possibility to paste something from the menu inside the Search Pattern. Personally I nearly don't paste anything from the context menu but as this feature was created by the original scripter... Instead I like to consult this context menu as a RegExp syntax reminder ! Anyway, just experiment it and choose what's best for you. 99% of the time, the Search Pattern Tab will be on top. If you notice another colored Tab (except the Personal Tab which will never be highlited), then it means that there is something written in this other tab : the color is here only to remind you that there IS something in this other tab, in case you had forgotten. Even a space or a blank line would color the Tab. YJ This particular design (due to original scripter) won't allow you to type "" in the Replace Pattern Tab (mikell frowned, concerning this missing feature). Gladly I found that typing a non existing group, for example $99 will have the same effect as "" so it's a workaround that seems to do the job. The "Code" button allows you to generate the corresponding AutoIt code, which will be copied to the Clipboard Don't hesitate to ask if you have questions. Our RegExp gurus (that's not me) just love RegExp questions Edit: I forgot. You can drag a text file (or htm etc...) inside the Match Text edit control (it's a droppable zone) . There shouldn't be a 32Kb file size limit anymore as I added code to override this limit. There are probably a couple of other functionalities I'm not thinking of now, you'll easily find what you need if you look at the code. And if you want to modify something in the code, don't hesitate. Just share here your modifications in case other users find them useful too, thanks. Updates are detailed in next post Download last version 11 nov 2024 : RegExpQuickTester 2.5r.au3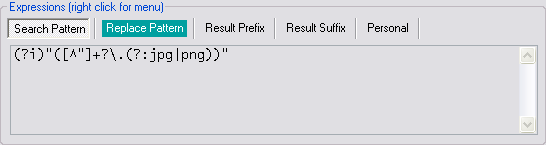
2_5p.png.bd11b44b55819fd742004e45c6181a8f.png)
 1 point
 -
AutoIt Cheat Sheet
sylremo reacted to SOLVE-SMART for a topic
Hi folks 👋 , I was thinking about how I decide to learn a new programming language. I mean, apart of professional requirements, there are some criteria for how I (and also some of my colleagues) choose a new technology or programming language. To get a good overview about how the language is written, how the syntax looks like and fits this my interests and expectations, I use cheat sheets for the specific programming language, a technology or methodology. Also for experienced programmers who want to switch a language or as an addition, it could be helpful to understand some basics, syntax etc. Is there any cheat sheet for AutoIt? I didn't find any. Do we need it as a community or at least would it be helpful? Would there be some of you supporting the idea of creating one? Do some of you know about templates that could be used (out of the box)? In case you are not familiar with the topic¹ and you do not know what I am talking about, please simple do a google search for "cheat sheet programming languages". 💡 There are hundreds of them, but non of these are for the AutoIt language². To spread this wonderful language to more people in the world, to support the accessibility, it should be a "must have" (among other things). I plan to build one => in best case as a community project with several of yours. Who wants to join? Best regards Sven ¹ A cheat sheet is a quick look-up reference chart or set of simple, brief instructions for accomplishing a specific task. ² It does not matter whether it's a PDF or a image in the forum which is well linked and present (next to the help) or a website. 📅 Update 2023-02-21: AutoIt (en) Cheat Sheet 🔗 AutoIt (en) Cheat Sheet as website on cheatography (a website which is made to create and publish cheat sheets by the help of templates) 🔗 AutoIt (en) Cheat Sheet as PDF (generated by cheatography) 🔗 Alternative Link to the PDF1 point -
AutoIt Cheat Sheet
RTFC reacted to SOLVE-SMART for a topic
Done ✔ You're right. The description/explanation in the wiki tutorial is wrong. Done ✔ Improved it by the help file example ✔ Done ✔ Best regards Sven1 point -
AppData\Local\VirtualStore ??
SOLVE-SMART reacted to mLipok for a topic
In some scenarios we are using CesarFTP as services which lead us to this folder. I was just curious.1 point -

AutoIt Cheat Sheet
SOLVE-SMART reacted to RTFC for a topic
Remarks: Please put the links to the website/pdf in the first post, so people can actually find it without searching the entire thread. Logical Operators (And, Or, Not, evaluating conditions) are not Binary operators (BitAnd, BitOr, etc, acting on values/bitmasks)! Modulus "not %" is confusing (see previous point), and it's not an actual example of usage like all the others; maybe: Mod<tab>Modulus<tab>Mod(val1, val2) the Select example does not emphasize the difference from Switch; the former evaluates conditional expressions (dynamic, slow), the latter specific (ranges of) values (hardcoded, fast) In Comparison Operators, ci and cl are difficult to distinguish, maybe use capitals (CI/CL)?1 point -
AutoIt Cheat Sheet
Nisteo reacted to SOLVE-SMART for a topic
Thanks @Nisteo, I checked it with VSCode and found unfortunately the same result and behavior 😔 . I cannot adjust this in any way. It's the way cheatography build their frontend/website. An working alternative is: Copy-paste from the PDF Version of the Cheat Sheet 😀 . Best regards Sven1 point -

solved --how to return several values as an array?
jacky998877 reacted to dmob for a topic
Create the array before the While loop. Copy the values into the array before Return.1 point -
Hi I don't know if this is the right place for this but I thought it might come in useful to someone and I couldn't find it while I was searching for posts that address it. This: Global $exampleGUI = GUICreate("Rounded corners", 400, 300, -1, -1) Will automatically get rounded corners in Windows 11... But this: Global $exampleGUI = GUICreate("Rounded corners", 400, 300, -1, -1, $WS_POPUP) Will not. I usually like to ditch the windows title bar and replace it with my own, so it was annoying, that on Windows 11, my stuff didn't look the part. The trick is to use DwmSetWindowAttribute to set DWMWA_WINDOW_CORNER_PREFERENCE (33) to DWMWCP_ROUND (2) as explained here: Apply rounded corners in desktop apps for Windows 11 I modified the function in WinAPIGdi.au3 to accept 33 as a valid parameter and used the function from there: Func _WinAPI_DwmSetWindowAttribute($hWnd, $iAttribute, $iData) Switch $iAttribute Case 2, 3, 4, 6, 7, 8, 10, 11, 12, 33 Case Else Return SetError(1, 0, 0) EndSwitch Local $aCall = DllCall('dwmapi.dll', 'long', 'DwmSetWindowAttribute', 'hwnd', $hWnd, 'dword', $iAttribute, _ 'dword*', $iData, 'dword', 4) If @error Then Return SetError(@error, @extended, 0) If $aCall[0] Then Return SetError(10, $aCall[0], 0) Return 1 EndFunc ;==>_WinAPI_DwmSetWindowAttribute Example: #include <WinAPIGdi.au3> #include <GUIConstantsEx.au3> #include <Windowsconstants.au3> Global $exampleGUI = GUICreate("Rounded corners", 400, 300, -1, -1, $WS_POPUP) _WinAPI_DwmSetWindowAttribute($exampleGUI,33,2) Local $label = GUICtrlCreateLabel(" This is an example.", 50, 150,200, 50) GUISetState(@SW_SHOW, $exampleGUI) While 1 $msg = GUIGetMsg() Select Case $msg = $GUI_EVENT_CLOSE Exit EndSelect WEnd1 point
-

AutoIt Cheat Sheet
SOLVE-SMART reacted to Nisteo for a topic
@SOLVE-SMART I found a mini bug, lol 😂 If you copy-paste one of the example strings, then syntax checker will throw an error. Because there are some invisible characters between the quotes. 1 point
 -
AutoIt Cheat Sheet
Marc reacted to SOLVE-SMART for a topic
Update: Contrary to my conclusion (at the end of this post) and to my first thoughts about it, I decided to create a cheat sheet 😅 . Let's see what the future brings. Best regards Sven1 point -
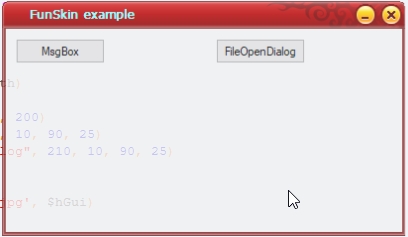
I renamed with all calls to this func and i seems to work. FunSkin.au3
 1 point

