Leaderboard


Popular Content
Showing content with the highest reputation on 06/12/2019 in all areas
-

Peace Equalizer shows power of AutoIt
Zedna and 3 others reacted to PeterVerbeek for a topic
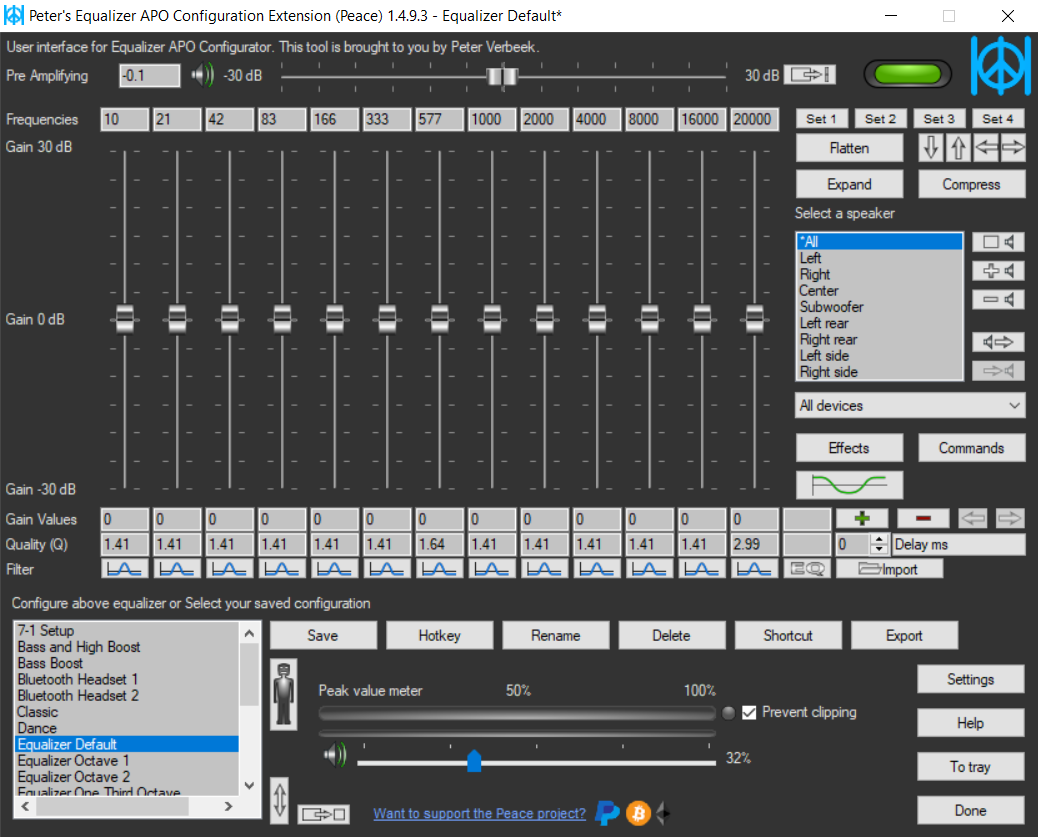
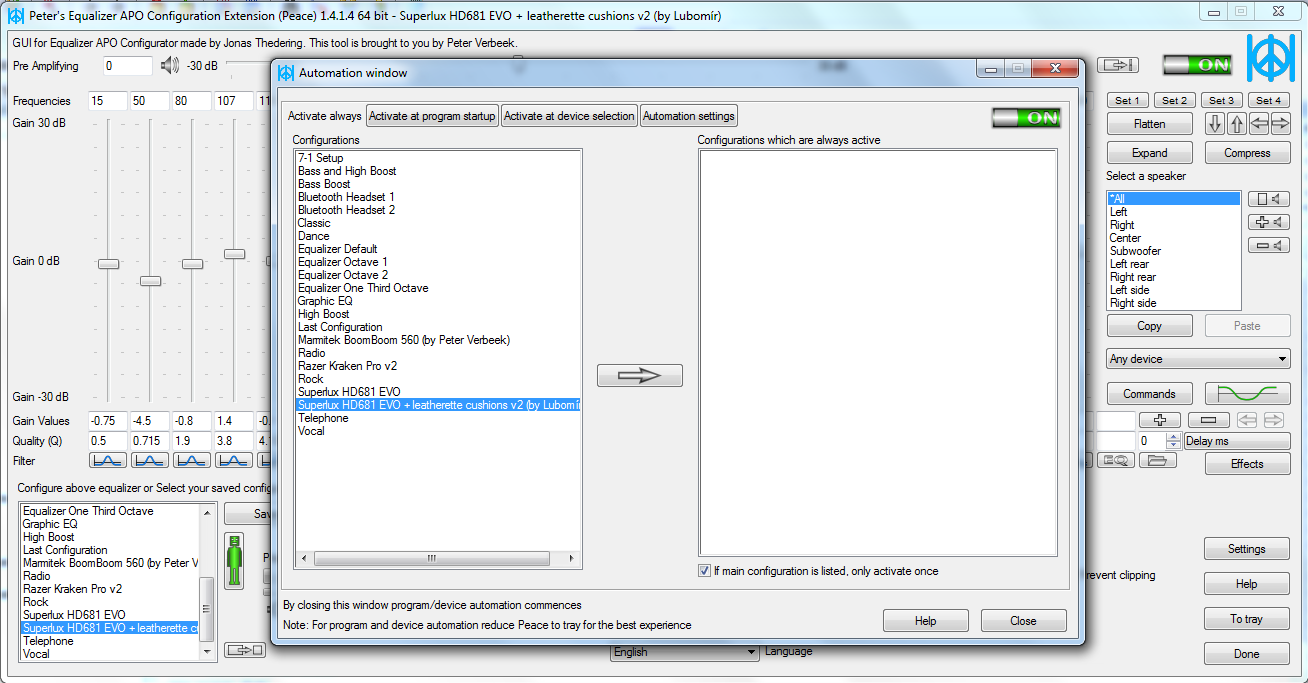
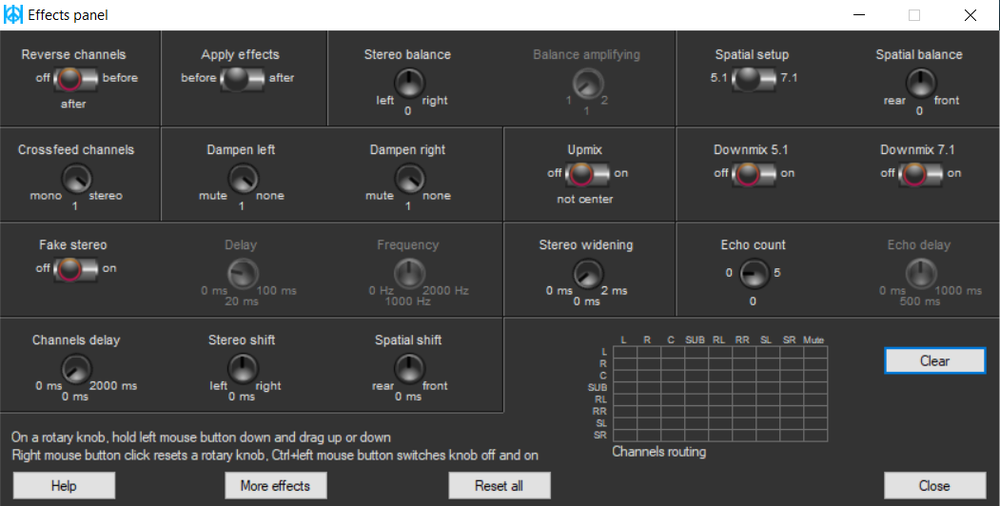
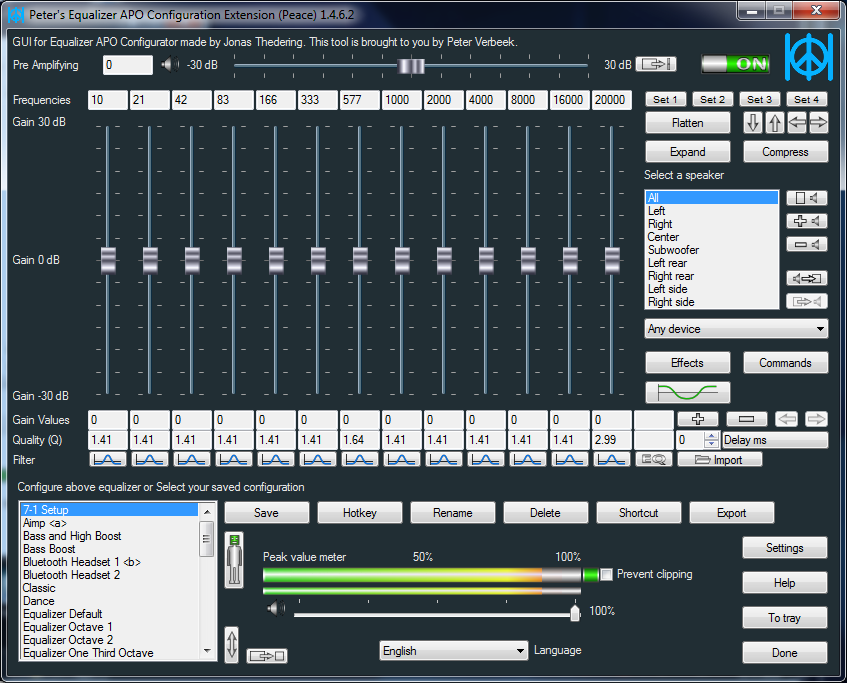
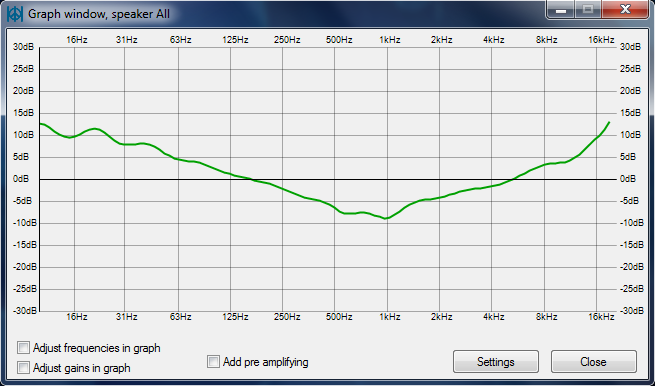
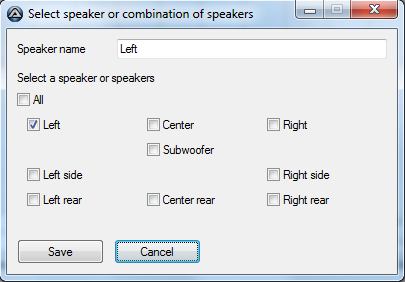
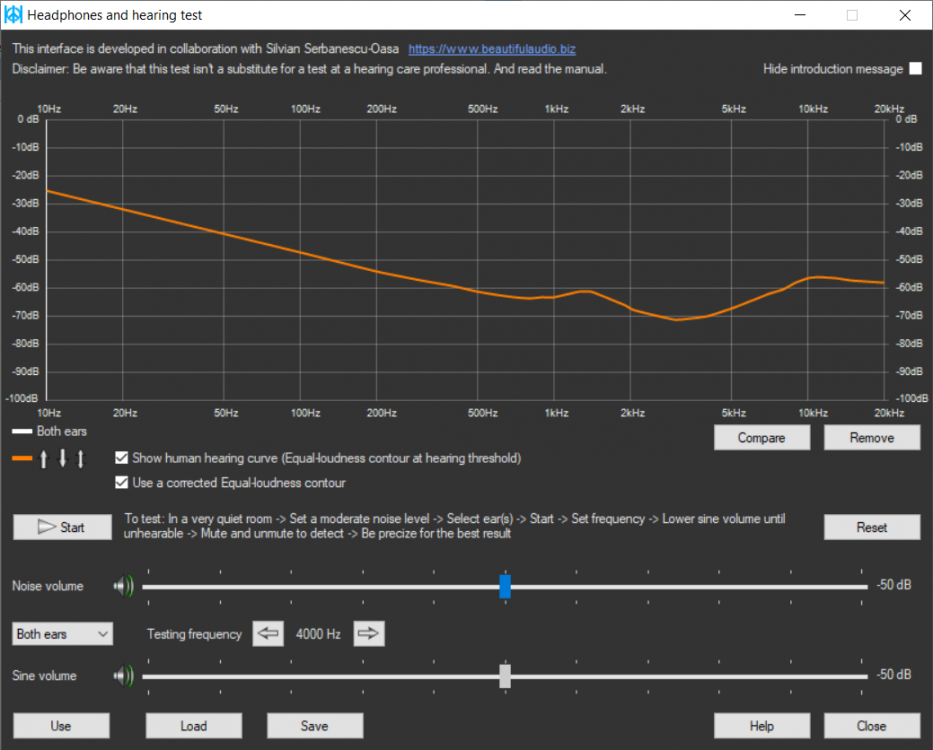
In this post I take the opportunity to show the awesome capabilities of AutoIt and its libraries. My open source project Peace is a long running AutoIt based app located on SourceForge. It provides users with a system-wide equalizer and effects machine. It's an interface using the power of Equalizer APO, an audio processing object software. Peace has been download over 2,600,000 times by various kind of users. Amongst others it gives them possibilities like these: Hearing impaired - Amplify the gain of frequencies which are impaired. Home Theatre - Create Equalizer presets for watching movies and listening to music. Music lovers & audiophiles - Create presets for listening to music on their high quality speakers and headphones. Gamers - Enhance frequencies to get an edge over other gamers. Headphones - Improve the sound quality of cheap headphones and get the max out of expensive ones. Bass lovers - Boost low frequencies for extra bass. Voice - Make a microphone sound better and improve the voice, for instance for YouTube usage. Low audio - Boost low audio of an input source to a comfortable level. This list covers the main needs of the Peace user. Many people have contacted me over the years asking for new features and telling me how they use Peace for their (sometimes specific) needs. I was able to use AutoIt and its libraries for all of their needs. So what are the main features of Peace? Equalize your computer audio by using up to 31 sliders. Support of equalizing 9 speakers : left/right, center, subwoofer, left/right rear, left/right side. Per slider a filter can be chosen such as peak, low/high pass, shelving. The graph windows shows your equalization so you see exactly what you're doing. Apply an effect such as crossfeed simple/Jan Meier/Chu Moy, stereo balance, bass/treble, upmix/downmix, channel routing. Save presets (called configurations) and activate by mouse click, hotkey, desktop shortcut or Peace system tray. Select a target device to equalize, microphone as input can also be equalized. Automate: you can let Peace automatically activate presets on a switch to another device and another process. Peace is available in these languages: English, Czech, Deutsch, Français, Italiano, Nederlands, Pусский, Українська So who am I? I'm a Dutch programmer who happens the stumble upon AutoIt 5 years ago and created a small Equalizer interface app of less than 400 program lines with it. Nowadays Peace has grown to more than 18,000 lines as many features were added. Although Peace is open source, the program code isn't of the best possible quality. The reason being that I didn't expect it to become so popular. It caught me by supprise. I've created a Library of functions called Pal (link to forum post) which quality is up to the AutoIt community standard as counterpart to the Peace program code. I want to state here that AutoIt is a mature program language as Peace obviously shows. I wish it to be used more extensively for professional or semi-professional apps. In my view AutoIt deserves a place amongst the major programming languages for Windows computers. Regards, Peter Verbeek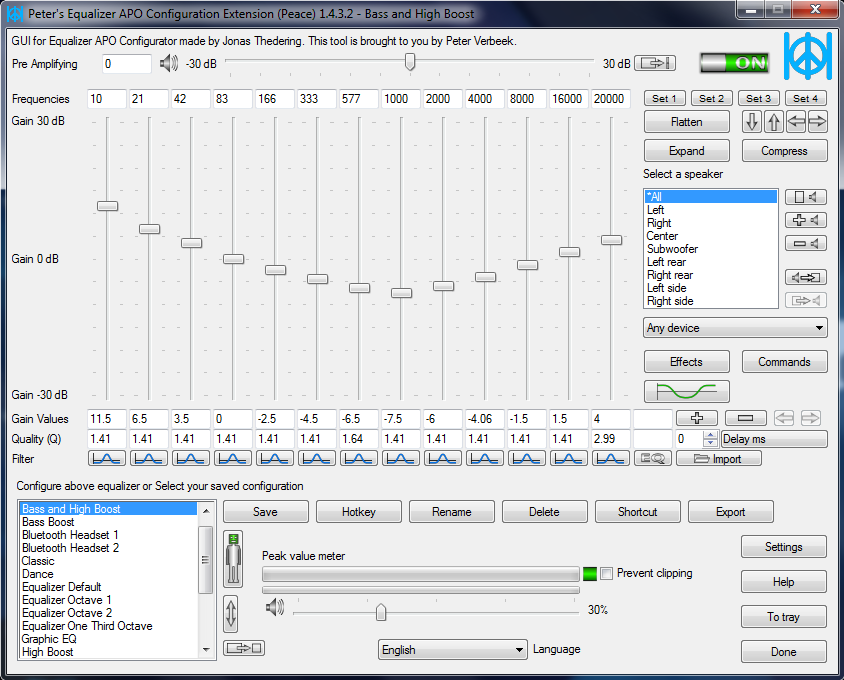


 4 points
 -
I think you should use _GUICtrlRichEdit_StreamFromVar(); first, place in some way the formatted text in a var and then send the var content to the richedit via the _GUICtrlRichEdit_StreamFromVar() if you want use copy/paste you could copy the formatted text by hand to the clipboard, then transfer it to a var in your script using the ClipGet() function #include <GUIConstantsEx.au3> #include <GuiRichEdit.au3> #include <WindowsConstants.au3> Example() Func Example() Local $hGui, $hRichEdit, $iMsg $hGui = GUICreate("Example (" & StringTrimRight(@ScriptName, StringLen(".exe")) & ")", 650, 300, -1, -1) $hRichEdit = _GUICtrlRichEdit_Create($hGui, "", 0, 0, 650, 300, _ BitOR($ES_MULTILINE, $WS_VSCROLL, $ES_AUTOVSCROLL)) ; you can get text from the clipboard ; Local $s = ClipGet() ; or ; set text directly in a variable Local $s = "{\rtf1\ansi\ansicpg1252\deff0\deflang1033{\fonttbl{\f0\fnil\fcharset0 Tahoma;}}" & _ "{\colortbl ;\red255\green0\blue0;\red51\green102\blue255;\red0\green0\blue0;}" & _ "\viewkind4\uc1\pard\cf1\f0\fs32 IN SHOP\cf0\i\fs30\par" & _ "\i0\tab\ul\fs28 PRODUCTION\ulnone\fs24\par" & _ "\tab\cf1 Piece 1\cf0 - \par" & _ "\par" & _ "\tab\ul\fs28 FINISHING\ulnone\fs24 \par" & _ "\tab\cf1 Piece 1\cf0 - \par" & _ "\par" & _ "\fs30 ********************************************************\par" & _ "\cf2\i\fs32 ON SITE\fs26\par" & _ "\tab\cf3\bullet\par" & _ "}" _GUICtrlRichEdit_StreamFromVar($hRichEdit, $s) GUISetState(@SW_SHOW) While True $iMsg = GUIGetMsg() Select Case $iMsg = $GUI_EVENT_CLOSE _GUICtrlRichEdit_Destroy($hRichEdit) ; needed unless script crashes ; GUIDelete() ; is OK too Exit EndSelect WEnd EndFunc ;==>Example2 points
-

Fork UDF (ish)
CoffeeJoe reacted to argumentum for a topic
Forking and threading. They both do stuff while another loop or event handler, does it's thing. Load a DLL, and ask for a function or procedure to run, and it'll do it. Handling all those takes time waiting, or to come up with semaphores and mutex and what not. So the issue at times is that we want to have all that in AutoIt and there comes the OMGs. To me, it all comes to run something and not get the main loop stuck waiting, unresponsive, as if frozen. ( oh, there is no threading in AutoIt, what can I do ! ) Hence this UDFish ( I'm not good at technical writing 😕 ), that has these functions: #cs === User Calltips: =============================================================================================== _Fork_Startup() Init. UDF - Place on your main script once everything is declared. _Fork_StartupOnFailMsgBox([$ShowMsgBox = Default]) Default = (not @compiled), True = Show error MsgBox(), False = Do Not show error MsgBox() _Fork_Func([$sFunction = Default], [$vParameter = ""], [$sExtraCmdLine = ""], [$iUseBase64Cmd = 0], [$sVerb = ""]) Starts another Process and Execute or Call $sFunction, Returns PID. _Fork_SetReceiver([$sFunction = ""]) Register/Unregister IPC Receiver Function. _Fork_GetReceiver() Get IPC Receiver Function name. _Fork_GetParentPID() Get the parent PID. _Fork_GetWinInfos([$AutoItWinTitlePrefix = Default],[ $ForkPID = ""]) Get an array of Forked Processes _Fork_CallArgArraySeparatorChar($sChar = Default) Default = Opt("GUIDataSeparatorChar") _Fork_AutoItWinTitlePrefix([$sPrefix = Default]) Returns the prefix, or set it by passing a new string. _Fork_ForkReceiverGuiTitlePrefix([$sPrefix = Default]) Returns the prefix, or set it by passing a new string. _Fork_ProcessGetWinList($vProcess, $sTitle = Default, $iOption = 0) Enumerates Windows of a Process. _Fork_WaitForReceiver($iPidChild, [$iTimeout = 60 Sec]) wait for _Fork_SetReceiver() to load via AutoItWinSetTitle(). _Fork_WaitForFork($iPidChild, [$iTimeout = 60 Sec]) wait for _Fork_Func() to load via AutoItWinSetTitle(). _Fork_Send($vPidOrHWnd, $sMessage,[$iTimeout = 500 mSec],[$fAbortIfHung = True]) Send IPC Message to Process via PID or hWnd. _Fork_Broadcast($sMessage, [$iTimeout = 500 mSec], [$fAbortIfHung = True], [$iDelayMs = 0], [$iExcludeSelf = 1], [$WinCloseAll = 0]) Send IPC Message broadcast to all in _Fork_AutoItWinTitlePrefix(), see comments. _Fork_DuplicateHandle($dwSourcePid, $hSourceHandle, $dwTargetPid = @AutoItPID, $fCloseSource = False) Returns a Duplicate handle. _Fork_GetVerUDF() Returns the version of this UDF. _DbgAid_SetActive([$Active = Default]) Enable sending data for debug: Default = Auto (True if Win found), True = Enable, False = Disable. _DbgAid_GetActive() Query Active state. _DbgAid_GuiTitle([$sTitle = Default]) Get or Set the GUI title for the debug receiver. _DbgAid_SelfName([$sSelfName = Default]) Get or Set a short name to be identified by. _DbgAid_Send($sString[, $iForceType = Default]) Send a string to the debug GUI. _DbgAid_SendVia([$iType = Default / $e_ForkDbgAid_ViaCOPYDATA / $e_ForkDbgAid_ViaMailslot]) Get / Set _DbgAid_Send() type. #ce === User Calltips: =============================================================================================== I believe that, with these functions, one can run a function in any count of other PIDs, communicate back and forth with any of them, and a console of sorts, to send data to follow what is happening with those other instances. This is basically a rewrite of "Another Multi Process Helper" by @piccaso. The functions not ported, I decided to not port. The renamed functions, are renamed to simplify the understanding of what they do, from a view of a ... me I did this because I'll need it in an upcoming project, and share it to aid those, that may find this, simple to implement in their code. Try the examples from SciTE ( or your editor ) and read the code, as there are notes explaining how it works. As always, share your views and improvements. If you have coding questions, kindly place them in "AutoIt General Help and Support". _Fork_UDF(v2019.06.29d).zip ( current version )1 point -
 The code is solid and simple, it can almost explain itself. This is the native autoit way to do the "imagesearch", no 3rd party .dll needed. It gets "your.bmp", and "screenshot.bmp" ----> Convert the .bmp files into 2D-Arrays (Malkey's function) ----> Compare the 2D-arrays, return the matched position. Tested on: Windows 7; Windows server 2008R2; Windows 10 1809. Pros: It is native. No extra .dll needed It is super robust. (I used to have lots of funny results using other imagesearch libs). It gets screenshot the same you get your screenshot crop, so it always gets a solid result, and 100% accurate. The code is very simple and friendly, all level users can understand and use it. Cons: It is slow to convert your.big.screen.bmp into a 2D-array, and may consume 200+MB of memory and may take 5 - 20 seconds to return the result. (the actual search in an array is fast, but the conversion from .bmp to array is slow. The speed depends on your CPU speed and your screen size). Correct: now optimized, it's ~5 seconds and ~ 70MB ram usage. It is a pixel-by-pixel color-code strict comparison in the "array-in-array" search, so you have to use the 24-bit BMP file, no "Tolerance" allowed. 2019-Jun-11: script update: Same day updated: Update example; Optimize the algorithm for performance, now most computers can get the result in ~5 seconds, using ~70MB temporary memory, for the 1920x1080 resolution screen. 2019-Jun-12 script update: It now uses "PrintScreen" hotkey to save the screenshot.bmp (restores the user's old clipboard content after it is done) ~This is the only way to make sure the screenshot matches exactly what the user is seeing, after doing dozens of harsh tests. The reason: The UDF "ScreenCapture" and "ImageSearch.dll" are not reliable for an unknown reason. Some window/dialogue special drawings are "invisible" in their screenshots. But the "PrintScreen" key -> Clipboard -> screenshot.bmp, this method always catches exact things showing on the screen. #include <GDIPlus.au3> #include <ClipBoard.au3> ;Sinple Example.================== the 1.bmp is what you want to find on your screen $result = _ScreenSearchBmp("1.bmp") if $result[0] = 0 Then MsgBox(0,"","not found") Else MouseMove($result[0],$result[1],20) ;move mouse to the result EndIf ;Example End.================== You can "include" this file after you remove this "Example" part here. ;=============================================================================== ; ; Description: Main Function. Find the position of an image on the desktop ; Parameter(s): ; $center = 1 - Set where the returned x,y location of the image is. ; default 1 means center, 0 means top-left ; ; Return Value(s): On Success - Returns the array of matched position [x,y] on your screen. ; On Failure - Returns array [0,0] (BTW, there is no position 0,0 on a screen, so it means error) ; ; Note: Warning: The BMP file must be a 24-bit BMP (windows default) ; ;=============================================================================== Func _ScreenSearchBmp($file,$center=1) local $pixelarray,$screenarray ;get both your image.bmp and screenshot.bmp into pixel-by-pixel 2D arrays _FileImageToArray($file, $pixelarray) _Clip_screenshot(@TempDir & "\screenshot.bmp") _FileImageToArray(@TempDir & "\screenshot.bmp",$screenarray) FileDelete(@TempDir & "\screenshot.bmp") ;compare the 2 2D-arrays local $result = _2darray_in_2darray($screenarray,$pixelarray) ;result tidy up, for if $center=1, and for if not found. Local $aresult[2] $aresult[0] = $result[0] $aresult[1] = $result[1] if $aresult[0] = 0 then Return $aresult ;if not found , return 0 0 here if $center = 1 then $aresult[0] = $result[0]+ Round(UBound($pixelarray,1)/2) if $center = 1 then $aresult[1] = $result[1]+ Round(UBound($pixelarray,2)/2) Return $aresult ;if ALL GOOD, and $center=1 then return the center of the image here. EndFunc ;=============================================================================== ; Code by Malkey, converts .bmp into 2D array pixal by pixal. : thanks man! ;=============================================================================== Func _FileImageToArray($filename, ByRef $aArray) Local $Reslt, $stride, $format, $Scan0, $iW, $iH, $hImage Local $v_Buffer, $width, $height Local $i, $j _GDIPlus_Startup() $hImage = _GDIPlus_ImageLoadFromFile($filename) $iW = _GDIPlus_ImageGetWidth($hImage) $iH = _GDIPlus_ImageGetHeight($hImage) $Reslt = _GDIPlus_BitmapLockBits($hImage, 0, 0, $iW, $iH, $GDIP_ILMREAD, $GDIP_PXF32ARGB) ;Get the returned values of _GDIPlus_BitmapLockBits () $width = DllStructGetData($Reslt, "width") $height = DllStructGetData($Reslt, "height") $stride = DllStructGetData($Reslt, "stride") $format = DllStructGetData($Reslt, "format") $Scan0 = DllStructGetData($Reslt, "Scan0") Dim $aArray[$width][$height] For $i = 0 To $iW - 1 For $j = 0 To $iH - 1 $aArray[$i][$j] = DllStructGetData(DllStructCreate("dword", $Scan0 + ($j * $stride) + ($i * 4)), 1) Next Next _GDIPlus_BitmapUnlockBits($hImage, $Reslt) _GDIPlus_ImageDispose($hImage) _GDIPlus_Shutdown() Return EndFunc ;==>_FileImageToArray ;=============================================================================== ; ; Description: ; My code, search a 2D array inside another 2d array ; If found, return the positon of first element ; If error or not found, return array [0,0]. Because the very first match would be [1,1], "0" means something wrong. ; eg. search a 2d array ; [1,2,3,4] ; [5,6,7,8] ; [9,0,1,2] ; for: ; [7,8] ; [1,2] ; You will get result [2,3] (means, matched, first element position is row 2, colunm 3) ; ; Parameter(s): ; ; Return Value(s): On Success - Returns the array of matched [x,y], the top-left element position in the source. ; On Failure - Returns [0,0] ; ; ;=============================================================================== Func _2darray_in_2darray($source,$search) ;get the size of the both arrays local $sourcerow = UBound($source,1) Local $sourcecol = UBound($source,2) local $searchrow = UBound($search,1) Local $searchcol = UBound($search,2) ;error input cheching, if error return position 0,0 if $sourcerow = 0 or $sourcecol = 0 or $searchrow = 0 or $searchcol = 0 then Local $aPeople[2] $aPeople[0] = 0 $aPeople[1] = 0 Return $aPeople EndIf ; A crazy 4-for-loops, compare every x,y of search array in every x,y in source array for $ssr = 1 to $sourcerow - $searchrow +1 for $ssc = 1 to $sourcecol - $searchcol +1 for $sr = 1 to $searchrow for $sc = 1 to $searchcol ;if an element not match, go back, search for next if $search[$sr-1][$sc-1] <> $source[$ssr+$sr-2][$ssc+$sc-2] then ContinueLoop 3 Next Next ;if the loop passed all elements test, made it here, means the result is found! congress! lets return the result: Local $aPeople[2] $aPeople[0] = $ssr $aPeople[1] = $ssc Return $aPeople Next Next ;all the loops finished, no result found. return [0,0] Local $aPeople[2] $aPeople[0] = 0 $aPeople[1] = 0 Return $aPeople EndFunc ; #FUNCTION# ==================================================================================================================== ; Name ..........: _Clip_screenshot ; Description ...: This get a screenshot.bmp using "Print Screen" key, so the image is EXACT same image you use "Print Screen" key, to avoid funny results. ; Syntax ........: _Clip_screenshot($file) ; Parameters ....: $file - The location of the screen shot .bmp file you want it to save ; Return values .: None ; Author ........: Kyle ; =============================================================================================================================== Func _Clip_screenshot($file) local $tempdata = _ClipBoard_GetData() ;save current user's clipboard Send("{PRINTSCREEN}") sleep(200) If _ClipBoard_IsFormatAvailable($CF_BITMAP) Then _ClipBoard_Open(0) $hClipboardImage = _ClipBoard_GetDataEx($CF_BITMAP) _ClipBoard_Close() _GDIPlus_Startup() $hBitmap = _GDIPlus_BitmapCreateFromHBITMAP($hClipboardImage) Local $iX = _GDIPlus_ImageGetWidth($hBitmap) Local $iY = _GDIPlus_ImageGetHeight($hBitmap) Local $hClone = _GDIPlus_BitmapCloneArea($hBitmap, 0, 0, $iX, $iY, $GDIP_PXF24RGB) ;make sure its 24bit bmp _GDIPlus_ImageDispose($hBitmap) $hBitmap = $hClone $sCLSID = _GDIPlus_EncodersGetCLSID("BMP") _GDIPlus_ImageSaveToFileEx($hBitmap, $file, $sCLSID, 0) _GDIPlus_BitmapDispose($hBitmap) _GDIPlus_Shutdown() EndIf _ClipBoard_SetData($tempdata) ; restore user clipboard EndFunc Remove the "example" part then you can include this code as a file.1 point
 -
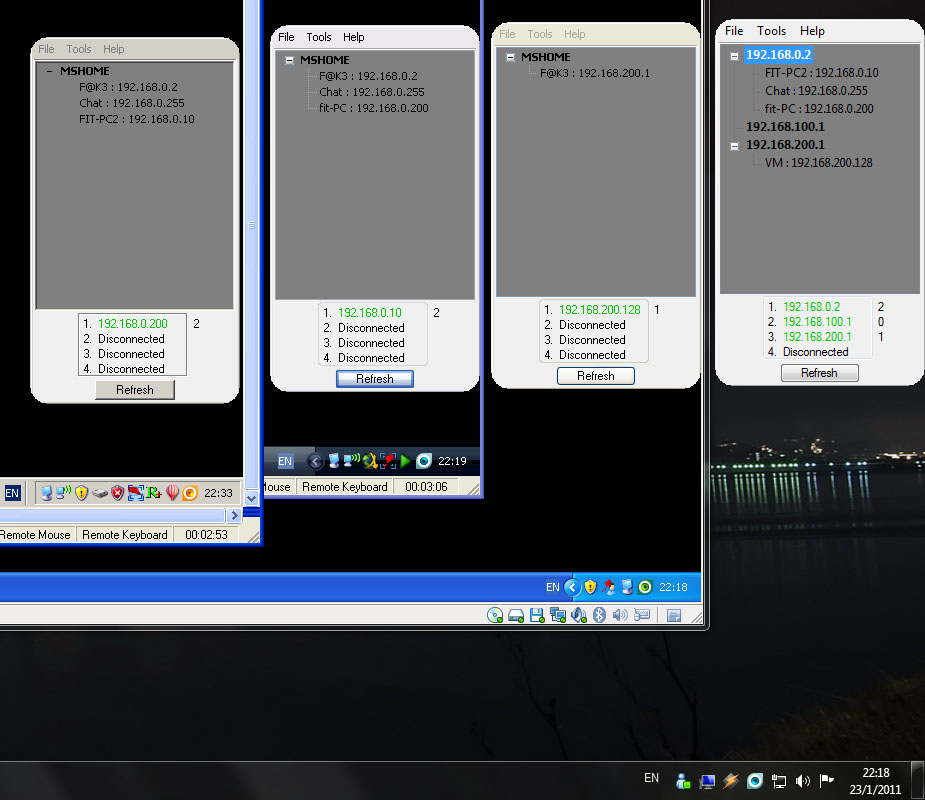
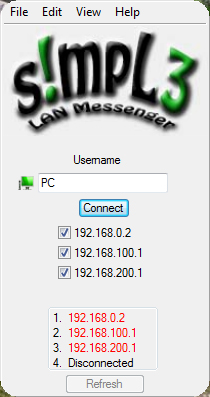
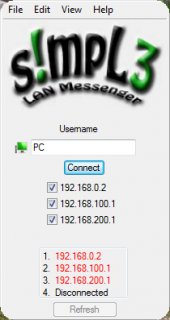
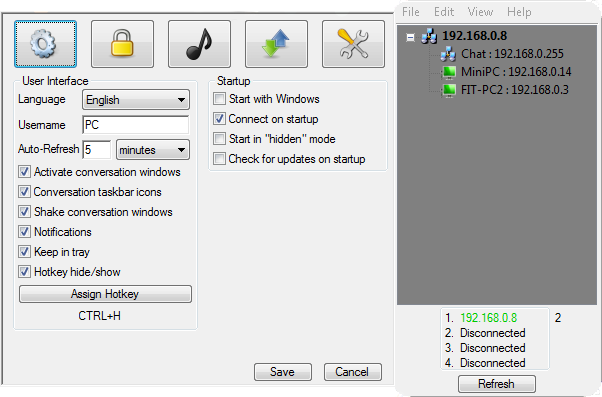
s!mpL3 LAN Messenger as the name suggests is a messenger designed and developed to offer chat communication over Local Area Networks while being as simple to use as possible. This project started way back in 2008 with only basic functionality and is regularly updated with new features in order to make it more useful and user friendly. What I wanted was a simple, small, serverless program that would work without installation cause that was the ideal combination for my workplace back then, so I ended up with this! I have attached some images from various versions: Check the rest below! (from various versions) More than 10.000 downloads! s!mpL3 LAN Messenger version 2.9.9.1 - [04/07/2019] - s!mpL3 LAN Messenger.zip 1. Fixed an issue that would occur when blocking another user and they would re-appear in the TreeView. 2. Updated File Transfers to make long file names shorter if they were too long to appear in the tray tip. 3. Removed notifications when checking for updates at application startup if there is no update available. You can view/download the full change log here: ChangeLog.txt Tested and working on both 32bit and 64 bit editions of Windows XP, Windows Vista, Windows 7, Windows 8, Windows 8.1 and Windows 10. Things you need to know before trying it: 1. Start the program, select one or more connections from what's available and click Connect (If a firewall notice comes up, click 'Allow' or 'Add Exception') When someone else on your network does the same, they will appear in your Tree-view and you will appear in theirs, double click their name and chat! 2. s!mpL3 LAN Messenger does not require a server to be running, it's standalone. 3. On the first run an .ini file is created at @LocalAppDataDir\s!mpL3 LAN Messenger which stores the settings so that they are used every time you run the application. If you delete the .ini file it will be created again (with default settings at program startup or with your selected settings if you press Save from the Preferences window). 4. All communication is encrypted using AES so it's quite secure against Network sniffers. 5. You can send files and folders by dragging and dropping them in a conversation window. Folders are compressed before being sent. You can also drop multiple items to be sent. 6. There is a "Hide" button located in the tray right click context menu that will hide all open windows. You can assign a Hotkey combination from Preferences. The default combination is Ctrl+H. 7. s!mpL3 LAN Messenger uses port 60000 by default. You can change the port used by adding "Port=****" (without quotes, stars represent numbers) to the Config file described above. Communication is UDP. 8. There is an Updater feature you can use to always have the latest available version, you only need an internet connection for that to work. You might need to clear your Internet Explorer Temporary Files in order for it to find an updated version. 9. You can Hide + Lock s!mpL3 LAN Messenger so it'll require a password in order to "Appear". To enable this, go to the Security Preferences. 10. Note that versions after 2.9.8.1 are not compatible with previous versions due to the encryption used being changed. I recommend using the latest version, or at least use the same version over the LAN. Important Notice: I will not be releasing the source code, however, I might share some parts of code if requested... If you choose to de-compile this software, don't release the source code.


 1 point
 -

Notepad++ 7 digit all digits, letters, alphanumeric delete regex?
youtuber reacted to FrancescoDiMuro for a topic
@youtuber Happy to have helped1 point -
This seems to work for me -- ^(.){0,7}\r\n1 point
-
Notepad++ 7 digit all digits, letters, alphanumeric delete regex?
youtuber reacted to FrancescoDiMuro for a topic
@youtuber You need to use something like this: Search Pattern: ^.{1,7}$ Replace Pattern: leave it blank1 point -
Ahh, Ok, try this : Local $sText = "AD9Q" For $i = 0 To 160 $sText = _IncrString ($sText) ConsoleWrite ($sText & @CRLF) Next Func _IncrString ($sString) Local $iLen = StringLen ($sString), $iChar, $sResult = "" For $i = $ilen To 1 Step -1 $iChar = Asc(StringMid ($sString,$i,1))+1 $iChar = ($iChar = 58 ? 65 : ($iChar = 91 ? 48 : $iChar)) $sResult = Chr ($iChar) & $sResult If $iChar <> 65 Then Return StringLeft ($sString,$i-1) & $sResult Next Return $sResult EndFunc1 point
-
Apparently you mean "characters" not "digits" (which in regex are numbers only) So I suggest "^.{7}$" which matches 7 chars exactly1 point
-

string increment alphabetic to numeric or viceversa
Earthshine reacted to BrewManNH for a topic
This modification will do what you want, and also handles input in upper or lowercase converting the overflow into the correct case depending upon what was input. Local $sMyString = "ZwZX" For $i = 1 To 5 $sMyString = _AlphaIncr($sMyString) ConsoleWrite($sMyString & @TAB & (@error ? "<- Overflow!" : "") & @CRLF) Next ; returns the passed string incremented by 1 asc Func _AlphaIncr($sString) Local $sResult = "", $Carry = "" For $i = 1 To StringLen($sString) $iStringAdd = Asc(StringMid($sString, $i, 1)) + 1 Switch $iStringAdd Case 91, 123 $iStringAdd = 48 Case 58 If $iStringAdd - 1 = 90 Then $iStringAdd = 65 ElseIf $iStringAdd - 1 = 122 Then $iStringAdd = 97 EndIf EndSwitch $sResult = Chr($iStringAdd) $Carry &= $sResult Next Return $Carry EndFunc ;==>_AlphaIncr This gives an output like this: 0x0y 1y1z 2z20 3031 41421 point -
Try something like $oTag.getAttribute("ng-model") = "c.shortDescription" or $oTag.ClassName = "form-control ng-pristine ng-valid ng-empty ng-touched"1 point
-

Set Log On Informations for a service
Earthshine reacted to JLogan3o13 for a topic
C++ - oh, wait, that is what SC.exe is written in... Straight machine code - good luck with that.1 point -

RunAs not fully elevated (UAC issue)
wongshing1439 reacted to AdamUL for a topic
Here is a workaround for dealing with RunAs and RunAsWait and the UAC Admin Token. This uses re-execution to elevate the script and allow the Admin part of the script to run. After the admin part runs, it reverts back to the not admin part. Example script is below. #include <MsgBoxConstants.au3> Global $sAdminUser = "USERNAME" Global $sAdminPassword = "PASSWORD" Global $sDomain = @ComputerName Global $iLogOnFlag = 0 Global $sParameters = "" ;Run as the Admin account. If @UserName <> $sAdminUser And Not IsAdmin() Then $sParameters = "" If Not @Compiled Then $sParameters = ' "' & @ScriptFullPath & '"' EndIf ;Use RunAsWait to run as AdminUser, to continue the script as the user that started it, and to wait for the Admin part to Finish. RunAsWait($sAdminUser, $sDomain, $sAdminPassword, $iLogOnFlag, @AutoItExe & $sParameters) If @error Then Exit MsgBox($MB_ICONERROR + $MB_TOPMOST, "ERROR!", "Unable to run under administrator account.") EndIf ;Request the Admin Token for the Admin account in Windows Vista and Higher. If @UserName = $sAdminUser And Not IsAdmin() And Not StringRegExp(@OSVersion, "_(XP|200(0|3))") Then $sParameters = "" If Not @Compiled Then $sParameters = '"' & @ScriptFullPath & '"' EndIf ;Use ShellExecuteWait to run as AdminUser with Admin Token, to wait for the Admin part of the script to finish, and then to exit. ShellExecuteWait(@AutoItExe, $sParameters, "", "runas") If @error Then Exit MsgBox($MB_ICONERROR + $MB_TOPMOST, "ERROR!", "Unable to elevate to Admin due to UAC.") Exit EndIf MsgBox($MB_ICONINFORMATION, @UserName, "Is " & (IsAdmin() ? "" : "Not " ) & "Admin") ;Example Global $sDrive = EnvGet("systemdrive") ;Admin part of script. If IsAdmin() Then MsgBox ($MB_OK, "Admin Run Test", "Run Admin part of script and then exit to run as user who started the script.") ;Example Run($sDrive & "\vendor\vendor.exe") ;Wait for Vendor Version Control to close Do Sleep(100) Until Not WinExists("Vendor Version Control") ;Wait for VendorAppLauncher to exist ProcessWait("VendorAppLauncher.exe") ;Close the Vendor Launcher as Admin ProcessClose("VendorAppLauncher.exe") ;Exit to finish Admin part of script. Exit EndIf ;Put rest of the non Admin part of script here. ;Re-open Vendor Launcher as user Run($sDrive & "\Vendor\VendorAppLauncher.exe", $sDrive & "\Vendor") Adam1 point -

FreeBasic Graphical Examples build 2019-05-08
argumentum reacted to UEZ for a topic
Here some graphical examples written completely in FreeBasic just for fun. _WinAPI_SetWindowTitleIcon Check for Numeric Entry in an EditBox using RegEx CreateWindowEx (hGUI) Example FB 3D Starfield Rotating Flight FB File2Bas Code Generator FB Fire Particles FB Fireworks FB GFX Examples FB Image to Trapezoid Transformation FB Layered Parallax Effect FB Plasma FB Puristic Clock FB Rotating Cube FB Rotating Earth FB Rutt Etra Izer Effect FB Simple Recursive Tree Generator FB Snowfall FB Tunnel Flight FB Water Effect FMOD Examples GDI - GDI+ 3D Sinus Wave GDI - GDI+ Animated Pythagoras Tree GDI - GDI+ Bezier Lines GDI - GDI+ Particles - Repulsive Force Sim v2.0 GDI - GDI+ Plasma v5 Booster GDI - GDI+ Random Pattern GDI - GDI+ Space Flight GDI - GDI+ Tunnel Flight - WipeOut Style GDI Classic Raytraced Tunnel GDI Elastic Twister Effect GDI Exploding Pixels GDI Infinite Image Zoom Flight GDI Liquid Pixels GDI Mandelbrot GDI Particle Repulsion Grid GDI Particles Mouse Attraction GDI Starfield GDI The Nautilus Raymarcher GDI Worm Tunnel Flight GDI+ 3D Starfield Scrolling v1 Booster GDI+ 3D Starfield Scrolling v3 Booster GDI+ Convert Bitmap to ASCII GDI+ GIF Anim to ASCII Player GDI+ Image Painting GDI+ Impossible Possible GDI+ Kaleidoscope GDI+ Performance Test - Au3 vs FB GDI+ Polar Clock GDI+ Rotating Earth GDI+ Spiral Text GDI+ Star Wars Scroller GDI+ Streamer GDI+ Swiss Railway Clock GDI+ The MATRIX Ini Read - Write Rutt_Etra_Izer_Booster Stack TitchySID uFMOD Download: FreeBasic Examples build 2019-05-08.rar I will add new examples from time to time. FreeBasic source codes are also included.1 point -

A cross-platform implementation of the AutoIt language
moosjuice reacted to Earthshine for a topic
Look if you want to do it then what’s stopping you? It’s not my vote you asked for my opinion and I gave it but if you want to do it then don’t let any of us stop you1 point -
Come on folks, where is your heart, don't be so outright discouraging with your voting. Why so negative? Everything starts with a dream, and not all dreams come true, but allow him that one in a million chance ... you know you really want it. Truth or reality is often stranger than fiction. Anyway, a good experiment for the lad, and a wonderful journey .... sure to learn a thing or three. It's not like he is going to mortgage his house in this endeavor.1 point
-

what am i doing wrong here? (ScriptControl)
ss26 reacted to TheAutomator for a topic
JohnOne, now it works, so it's a 64bit problem then thanks for the help JohnOne [EDIT:] put this on top in the au3 script and you don't have to compile it every time: #AutoIt3Wrapper_UseX64=n TheAutomator.1 point -

what am i doing wrong here? (ScriptControl)
seadoggie01 reacted to JohnOne for a topic
I'd try compiling as x86 and trying that.1 point -
This is how I get the IE object for the currently active tab: ;=============================================================================== ; ; Function Name: _IEGetActiveTab() ; Description: Retrieve the IE Window Object of the currently active tab ; Parameter(s): None ; Requirement(s): AutoIt3 V3.2 or higher ; On Success - Returns an object variable pointing to the IE Window Object ; On Failure - Returns 0 and sets @ERROR ; @ERROR - 0 ($_IEStatus_Success) = No Error ; - 7 ($_IEStatus_NoMatch) = No Match ; Author(s): Dan Pollak ;=============================================================================== ; Func _IEGetActiveTab() Local $hwnd, $i, $title, $oIE ; get first IE instance $oIE = _IEAttach ("", "instance", 1) If @error = $_IEStatus_Success Then ; get window title $hwnd = _IEPropertyGet($oIE, "hwnd") $title = WinGetTitle($hwnd) $oIE = _IEAttach($title, "windowtitle") EndIf Return $oIE EndFunc1 point