Leaderboard

Popular Content
Showing content with the highest reputation on 04/15/2025 in all areas
-
Long time ago some posted a VB Wrapper for the controls To run them you need to install the VB6 Controls Runtime Plus 2.2 Dependency files: https://sourceforge.net/projects/vb6extendedruntime/ You only need this to install (not the rest !!) Once installed you can run the included AU3 Example scripts : I guess once you have installed the VB6 runtime control you can get the Edge Wrapper to work as well... Success _VB Controls.zip

 3 points
 -

JSON UDF using JSON-C
Musashi and one other reacted to seangriffin for a topic
I created this UDF for JSON using JSON-C because I needed high performance parsing of JSON data in my script. I needed to query large data arrays of several thousand entries and other UDFs were taking many seconds to do so. With this UDF a query of 5,000 array entries takes me about 600ms (see Example2.au3). This UDF executes JSON functions through a JSON-C DLL to achieve better performance. The JSON-C project is https://github.com/json-c/json-c. To download this UDF please visit https://github.com/seanhaydongriffin/JsonC-UDF. Two examples are provided (Example1.au3 and Example2.au3) that demonstrate all the functions.2 points -
JSON UDF using JSON-C
argumentum and one other reacted to TheXman for a topic
Here are the results with jq added to the mix. This was run on a 10 year old Dell XPS 8700 running Windows 7 64bit. That explains the slower speeds overall.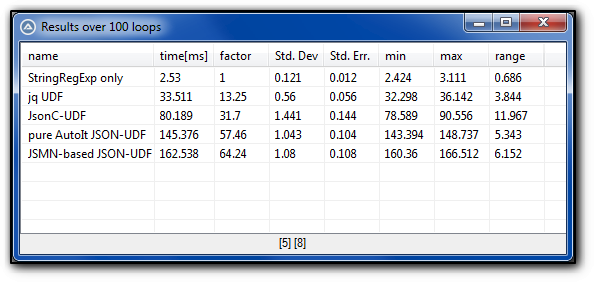 2 points
 -
Good find. I was trying to use one of my IPC to connect both running processes. Even with the MsgBox I am having a hard time to send messages to rendering process. However the Main process can receive quite nicely messages from the rendering process. Along the way I made a small UDF to create interface object, based on our discussion and from a post I saw from trancexx. I also included it in the script. I'll let you decide what you want to do with this version 2 of the engine. MediaEngine.zip2 points
-
After the opencv udf, Dlib seems to be a missing library for image processing. This UDF provides a way to use dlib in AutoIt The usage is similar to the python usage of dlib Prerequisites Download and extract autoit-dlib-20.0-opencv-4.12.0-com-v2.0.0.7z into a folder Sources Here Documentation A generated documentation for functions is available here (v2.0.0) Examples More examples can be found here (v2.0.0) To run them, please follow these instructions (v2.0.0) Face detection #Region ;**** Directives created by AutoIt3Wrapper_GUI **** #AutoIt3Wrapper_UseX64=y #AutoIt3Wrapper_Change2CUI=y #AutoIt3Wrapper_Au3Check_Parameters=-d -w 1 -w 2 -w 3 -w 4 -w 5 -w 6 #AutoIt3Wrapper_AU3Check_Stop_OnWarning=y #EndRegion ;**** Directives created by AutoIt3Wrapper_GUI **** #include <Misc.au3> #include "autoit-dlib-com\udf\dlib_udf_utils.au3" _Dlib_Open("opencv-4.12.0-windows\opencv\build\x64\vc16\bin\opencv_world4120.dll", "autoit-dlib-com\autoit_dlib_com-20.0-4120.dll") OnAutoItExitRegister("_OnAutoItExit") Example() Func Example() Local Const $dlib = _Dlib_get() If Not IsObj($dlib) Then Return Local $detector = $dlib.get_frontal_face_detector() Local $win = _Dlib_ObjCreate("image_window") Local $image_path = _Dlib_FindFile("examples\faces\2008_002470.jpg") Local $img = $dlib.load_rgb_image($image_path) $win.set_image($img) ; The 1 in the second argument indicates that we should upsample the image ; 1 time. This will make everything bigger and allow us to detect more ; faces. Local $dets = $detector.call($img, 1) ConsoleWrite("Number of faces detected: " & UBound($dets) & @CRLF) Local $d For $i = 0 To UBound($dets) - 1 $d = $dets[$i] ConsoleWrite(StringFormat("Detection %d: Left: %d Top: %d Right: %d Bottom: %d", _ $i, $d.left(), $d.top(), $d.right(), $d.bottom()) & @CRLF) Next $win.add_overlay($dets) hit_to_continue() EndFunc ;==>Example Func hit_to_continue() ToolTip("Hit ESC to continue", 0, 0) ConsoleWrite("Hit ESC to continue" & @CRLF) Do Sleep(50) Until _IsPressed("1B") EndFunc ;==>hit_to_continue Func _OnAutoItExit() _Dlib_Close() EndFunc ;==>_OnAutoItExit Camera face detection using opencv First, download the opencv UDF from here #Region ;**** Directives created by AutoIt3Wrapper_GUI **** #AutoIt3Wrapper_UseX64=y #AutoIt3Wrapper_Change2CUI=y #AutoIt3Wrapper_Au3Check_Parameters=-d -w 1 -w 2 -w 3 -w 4 -w 5 -w 6 #AutoIt3Wrapper_AU3Check_Stop_OnWarning=y #EndRegion ;**** Directives created by AutoIt3Wrapper_GUI **** #include <Misc.au3> #include "autoit-dlib-com\udf\dlib_udf_utils.au3" #include "autoit-opencv-com\udf\opencv_udf_utils.au3" _Dlib_Open("opencv-4.12.0-windows\opencv\build\x64\vc16\bin\opencv_world4120.dll", "autoit-dlib-com\autoit_dlib_com-20.0-4120.dll") _OpenCV_Open("opencv-4.12.0-windows\opencv\build\x64\vc16\bin\opencv_world4120.dll", "autoit-opencv-com\autoit_opencv_com4120.dll") OnAutoItExitRegister("_OnAutoItExit") Example() Func Example() Local Const $dlib = _Dlib_get() If Not IsObj($dlib) Then Return Local Const $cv = _OpenCV_get() If Not IsObj($cv) Then Return Local $detector = $dlib.get_frontal_face_detector() Local $cam = _OpenCV_ObjCreate("VideoCapture").create(0) Local $color_green = _OpenCV_Tuple(0, 255, 0) Local $line_width = 3 Local $img, $dets, $det While True If $cam.read() Then $img = $cv.extended[1] $dets = $detector.call($img) For $i = 0 To UBound($dets) - 1 $det = $dets[$i] $cv.rectangle($img, _OpenCV_Tuple($det.left(), $det.top()), _OpenCV_Tuple($det.right(), $det.bottom()), $color_green, $line_width) Next ;; Flip the image horizontally to give the mirror impression $cv.imshow("my webcam", $cv.flip($img, 1)) EndIf If _IsPressed("1B") Then ExitLoop ; esc to quit EndIf Sleep(1) WEnd $cv.destroyAllWindows() EndFunc ;==>Example Func _OnAutoItExit() _OpenCV_Close() _Dlib_Close() EndFunc ;==>_OnAutoItExit1 point
-
First I must thank @MattyD for showing me how to perform such a task in this thread. I felt I needed to play with it to fully understand the intrinsic. So I ended up making a small UDF that is accomplishing the creation of interface objects and the deletion of those made by the UDF. The example included in the zip file is largely inspired on the example made by the original author of the Media Engine topic. I believe the UDF is quite straightforward to use but, in any cases, post here your questions, I will be glad to answer in the scope of my knowledge. Version 2025-04-16 * Solved an issue with the tag transformation * Code optimization * Added tag validation ObjFromTag UDF.zip1 point
-

MiniMark (a minimalistic rtf editor)
TheAutomator reacted to pixelsearch for a topic
@TheAutomator glad I could help Just a reminder : in case one day you'll have to check $Bar and $Tumb in your main loop (please add them to your script, for a quick test) While 1 Switch GUIGetMsg() ... Case $Bar ConsoleWrite("Bar" & @crlf) Case $Tumb ConsoleWrite("Tumb" & @crlf) EndSwitch WEnd Then this is what would happen, when you click the Bar control or the Tumb control : 1) Order of creation of the 2 overlapping controls, as found in your script above : $Bar = GUICtrlCreateLabel('', 70, 70, 40, 270, $SS_BLACKRECT) $Tumb = GUICtrlCreateLabel('', 70, 70, 40, 80, $SS_GRAYRECT) Bad ConsoleWrite : "Bar" is always displayed in the Console, even when clicking on Tumb ! 2) Let's reverse the order of creation : $Tumb = GUICtrlCreateLabel('', 70, 70, 40, 80, $SS_GRAYRECT) $Bar = GUICtrlCreateLabel('', 70, 70, 40, 270, $SS_BLACKRECT) Now it's worse : the Tumb doesn't even show in the GUI ! 3) Correct way of creation + use of $WS_CLIPSIBLINGS $Tumb = GUICtrlCreateLabel('', 70, 70, 40, 80, $SS_GRAYRECT) $Bar = GUICtrlCreateLabel('', 70, 70, 40, 270, BitOr($SS_BLACKRECT, $WS_CLIPSIBLINGS)) Tumb appears normally in the GUI, ConsoleWrite shows correctly "Bar" or "Thumb" depending on the clicked control. I did several tests like these, using overlapping label + label, then label + pic, then label + button. I also checked at the same time GUIGetCursorInfo() to make sure the last element of the returned array corresponds to the correct control hovered over. Gladly it seemed to work in all cases As you scripted it differently (without the need to check $Tumb and $Bar in the main loop) then you're not concerned with all this, just remember this post if one day you need it, who knows. For what it's worth...1 point -

MiniMark (a minimalistic rtf editor)
pixelsearch reacted to TheAutomator for a topic
Yeah, and moving the cursor down or up so that the edit updates also changes the tumb position @Nine detected when the tumb was pressed in the main loop by ctrl id, and so did you, but that means an extra block of code, using _ispressed, and an extra fuction to update some variables, so i skipped that part ( not sure if that's a good approach but it's working 😛 ) Gonna put this and some other fixes in the MiniMark code soon. you helped me a lot, thanks for that!1 point -
Introduction This UDF is a Bridge between Autoit and the native Mongodb C Driver, namely mongoc-1.0.dll and parts of bson-1.0.dll As a native driver, the functions are extremely performant e.g. 10.000 queries per second to a simple Mongo Table It does not expose "all" functionalities of the original mongoc driver dll but hopefully it translates everything that one needs in real life. In difference to all known to me existing ways of using Mongodb from autoit, this is fully portable and dependency free. The reason why i worked on this is because i wanted @steipal to migrate FFAStrans from using Filesystem as a Database to a real Database. FFAStrans has been introduced here, it is a huge Tool for Workflow Automation written in Autoit. Why i want to change from FS to DB is this is that the filesystem is not a database and in larger scenarios with concurrent access in a distributed system, one hits many issues which are hard or even impossible to debug and workaround. Requirements DLL and UDF package: https://github.com/emcodem/MongoCBridge/releases/ Only 64bit build is provided. OS must be above Win 7 because the original mongoc dll links to bcrypt.dll and therefore cannot work in old windows. Otherwise the build is fully static and standalone, my dll contains all dependencies, even the mongoc and bson dlls. Source Code https://github.com/emcodem/MongoCBridge Documentation The core functions of the UDF, MongoDB.au3, are documented with comments inside the file as usual. For some understanding which JSON payload some functions require, especially "command_simple", you will need to consult the original MongoC documentation, direct links to the functions are also found in MongoDB.au3, example: https://mongoc.org/libmongoc/1.29.1/mongoc_client_command_simple.html The release package includes an example implementation, showing how to utilize the mongodb driver, _DB_FileFuncAbstraction_Test.au3. Note that you only need to make the connection ONCE in your code (using func _Mongo_CreateCollection). The underlying MongoC Driver DLL takes care about networking issues so even if the network connection gets lost or mongo offline in some way, it will automatically continue working again once the DB is back alive and connectable. Of course all requests to the DB will fail while it is offline, setting corresponding autoit errors structs as usual. This means instead of re-init connection in case of error, you can just retry the action (read/insert/admin cmd) Example wind up (and issue "drop collection" command for testing): #include "MongoDB_UDF\MongoDB.au3" #include "MongoDB_UDF\MongoDB_SimpleJson.au3" _Mongo_Init(@ScriptDir & "\MongoDB_UDF") Local $s_mongo_url = "mongodb://localhost:27017" Local $s_mongo_database_name = "tests" Local $s_mongo_collection_name = "db" Local $pDB = _Mongo_CreateCollection($s_mongo_url, $s_mongo_database_name, $s_mongo_collection_name) ;; from here $pDB is used for all database commands to this collection, it does not ever need to be renewed _Mongo_ClientCommandSimple($pDB, '{"drop": "'&$s_mongo_collection_name&'"}') Help / Support Please post questions directly in this thread.1 point
-
caramen, Start from the bottom and work up: For $i = $iRows To 0 Step -1 That way you never try to access a non-existent row. M231 point
-
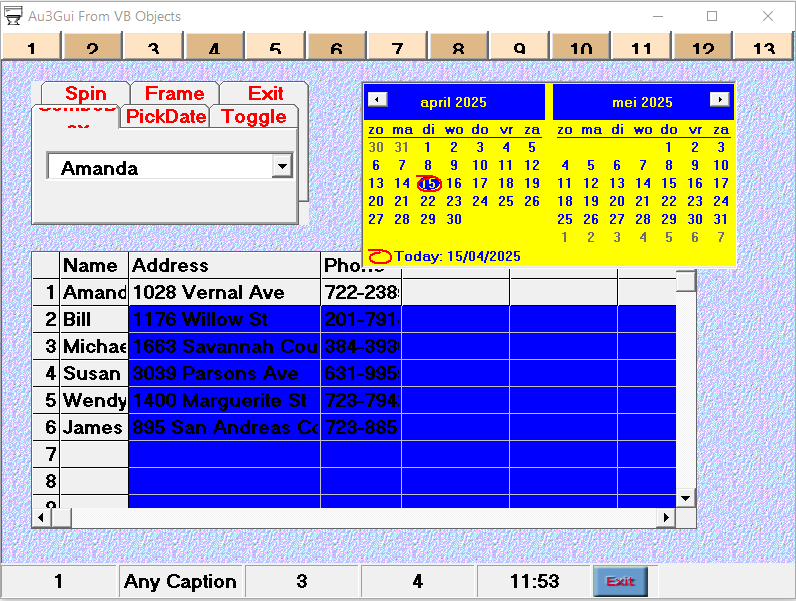
A while back I shared my VB dll wrapper exposing some objects. Here is my re-written VB dll wrapper, much simpler letting you use VB Forms and Controls in a more "COM" oriented way. Here are the Methods,Properties,and Objects. Look @ the example files to get the details. .Set_Window Setup your Gui(Window) (if X and Y = 0 Gui is centered) .Set_Control Setup your Controls on Gui .Load_Picture Load a picture file to an object .Obj2Ptr Get a pointer from an object .RGB_ VB's RGB function .NoFocus_On Remove focus lines on controls that have them .Show_Window Show Gui(Window) .Close_Window Close Gui(Window) .Click Click an object returns the pointer to the object .Index Get VB's index object (some VB objects use and set an index) .DllActive Return the number of open windows .BorderStyle Set Gui(Window) border style 0=None,1=Fixed Single,2=Sizable,3=Fixed Dialog,4=Fixed ToolWindow, 5=Sizable ToolWindow (*Must be set before Set_Window()*) If style is 0(none) the mouse will automatically drag the window. If style is 0(none) and you don't want to drag the window set the window 'Tag' property to True. (look @ example4.au3 a simple custom skin) By setting the textbox 'Tag' property to true you can drag the window by textbox. .vbTagColor Set the background color property of a command button for mouse over effect default is RED To use this property set 'Tag' to True of the command button object. If a Picture object is set for command button along with the DownPicture property, set the 'Tag' property to a picture file name for mouse over picture. (look @ example2.au3 for a lot of different controls and effects) These are the controls you can use, each one returns an object. CommandButton Label PictureBox ListBox TextBox Timer DriveListBox DirListBox FileListBox ComboBox OptionButton CheckBox Frame HScrollBar VScrollBar MonthView Image Line Shape HUpDown VUpDown SSTab ToggleButton (Is a formated CheckBox) DTPicker StatusBar ProgressBar MsFlexGrid Slider ListView TreeView ImageList ToolBar App Screen Pressing Esc will close any window. example1=simple random pixel test example3=VB's controls for drives, directories, and Files. Run the examples to see how it all works, and remember... have fun. Don't forget to register the DLL. Get it here vbobjs.zip1 point