Leaderboard


Popular Content
Showing content with the highest reputation on 04/23/2018 in all areas
-
Seriously ? no. The icon in the MsgBox is not the same2 points
-

Version 1.6.3.0
18,742 downloads
Extensive library to control and manipulate Microsoft Active Directory. Threads: Development - General Help & Support - Example Scripts - Wiki Previous downloads: 30467 Known Bugs: (last changed: 2020-10-05) None Things to come: (last changed: 2020-07-21) None BTW: If you like this UDF please click the "I like this" button. This tells me where to next put my development effort1 point -

Sign your exe with a Digital Signature / Signtool.exe
TheSaint reacted to Tankbuster for a topic
If someone gets offended by this, because he knows already 200 posts about it. Do not reply. Yes, some wrote already here some words what to do. Yes, you are right I created nothing new. But I want this summed up for forum searchers, that maybe find this posting useful in spending less time to find an answer in one place. I don't want to re-animate very old postings. So forgive me if I try to help other idiots like myself. ==================== First I need to give credits to: For summing it up in a nearly complete way. ==================== There is a nice Gui existing that wrapps it up: Digital Sign Tool Below you also find some instructions how to add it to the compiler. ==================== I tested this on a Windows 7 (x64) - but all codes used is x86 (32bit) - for 64bit I need to create another package (or make the script smarter). So here is the sequence in general: general purpose: I created several EXE files of the years, and I do not want to use the SIGNUI to click each file. So I want a command line version. Create a folder - I named it x:cert4me Download from : http://www.kastaban.de/cert4me/MAKE_MY_CERT_FILE.zip The zip: Contains: 1999-04-15 17:10:28 PVKIMPRT.EXE 2003-03-24 23:03:00 makecert.exe 2005-09-23 07:56:00 cert2spc.exe 2006-03-03 23:22:44 signtool.exe 2007-04-11 11:11:20 capicom.dll 2007-09-27 14:17:44 pvk2pfx.exe 2013-03-13 15:24:27 MAKE_MY_CERT_FILE.CMD 2013-03-13 15:31:52 SIGN_FILE.CMD Extract the files in : X:Cert4me now open a cmd in the created folder with the extracted files (the script will also work from other folder but so you are closer to the result...) cd /D x:\cert4me Now you either watch this little video with a sample of the signing process (a little bit fast - but you are to pause it if you like, and sorry for the German screen texts) http://www.kastaban.de/cert4me/CERT4ME/CERT4ME.html or First start : MAKE_MY_CERT_FILE.CMD myNewCertificate secret01 MAKE_MY_CERT_FILE.CMD needs two arguments 1=the name of the certificate 2=your password Sign now the EXE with: SIGN_FILE.CMD "d:\1work\mit space\TFTP_HELPER.exe" keys\myNewCertificate_cert.pfx secret01 SIGN_FILE.CMD needs three arguments 1=the file path of your executable 2=the filepath to the pfx folder (created before !) 3=your password Done. in case you want to sign more than one EXE repeat the "Sign now" step with the other EXE. ================= I packed the files from the original post and added additional files to offer a complete package. this was tested on Windows 7 (64bit) but all tools and my EXE are 32bit . Keep this in mind. For 64bit the similar tools of 64bit are maybe needed (not sure). Maybe someone could start to convert this to a AU3.....because some fields are still left open. Like the End DATE, email field, timestamps URL..... And "if" someone got additional stuff to add here (for other idio.....mmmh......searchers), do it. And most important , in case I wrote something wrong or it does not work for you please comment. ======================================================================== //edit: 16.03.2013 - Thx Emiel - as always I face problems with the NOT and Or :-)1 point -
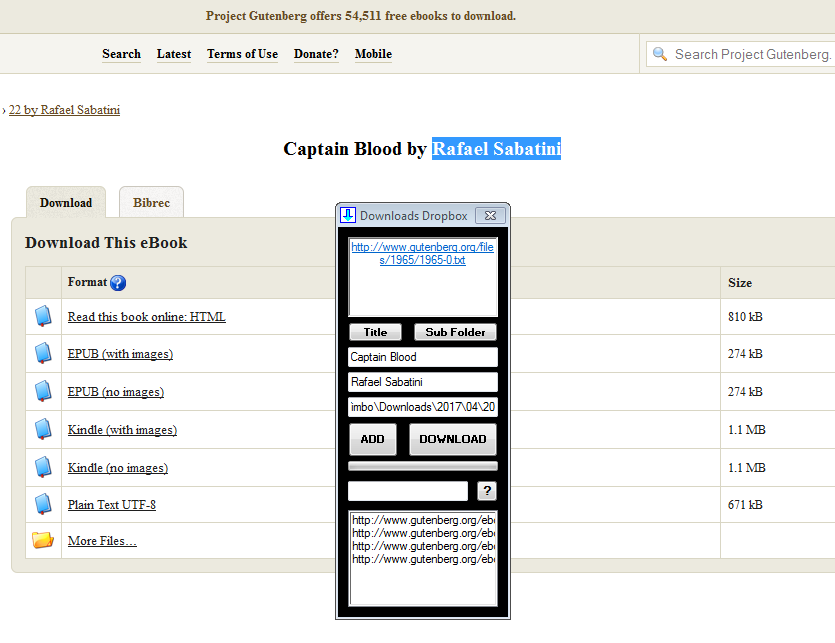
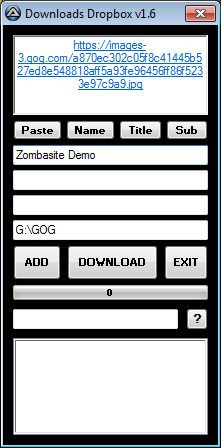
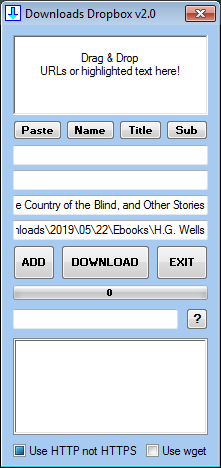
Some of you might find this little program I whipped up yesterday, to be useful. I had a need and it was filled. It is pretty basic and I admit was pretty much slapped together speedily and then fine tuned some time later, and could certainly do with more improving, if you care to do so. Thanks to Jefrey for his 'parse.au3' for the PHP elements. Source found here. I also used my Dropbox code, found here. Gutenberg Project page I used for the screenshot - http://www.gutenberg.org/ebooks/1965 One of their links looks like - http://www.gutenberg.org/ebooks/1965.epub.images?session_id=5932cd1d25afee6150a958323abd8a32d68249a7 V1.3 v1.6 v2.0 Basically, the Download Dropbox program aims to simplify and speed up downloading of files, with Batch and easy sub-folder creation. Everything in the program is done by either Drag & Drop or clicking a button. Window floats on top of others, naturally. 1. Drag a folder to the Destination input field to set the destination path. 2. Highlight some text, then drag that text to the drop zone (top edit field), to create the first sub-folder (if you want one). Click the SUB FOLDER button to assign it. 3. Do the same for the next sub-folder (if you want one or instead of the other sub folder). Click the TITLE button to assign it. 4. Select and drag a link (URL) to the drop zone. Click the ADD button to have it added to the Download list (last field). 5. Repeat for more files, that you wish to send to the same destination. 6. Click the DOWNLOAD button to have them start downloading. If size of each download can be determined, you will see the Progress bar working. All the buttons & List have a CTRL key feature, some also have a SHIFT key one. See the Program Information dialog for details. Drop zone and other inputs, can also be typed or pasted into. Some settings are saved to INI file and recalled on subsequent executions or the click of a button with CTRL held down. NOTE - I particularly like the Text Drag ability, as that simplifies things when doing lots of sub-folders. No browsing required. ADVICE - Clicking an entry in the list field, will momentarily display its full link text in the drop zone. Entries on the List are not sorted, so they appear in the order added. Obviously I wanted the program to take up as least desktop space as feasible, so that means truncated list entries etc. WARNING - Before doing a bunch of links from a site, where the links are not straight forward, do a test run of one. Especially as there is currently no STOP button. Downloads Dropbox v2.1.zip (see Post #11 for detail) (see Post #7 for a GOG example) OLDER DOWNLOADS IMPROVEMENTS & LIMITATIONS I have tailored certain elements for Gutenberg Project downloads and another site or two, so things will not work out-of-the-box for all possible download sites. That means you will have to tweak the code for some sites. Straight forward download links (no tricky php) seem to work fine. In particular, while what you might want to get downloads fine, it may be missing the file extension and not have the desired name. Sometimes, if you drag & drop an image onto the drop zone, the image will display there, and you cannot grab its URL. In those cases, I just right click the original image, grab its URL and paste that into the drop zone. You can clear the displayed image (and any other entry in the drop zone) by holding down CTRL while clicking the DOWNLOAD button. At this stage, you can only batch download files that you want, to the same destination. I am considering adding a multiple destination ability. Need to add a STOP button. P.S. This is my first second full program with the latest AutoIt.

 1 point
 -
Hello to all, I saw many people looking for a solution to Ping multiple devices and quickly. that is why I propose a solution that I use. the principle is simple: -a list of IP address in a table. -then execution of all Ping from array -recovery of the return via a Windows message. thats all.the recovery of the return via a SendMessage to not beforced to wait for a return.the return due it to an event. I let you discover and make me your comment. excused my English, I'm French! :-) FastMultiPing.zip1 point
-

[SOLVED] WinMenuSelectItem method cannot find in C#
IgImAx reacted to Earthshine for a topic
Ok. I will take a look at it when I get back in the office tomorrow1 point -

Counting Up in AutoIt
jameelo25 reacted to JLogan3o13 for a topic
@jameelo25 in short, something like this: for $x = 5000 to 6000 Send($x) Sleep(2000) Next Just realize that Send is unreliable - it doesn't care what window is active. If you have a specific window/program in mind, look at ControlSend in the help file.1 point -
So asynchronous programming is something quite difficult to do in JavaScript, but since we now have Promises and async/await, it's becoming increasingly less complicated. Plus there is no need for "callback hell". So I will assume you understand what Promise.all() is and why it can sometimes be problematic, as it will not wait for all requests to complete and just fails on the first rejected Promise. The following function will still reject on a failed Promise, but the difference being it will wait for all the Promises to complete before resolving or rejecting. If no failure occurred, then the resolved value is the same as Promise.all(), an array of resolved values; otherwise, it returns a completed object (see below for details). Also note that the array might contain empty slots, this is so it's easier to debug which Promise failed in the array, as they're inserted in the same index slot Promise.allComplete = (iterable) => { if (!Array.isArray(iterable)) { throw new TypeError('Invalid argument, expected "iterable" to be an array'); } const completed = { resolved: [], rejected: [], }; const wrapResolutionOrRejection = (type, index) => valueOrReason => (completed[type][index] = valueOrReason); const wrappedIterable = iterable.map((value, index) => Promise.resolve(value) // The rejected wrapper function could be put in the catch, but it's wasteful for our purposes .then(wrapResolutionOrRejection('resolved', index), wrapResolutionOrRejection('rejected', index)) ) return Promise.all(wrappedIterable) .then(() => completed.rejected.length === 0 ? Promise.resolve(completed.resolved) : Promise.reject(completed)); }; // Example const requests = [ createPromise(true, 10), createPromise(false, 10), createPromise(true, 200), createPromise(true, 1000), ]; // Rejects on the first Promise which fails, but if you check in the console, it didn't wait // for the third Promise to successfully complete, as the console log came after the error log was displayed // Promise.all(requests) // .then(values => console.log('Successfully completed', values)) // .catch(err => console.error('Not successfully completed', err)) // "allComplete" is different, in that it will wait for all the Promises to be completed i.e. resolve and reject, // then resolve if all Promises were successful or reject if one Promise failed. // It returns the following data structure: // { // resolved: [...Promises which resolved, and inserted by the associated Promise's index], // rejected: [..Promises which rejected, and inserted by the associated Promise's index], // } Promise.allComplete(requests) .then(completed => console.log('Successfully completed', completed)) .catch(completed => console.log('Not successfully completed', completed)) function createPromise(isResolved, delay) { return new Promise((resolve, reject) => { setTimeout(() => { console.log(`Promise: "${delay}"`); if (isResolved) { resolve(delay); } else { reject(new Error('An unexpected error occurred')); } }, delay); }); }1 point
-

ProcessExists
Earthshine reacted to BrewManNH for a topic
Do you want to use an INI file? Then use the INI functions. Do you want to write it directly from the array, then use _FileWriteFromArray correctly. From the help file:1 point -

Editing a page with firefox <FF.Au3>
Clerythecleric reacted to Danp2 for a topic
Have you tried using _FFCmd, something like this? _FFXPath("//button[@id='investigateBatch']") _FFCmd("FFau3.xpath.style='your new style settings go here'")1 point -
itsid, Welcome to the AutoIt forums. In future, you might like to consider posting runnable code - lots of people will not take the trouble to add the necessary additional code to get snippets running. Anyway, I did - and your loop seems to work just fine for me (with a small change to the ConsoleWrite line to prevent it going mad and printing for every pass): #include <GUIConstantsEx.au3> #include <MsgBoxConstants.au3> ;//runtime variables init Local $runmx = -1 Local $runit = 1 Local $dofetch = False $runmx = 2000 Global $sites[2] $MainGui = GUICreate("main", 200, 200, 100, 100) $btn_startop = GUICtrlCreateButton("Test", 10, 10, 80, 30) $total_progress = GUICtrlCreateProgress(10, 90, 180, 20) $men_exit = GUICtrlCreateButton("Exit", 110, 160, 80, 30) $cTest_1 = GUICtrlCreateDummy() $cTest_2 = GUICtrlCreateDummy() $cTest_3 = GUICtrlCreateDummy() GUISetState() $frmSiteAdd = GUICreate("SiteAdd", 200, 200, 400, 100) $btn_add_Site = GUICtrlCreateButton("Add", 10, 10, 80, 30) GUISetState() $frmRegAdd = GUICreate("RegAdd", 200, 200, 700, 100) $btn_add_Reg = GUICtrlCreateButton("Add", 10, 10, 80, 30) GUISetState() ;//loop di loop While 1 Local $aMsg = GUIGetMsg(1) Switch $aMsg[1] Case $MainGui Switch $aMsg[0] Case $GUI_EVENT_CLOSE, $men_exit Exit ; ExitScript() ;Case $men_addsite ;GuiAddSite() ;Case $men_addreg ;GuiAddReg() ;Case $men_exit ; ExitScript() Case $btn_startop If $dofetch = True Then $dofetch = False GUICtrlSetData($btn_startop, "Start") Else $dofetch = True GUICtrlSetData($btn_startop, "Pause") EndIf Case Else For $i = 1 To UBound($sites) - 1 ;// on the fly created submenu that's why it's an array it loops... If $aMsg[0] = $cTest_1 Then ;$runsit[$i] Then $runmx = 2000 ;$runpname = $sites[$i][1] $dofetch = True GUICtrlSetData($btn_startop, "Pause") ElseIf $aMsg[0] = $cTest_2 Then ; $runrefsit[$i] Then ;Local $html = loadPage($sites[$i][2]) ;url $runmx = 2000 ;$runpname = $sites[$i][1] $dofetch = True GUICtrlSetData($btn_startop, "Pause") ElseIf $aMsg[0] = $cTest_3 Then ; $expsit[$i] Then ;exportSQL($sites[$i][1]) EndIf Next EndSwitch Case $frmSiteAdd Switch $aMsg[0] Case $GUI_EVENT_CLOSE GUIDelete($frmSiteAdd) Case $btn_add_Site ;//blablabla waaaaay too long GUIDelete($frmSiteAdd) EndSwitch Case $frmRegAdd Switch $aMsg[0] Case $GUI_EVENT_CLOSE GUIDelete($frmRegAdd) Case $btn_add_Reg ;//blablabla waaaaay too long GUIDelete($frmRegAdd) EndSwitch EndSwitch ;//the running code is what kinda looses the GUI-message If $aMsg[0] <> 0 Then ConsoleWrite($aMsg[0] & @CRLF) ; simply does NOT write to console once the code below gets triggered EndIf If $runit <= $runmx Then If $dofetch = True Then ;_GUICtrlStatusBar_SetText($StatusBar1, @TAB & @TAB & "page: " & $runit & " of " & $runmx, 2) GUICtrlSetData($total_progress, 100 * $runit / $runmx) ;// GUI Updates working nicely! ;// so does all other code (reading files, writing to database...everything) ;// except setting $dofetch to false with the GUI button $runit = $runit + 1 EndIf EndIf WEnd So I would suggest that the problem lies elsewhere in your script - of which there is obviously a lot more. M231 point
-
Look up the ShellExecute(), Run(), or RunDos() functions in the help file to see some of the ways to launch a command. For the actual command, use the link below. To open additional tabs, you can execute the command again for each tab you would like to open. http://lmgtfy.com/?s=d&q=how+to+start+microsoft+edge+from+command+line Search engines can be very useful tools.1 point
-
AutoIt v3.3.14.5 has been released. Just a small bug fix to the updater script. Download it here. Complete list of changes: History1 point
-

how to i draw one rectangle on screen?
PoojaKrishna reacted to Malkey for a topic
Here is a simple example at draws the pixels of a rectangle to the desktop, #include <WinAPI.au3> _WinAPI_DrawRect(20, 20, @DesktopWidth / 2, @DesktopHeight / 2, 0x0000FF) Func _WinAPI_DrawRect($start_x, $start_y, $iWidth, $iHeight, $iColor) Local $hDC = _WinAPI_GetWindowDC(0) ; DC of entire screen (desktop) Local $tRect = DllStructCreate($tagRECT) DllStructSetData($tRect, 1, $start_x) DllStructSetData($tRect, 2, $start_y) DllStructSetData($tRect, 3, $iWidth) DllStructSetData($tRect, 4, $iHeight) Local $hBrush = _WinAPI_CreateSolidBrush($iColor) _WinAPI_FrameRect($hDC, DllStructGetPtr($tRect), $hBrush) ; clear resources _WinAPI_DeleteObject($hBrush) _WinAPI_ReleaseDC(0, $hDC) EndFunc ;==>_WinAPI_DrawRect Here is a more complex example that draws your rectangles to a layered window on the desktop. #include <GDIPlus.au3> #include <GuiConstantsEx.au3> #include <WindowsConstants.au3> #include <Misc.au3> ; Modified from http://www.autoitscript.com/forum/index.php?s=&showtopic=97126&view=findpost&p=698489 Opt("MustDeclareVars", 1) Opt("GUIOnEventMode", 1) Opt("MouseCoordMode", 1) ;1=absolute, 0=relative, 2=client Main() Func Main() Local $hBitmap, $hGui, $hGraphic, $hImage2, $GuiSizeX = @DesktopWidth, $GuiSizeY = @DesktopHeight Local $GuiSize = 70, $hWnd, $hDC, $pSize, $tSize, $pSource, $tSource, $pBlend, $tBlend Local $iX1 = 0, $iY1 = 0, $tPoint, $pPoint, $hBMPBuff, $hGraphicGUI, $hPen, $aMPos, $aMPosNew Local $iOpacity = 255, $dll = DllOpen("user32.dll") $hGui = GUICreate("L1", $GuiSizeX, $GuiSizeY, -1, -1, $WS_POPUP, BitOR($WS_EX_LAYERED, $WS_EX_TOPMOST)) GUISetState() _GDIPlus_Startup() $hWnd = _WinAPI_GetDC(0) $hDC = _WinAPI_CreateCompatibleDC($hWnd) $hBitmap = _WinAPI_CreateCompatibleBitmap($hWnd, $GuiSizeX, $GuiSizeY) _WinAPI_SelectObject($hDC, $hBitmap) $hGraphic = _GDIPlus_GraphicsCreateFromHDC($hDC) $hBMPBuff = _GDIPlus_BitmapCreateFromGraphics($GuiSizeX, $GuiSizeY, $hGraphic) $hGraphicGUI = _GDIPlus_ImageGetGraphicsContext($hBMPBuff) _GDIPlus_GraphicsClear($hGraphic); Add ,0x01000000) to disable underling desktop $hPen = _GDIPlus_PenCreate(0xffff0000, 3) $tSize = DllStructCreate($tagSIZE) $pSize = DllStructGetPtr($tSize) DllStructSetData($tSize, "X", $GuiSizeX);$iWidth ) DllStructSetData($tSize, "Y", $GuiSizeY);$iHeight) $tSource = DllStructCreate($tagPOINT) $pSource = DllStructGetPtr($tSource) $tBlend = DllStructCreate($tagBLENDFUNCTION) $pBlend = DllStructGetPtr($tBlend) DllStructSetData($tBlend, "Alpha", $iOpacity) DllStructSetData($tBlend, "Format", 1) $tPoint = DllStructCreate($tagPOINT); Create point destination structure here $pPoint = DllStructGetPtr($tPoint); Create pointer to this dll data structure, $pPTDest parameter DllStructSetData($tPoint, "X", $iX1) DllStructSetData($tPoint, "Y", $iY1) _WinAPI_UpdateLayeredWindow($hGui, $hWnd, $pPoint, $pSize, $hDC, $pSource, 0, $pBlend, $ULW_ALPHA) Do Select Case _IsPressed("01", $dll); Ctrl mouse button to move $aMPos = MouseGetPos() Do Sleep(10) Until Not _IsPressed("01", $dll) $aMPosNew = MouseGetPos() ;_GDIPlus_GraphicsDrawLine($hGraphic, $aMPosNew[0], $aMPosNew[1], $aMPos[0], $aMPos[1], $hPen) ; I used _Iif() from Misc.au3 instead using of _Min() from Math.au3. _GDIPlus_GraphicsDrawRect($hGraphic, _Iif($aMPos[0] < $aMPosNew[0], $aMPos[0], $aMPosNew[0]), _Iif($aMPos[1] < $aMPosNew[1], $aMPos[1], $aMPosNew[1]), Abs($aMPosNew[0] - $aMPos[0]), Abs($aMPosNew[1] - $aMPos[1]), $hPen) _WinAPI_UpdateLayeredWindow($hGui, $hWnd, 0, $pSize, $hDC, $pSource, 0, $pBlend, $ULW_ALPHA) Case _IsPressed("04", $dll) Or _IsPressed("11", $dll) ; Middle mouse button 0r Ctrl key <======= Clear screen of rectangles. _GDIPlus_GraphicsClear($hGraphic) _WinAPI_UpdateLayeredWindow($hGui, $hWnd, 0, $pSize, $hDC, $pSource, 0, $pBlend, $ULW_ALPHA) EndSelect Sleep(50) Until _IsPressed("1B", $dll); ESC key DllClose($dll) _GDIPlus_PenDispose($hPen) _GDIPlus_GraphicsDispose($hGraphicGUI) _GDIPlus_GraphicsDispose($hGraphic) _WinAPI_ReleaseDC(0, $hWnd) _WinAPI_DeleteObject($hBitmap) _WinAPI_DeleteDC($hDC) _GDIPlus_Shutdown() EndFunc ;==>Main1 point