xekon
-
Posts
35 -
Joined
-
Last visited
Everything posted by xekon
-
Thank you very much! I ordered a couple of these PC817 8 way optocouplers: https://www.ebay.com/itm/334974375491 Will be like a month before they arrive, going to see what the most affordable "USB to 8 digital lines device" is that I can find. So far I am not finding anything for less than the Adafruit FT232H breakout usb to gpio for about $14 https://www.adafruit.com/product/2264 Update after a bit more reading: The Adafruit uses CircuitPython, which is a fork of micropython. CircuitPython is actually developed BY Adafruit. I found a board that I believe would work similar(ESP32 CH340C), it is only $3 but it would use micropython: https://www.ebay.com/itm/166409779569 The difference is that it might take longer to get up and running with the micropython version, circuitpython already has massive library you can draw from. Having never worked with either, im not sure about possible limitation like file transfer etc, the Adafruit FT232H from the description sounds very capable, they compare it to a swiss army knife!
-
I think I have got it. I can use https://www.adafruit.com/product/2264 and I can use some 3.3v mosfets to act as the switches: https://electronics.stackexchange.com/questions/235672/for-3-3v-microprocessors-whats-the-best-way-to-power-the-gate-of-a-mosfet very steep learning curve when dealing with electronics, spent most of the day reading.
-
The more I look at relays, the more I see why it matters what I am using them for, the product I was looking at appears to be good for 75-250 VAC I am not even sure it would do what I am wanting. Maybe what I need is to use an optocoupler, I just need a device that can complete simple small circuits, like the shutter button on a camera, or the power button on my computers front panel header. (sounds fun!) https://forum.arduino.cc/t/arduino-to-turn-on-pc-using-opto-coupler-help-needed/468878/5 Then I find products like this https://www.ebay.com/itm/324988937994 why is 3.6 volts the minimum, I can understand a maximum, but why a minimum, I thought optocoupler was all about isolation, I just want to complete the circuit and let the button send whatever voltage it normally would send. What if my button actually sends less? I guess I need to get a volt meter on my intended buttons to control!
-
so if I bought one of these: https://www.ebay.com/itm/235155940733 I am guessing I could interface my pc with it directly over usb using this FT232H breakout usb to gpio board: https://www.adafruit.com/product/2264 but would Autoit have any way to communicate with the Adafruit FT232H Breakout?
-
OH! now I understand what your asking, they are switches that are mounted to a PCB, One of them is a camera, I soldered wires to the underside of the shutter button. I assumed the pcb is a circuit and that its just checking continuity or sending very low voltage and current when pressed. I also have an infrared light that you press the same button repeatedly to cycle modes (not a toggle switch) Off, Low, Med, High, Off, that one is probably also low voltage, but I will check it. Assuming all switches are very low voltage and current the solid-state-relay board should do the trick right? I would just need to figure out the best way to interface it with the PC so that autoit can talk to it. I do not know the frequency range, but I could probably use my digital volt meter to check the volts/current on the buttons. The Camera is powered by 2 AA batteries, so there can't be much current going through that shutter button I would think. Edit, more info: The idea is I have a webcam that looks for general movement, then I have a more high resolution Camera that I can signal to take high res pictures, and if its night time also turn on additional infrared lights, if it goes well I have more cameras I would like to setup as well. I know there are high end cameras that can do all of this, but this is just meant to be an experiment in remotely triggering hardware to perform functions, even old hardware that is not setup for internet of things type remote control.
-
I really appreciate the responses guys! I also found another post where a person is doing basically exactly what I want to do: https://maker.pro/forums/threads/how-can-i-press-a-push-button-with-a-relay.265601/ Knowing I might want to complete the circuit of up to 8 buttons, that would mean I need 16 relays. I watched this video, and my immediate thought was WOW those are loud: https://www.youtube.com/watch?v=TFt480sxNWg So Now I am thinking I want to try solid state relays to accomplish my goal, either directly controlled over USB, or if I have to controlled while connected from a raspberry pi. I found this 8 channel one, but I am wondering if they can be found for less: https://www.ebay.com/itm/235155940733 (this one is not usb so I would have to connect it to an arduino or raspberry pi)
-
The momentary switches are buttons on devices, that can be pressed manually, but I also soldered some wires to the button's solder pads so that I can hopefully automate some stuff. I prefer DIY or inexpensive. I think what I am looking for is something like the GPIO pins on the raspberry pi, but something that can be controlled directly from a desktop PC, maybe some kind of usb device that has IO pins that can be used as output, I could then send signal to short two of the pins together, and those pins could lead to the wires that I tapped into the momentary buttons. One of the things I am trying to do is have one camera trigger another cameras flash/shutter, but I can think of other type uses, like if certain activity is seen on camera then trigger a siren. I think I am on the right track with looking for some kind of GPIO board, but something that autoit could directly send a signal to would be great, otherwise I could see me writing an autoit script that calls some 3rd party program to send signals to the gpio device, which just seems kinda messy. 1. switches are open/close which instructs the device to do something or not do something 2. I would be controlling between 4 and 8 switches/buttons 3. usb would work, my pc has plenty of those, I could also make serial work with a usb to serial adapter (pc motherboard has no serial) 4. can be powered however. 5. the frequency of the event will depend on how often detected, could range from 3 times a minute to every couple hours. (when detected I would short two pins for maybe 200ms, to make sure the appropriate device registers the button press) 6. Cosmetics don't matter, I mean I have already hacked apart some consumer devices to add wire leads to the buttons, lol. 7. cheaper the better
-
Appreciate the suggestion on OpenCV, but I prefer to stick with autoit if anyone knows of a UDF that allows interacting with hardware. Will keep OpenCV in mind for some projects though.
-
I am working on a project where I have several momentary buttons, these are the normally open type of button, then when you press the button it completes the circuit. These buttons are able to perform tasks manually, but I also have a webcam setup, and would like a way to have autoit short these circuits when certain colors are seen. (I can handle programming this part myself) I have been using autoit for various tasks going on 20 years now, but it has always been a simply software solution. The biggest problem is trying to search for solutions.... searching things like autoit button, autoit hardware button, autoit relay, is not very specific. I get the idea that somebody more versed in controlling circuits via autoit would be able to point me in the right direction. (soldering is not an issue)
-
I tried _Resource_SetToCtrlID($L, 'Torus', True) which according to the functions documentation in the UDF should have resized the image, but when I do this the Torus image does not load at all. EDIT: I got it working _Resource_SetToCtrlID($L, 'Torus', Default, Default, True)
-
EDIT: I should have opened up the UDF, it is self documented and appears to support what I am trying to do _Resource_SetToCtrlID($L, 'Torus', Default, Default, True) When using _Resource_SetToCtrlID() is there a way to resize the image to the dimensions of the control, even if that means stretching the image? currently when I create a control then use _Resource_SetToCtrlID(), it resizes the controls dimensions for me and uses the images physical dimensions. For most cases thats actually perfect, but I am needed to be able to set some images to some controls and have the image stretched to fit. I am including a test case as well as some images to further illustrate my issue and what I am trying to accomplish. currently this is what I am seeing: my desired outcome is actually: and here is the code for this example: #Region ;**** Directives created by AutoIt3Wrapper_GUI **** #AutoIt3Wrapper_Res_File_Add="C:\Program Files (x86)\AutoIt3\Examples\GUI\Torus.png", RT_RCDATA, Torus, 0 #EndRegion ;**** Directives created by AutoIt3Wrapper_GUI **** #include <ResourcesEx.au3>;transparent gui buttons #include <WinAPISysWin.au3>;requirement #include <GUIConstantsEx.au3>;gui #include <array.au3>;arrays Local $hGUI = GUICreate("Test", 1024, 768) $bg = GUICtrlCreatePic("C:\Program Files (x86)\AutoIt3\Examples\GUI\msoobe.jpg", 0, 0, 1024, 768) GUICtrlSetState($bg,$GUI_DISABLE) GUISetState(@SW_SHOW) Local $L = GUICtrlCreatePic('', 100, 100, 400, 50) ;debug shows that the GUICtrlCreatePic is set to my desired width 400 and height 50 MsgBox($MB_SYSTEMMODAL, "control properties", _ArrayToString(ControlGetPos("Test", "", $L ), @TAB)) _Resource_SetToCtrlID($L, 'Torus') ;debug shows that _Resource_SetToCtrlID has changed the dimensions of the control I created with GUICtrlCreatePic MsgBox($MB_SYSTEMMODAL, "control properties", _ArrayToString(ControlGetPos("Test", "", $L ), @TAB)) While 1 If GUIGetMsg() = $GUI_EVENT_CLOSE Then ExitLoop EndIf sleep(random(6,9)) Wend GUIDelete($hGUI) I am hoping that this UDF supports such a method, but if not, let me know if anyone can think of a clever solution.
-
Thank you! My script using ResourcesEx would not compile: "_WinAPI_SetWindowLong" "undefined function" So I edit ResourcesEx.au3 adding that include: #include <WinAPISysWin.au3> and now it compiles, Hooray!
-
Yes I agree, wrapping it up in a function is perfect! Thank you
-
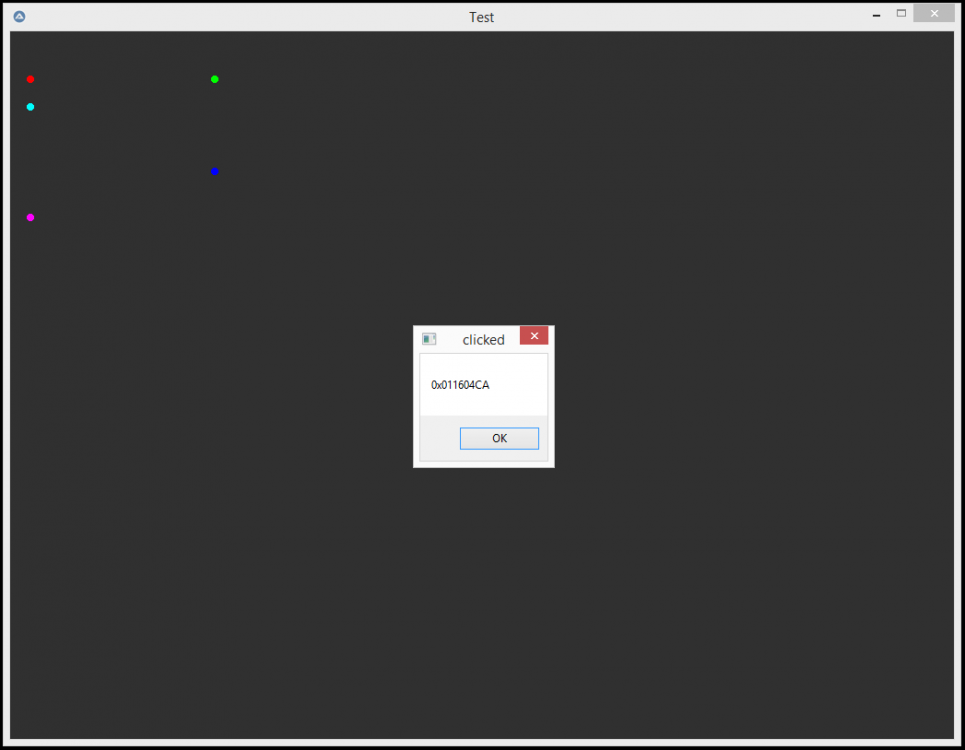
Thanks argumentum, it does seem that the labels also work if the GUISetState(@SW_SHOW) is called prior to creating them just like in the GDI example posted by careca. This most closely resembles the appearance I am going for if I went without GDIPlus, its a solid square pin instead of round: #include <GUIConstantsEx.au3> #include <MsgBoxConstants.au3> Local $idMsg CreateChild() Do; Loop until the user exits. $idMsg = GUIGetMsg(1) If $idMsg[0] > 0 Then MsgBox($MB_SYSTEMMODAL, "clicked", $idMsg[2], 1) Until $idMsg[0] = $GUI_EVENT_CLOSE Func CreateChild() GUICreate("Test", 1024, 768) Local $bg = GUICtrlCreatePic("C:\Program Files (x86)\AutoIt3\Examples\GUI\msoobe.jpg", 0, 0, 1024, 768) GUICtrlSetState($bg,$GUI_DISABLE) GUISetState(@SW_SHOW) ;the actual buttons created as square labels with a solid background color Local $b001 = GUICtrlCreateLabel("", 20, 50, 7, 7) GUICtrlSetBkColor($b001, 0xff0000) Local $b002 = GUICtrlCreateLabel("", 50, 50, 7, 7) GUICtrlSetBkColor($b002, 0x00ff00) Local $b003 = GUICtrlCreateLabel("", 80, 50, 7, 7) GUICtrlSetBkColor($b003, 0x0000ff) EndFunc I really wish Auto it had a simple built in way to create round labels in addition to rectangle ones, that would be perfect. The square labels dont look that bad and its also less lines of code but I think I like the round pins just a bit better achieved by using the GDIPlus: #include <GUIConstantsEx.au3> #include <MsgBoxConstants.au3> #include <WindowsConstants.au3> #include <GDIPlus.au3> Local $idMsg _GDIPlus_Startup() CreateChild() Do; Loop until the user exits. $idMsg = GUIGetMsg(1) If $idMsg[0] > 0 Then MsgBox($MB_SYSTEMMODAL, "clicked", $idMsg[2], 1) Until $idMsg[0] = $GUI_EVENT_CLOSE Func CreateChild() Local $hGUI = GUICreate("Test", 1024, 768) $bg = GUICtrlCreatePic("C:\Program Files (x86)\AutoIt3\Examples\GUI\msoobe.jpg", 0, 0, 1024, 768) GUICtrlSetState($bg,$GUI_DISABLE) GUISetState(@SW_SHOW) ;the actual buttons created as transparent labels Local $b001 = GUICtrlCreateLabel("", 20, 50, 7, 7, $WS_EX_TRANSPARENT) GUICtrlSetBkColor($b001, $GUI_BKCOLOR_TRANSPARENT) Local $b002 = GUICtrlCreateLabel("", 50, 50, 7, 7, $WS_EX_TRANSPARENT) GUICtrlSetBkColor($b002, $GUI_BKCOLOR_TRANSPARENT) Local $b003 = GUICtrlCreateLabel("", 80, 50, 7, 7, $WS_EX_TRANSPARENT) GUICtrlSetBkColor($b003, $GUI_BKCOLOR_TRANSPARENT) ;draw button pins directly onto backgroup picture at button locations Local $hBrushR = _GDIPlus_BrushCreateSolid(0xFFff0000) ;color format AARRGGBB (hex) Local $hBrushG = _GDIPlus_BrushCreateSolid(0xFF00ff00) ;color format AARRGGBB (hex) Local $hBrushB = _GDIPlus_BrushCreateSolid(0xFF0000ff) ;color format AARRGGBB (hex) Local $hGraphic = _GDIPlus_GraphicsCreateFromHWND($hGUI) _GDIPlus_GraphicsFillEllipse($hGraphic, 20, 50, 7, 7, $hBrushR) _GDIPlus_GraphicsFillEllipse($hGraphic, 50, 50, 7, 7, $hBrushG) _GDIPlus_GraphicsFillEllipse($hGraphic, 80, 50, 7, 7, $hBrushB) EndFunc
-
Thanks so much guys, this is what I am using now: #include <GUIConstantsEx.au3> #include <MsgBoxConstants.au3> #include <WindowsConstants.au3> #include <GDIPlus.au3> #include <WinAPIGdi.au3> Local $idMsg _GDIPlus_Startup() CreateChild() Do; Loop until the user exits. $idMsg = GUIGetMsg(1) If $idMsg[0] > 0 Then MsgBox($MB_SYSTEMMODAL, "clicked", $idMsg[2], 1) Until $idMsg[0] = $GUI_EVENT_CLOSE Func CreateChild() Local $hGUI = GUICreate("Test", 1024, 768) $bg = GUICtrlCreatePic("C:\Program Files (x86)\AutoIt3\Examples\GUI\msoobe.jpg", 0, 0, 1024, 768) GUICtrlSetState($bg,$GUI_DISABLE) GUISetState(@SW_SHOW) ;the actual buttons created as transparent labels Local $b001 = GUICtrlCreateLabel("", 20, 50, 7, 7, $WS_EX_TRANSPARENT) GUICtrlSetBkColor($b001, $GUI_BKCOLOR_TRANSPARENT) Local $b002 = GUICtrlCreateLabel("", 50, 50, 7, 7, $WS_EX_TRANSPARENT) GUICtrlSetBkColor($b002, $GUI_BKCOLOR_TRANSPARENT) Local $b003 = GUICtrlCreateLabel("", 80, 50, 7, 7, $WS_EX_TRANSPARENT) GUICtrlSetBkColor($b003, $GUI_BKCOLOR_TRANSPARENT) ;draw button pins directly onto backgroup picture at button locations Local $hBrushR = _GDIPlus_BrushCreateSolid(0xFFff0000) ;color format AARRGGBB (hex) Local $hBrushG = _GDIPlus_BrushCreateSolid(0xFF00ff00) ;color format AARRGGBB (hex) Local $hBrushB = _GDIPlus_BrushCreateSolid(0xFF0000ff) ;color format AARRGGBB (hex) Local $hGraphic = _GDIPlus_GraphicsCreateFromHWND($hGUI) _GDIPlus_GraphicsFillEllipse($hGraphic, 20, 50, 7, 7, $hBrushR) _GDIPlus_GraphicsFillEllipse($hGraphic, 50, 50, 7, 7, $hBrushG) _GDIPlus_GraphicsFillEllipse($hGraphic, 80, 50, 7, 7, $hBrushB) EndFunc
-
Ahh so im guessing GUICtrlCreateGraphic is what is "drawing in the canvas" maybe instead of using GUICtrlCreateGraphic I should just create an actual jpg image for the dots and use GUICtrlCreateButton for my buttons instead. I just thought that GUICtrlCreateGraphic was pretty neat. Ultimately my project will have anywhere between 100 and 900 of those little dots, its a map project I am working on so the background image will be a streets map and the dots will be points of interest.
-
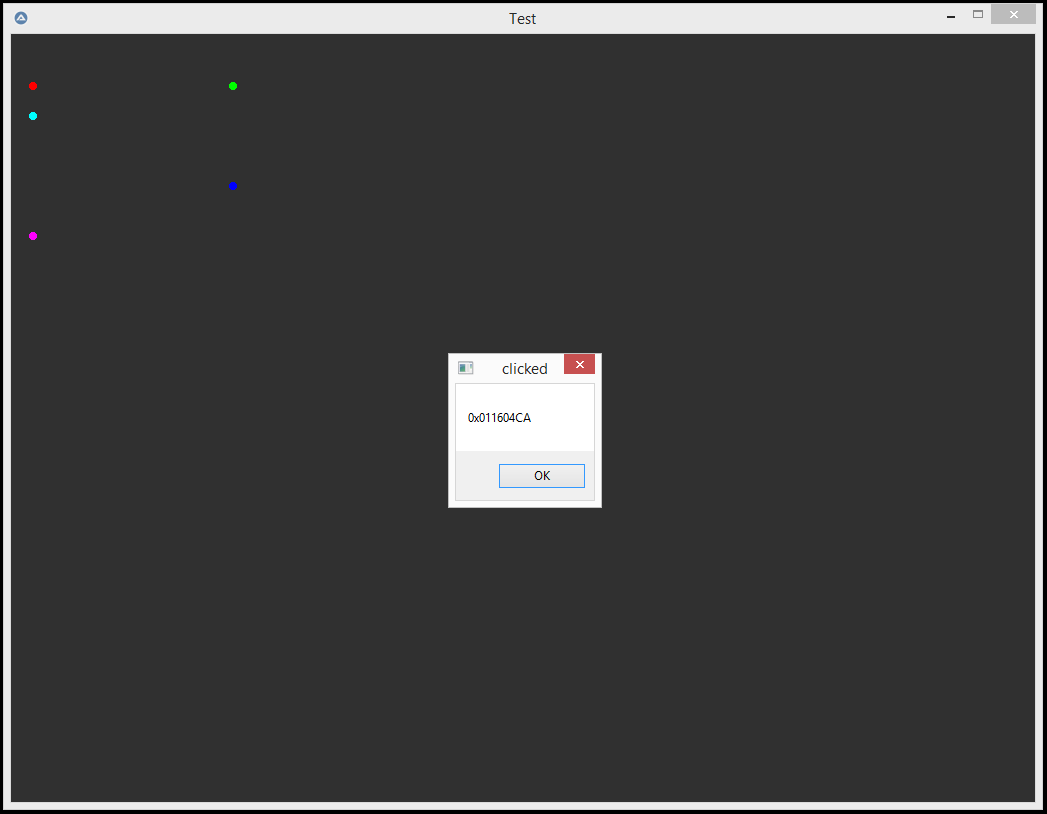
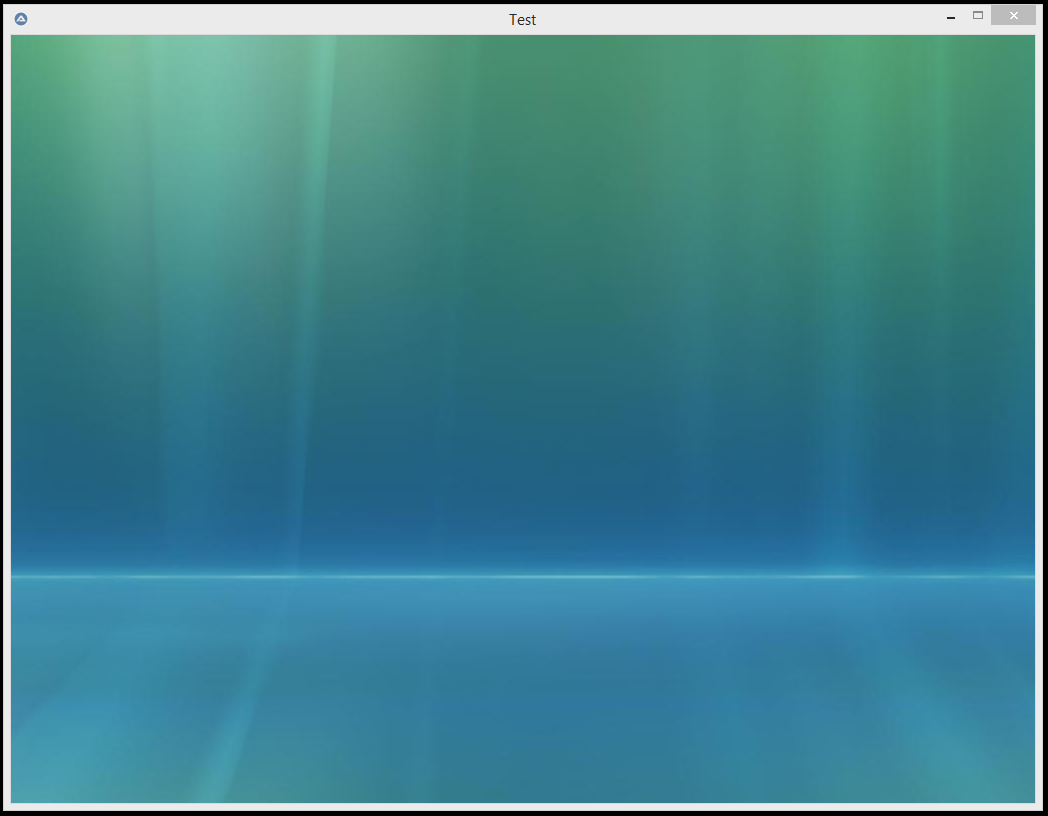
here is the full code: #include <GUIConstantsEx.au3> #include <MsgBoxConstants.au3> Local $g_a_idArray[6] Local $idMsg CreateChild() Do; Loop until the user exits. $idMsg = GUIGetMsg(1) If $idMsg[0] > 0 Then MsgBox($MB_SYSTEMMODAL, "clicked", $idMsg[2], 1) Until $idMsg[0] = $GUI_EVENT_CLOSE Func CreateChild() Local $hGUI = GUICreate("Test", 1024, 768) GUISetBkColor(0x303030, $hGUI) $bg = GUICtrlCreatePic("C:\Program Files (x86)\AutoIt3\Examples\GUI\msoobe.jpg", 0, 0, 1024, 768) GUICtrlSetState($bg,$GUI_DISABLE) $g_a_idArray[1] = GUICtrlCreateGraphic(20, 50, 4, 4) GUICtrlSetGraphic(-1, $GUI_GR_PENSIZE, 5) GUICtrlSetGraphic(-1, $GUI_GR_COLOR, 0xff0000) GUICtrlSetGraphic(-1, $GUI_GR_ELLIPSE, 0, 0, 4, 4) $g_a_idArray[2] = GUICtrlCreateGraphic(220, 50, 4, 4) GUICtrlSetGraphic(-1, $GUI_GR_PENSIZE, 5) GUICtrlSetGraphic(-1, $GUI_GR_COLOR, 0x00ff00) GUICtrlSetGraphic(-1, $GUI_GR_ELLIPSE, 0, 0, 4, 4) $g_a_idArray[3] = GUICtrlCreateGraphic(220, 150, 4, 4) GUICtrlSetGraphic(-1, $GUI_GR_PENSIZE, 5) GUICtrlSetGraphic(-1, $GUI_GR_COLOR, 0x0000ff) GUICtrlSetGraphic(-1, $GUI_GR_ELLIPSE, 0, 0, 4, 4) $g_a_idArray[4] = GUICtrlCreateGraphic(20, 200, 4, 4) GUICtrlSetGraphic(-1, $GUI_GR_PENSIZE, 5) GUICtrlSetGraphic(-1, $GUI_GR_COLOR, 0xff00ff) GUICtrlSetGraphic(-1, $GUI_GR_ELLIPSE, 0, 0, 4, 4) $g_a_idArray[5] = GUICtrlCreateGraphic(20, 80, 4, 4) GUICtrlSetGraphic(-1, $GUI_GR_PENSIZE, 5) GUICtrlSetGraphic(-1, $GUI_GR_COLOR, 0x00ffff) GUICtrlSetGraphic(-1, $GUI_GR_ELLIPSE, 0, 0, 4, 4) ;$bg = GUICtrlCreatePic("C:\Program Files (x86)\AutoIt3\Examples\GUI\msoobe.jpg", 0, 0, 1024, 768) ;GUICtrlSetState($bg,$GUI_DISABLE) GUISetState(@SW_SHOW) EndFunc I started out by creating a simple GUI with some clickable controls (colored dots): Next I wanted to add a background image, i have tried adding the image both before and after the other controls, neither works, with a background image the controls are no longer visible: test.au3
-
so far I have this UDF working easily, however when I use: _OOoCalcReadCell it is copying the formulas from the cells instead of the calculated values... if I manually/physically (without the script) hit copy on a cell and then paste into notepad, it correctly copies the calculated value, how can i read/copy the value instead of the formula?
-
Get or Read Pixel from Memory UDF - PixelGetColor .au3
xekon replied to jvanegmond's topic in AutoIt Example Scripts
excellent script, and this example works for me: #include <_PixelGetColor.au3> #include <Misc.au3> $init=TimerInit() For $x=1 To 4 For $y=1 To 10 PixelGetColor($x,$y) Next Next MsgBox(0,"","100%: " & TimerDiff($init) & @crlf & "Average: " & TimerDiff($init)/($x * $y)) $hDll = DllOpen("gdi32.dll") $vDC = _PixelGetColor_CreateDC($hDll) $vRegion = _PixelGetColor_CaptureRegion($vDC, 0,0,320,240,$hDll) $init=TimerInit() For $x=1 To 4 For $y=1 To 10 _PixelGetColor_GetPixel($vDC, $x,$y, $hDll) Next Next MsgBox(0,"","100%: " & TimerDiff($init) & @crlf & "Average: " & TimerDiff($init)/($x * $y)) Also on page 2 there were some speed comparisons. The difference for me was a LOT more than those posted, this script speeds things up lightning quick. PixelGetColor() Avg: ~12.3588 ms _PixelGetColor_CreateDC() Avg: ~0.0331 ms -
I tested your function "findBMP()" I saved it to the file "_FindBMP.au3" and then I used the below code to test it, and it works, the items I look for on my screen I have already generated .bmp files for. so I do not need to do that when I run the script, I just need to look for them. #RequireAdmin;win7 #include <GDIPlus.au3> #Include <ScreenCapture.au3> #Include <_FindBMP.au3> ;hotkey to run function to find image on screen HotKeySet("{F11}","Fpic") ; If debugging output is wanted to understand and analyse the algorithm put this on true/false Const $bDebug=False Const $cMatchLinePercentage=0.99 ;Minimum matching, put on 1 if exact matching is needed on all lines ;Constants for type of picture matching const $c24RGBFullMatch=1 ;Load as 24 bits and full match const $c24RGBPartialMatch=2 ;Load as 24 bits and partial match const $c16RGBFullMatch=3 ;Load as 16 bits and full match const $c16RGBPartialMatch=4 ;Load as 16 bits and partial match $fscreen = @scriptDir & "\fscreen.bmp" $find1 = @scriptDir & "\item1.bmp" $find2 = @scriptDir & "\item2.bmp" $find3 = @scriptDir & "\item3.bmp" $find4 = @scriptDir & "\item4.bmp" $find5 = @scriptDir & "\item5.bmp" while 1 sleep(1000) wend Func Fpic() _GDIPlus_Startup() _ScreenCapture_Capture($fscreen, 0, 0, -1, -1, False) $tResult = findBMP($fscreen, $find1, $c24RGBFullMatch) MsgBox(4096, "Test", "result: "&$tResult) _GDIPlus_Shutdown() EndFunc I am very interested in getting HBITMAP to work for the full screen capture, because then it does not need to be written to disk which is much faster. I tried what I though would work but it did not: $fscreen = _ScreenCapture_Capture("", 0, 0, -1, -1, False);HBITMAP method does anyone know how to compare a .bmp file to an HBITMAP? solution can be an example or something quick and dirty and I can make it work from there, much appreciated. (just not sure where to look next.)
-
Hey Thanks for that trancexx "Out of curiosity, why do you have "0x00" and Hex() thingy?" I have now simplified it to $bgr = _ColorGetRGB(_PixelGetColor_GetPixelRaw($vDC, $x, $y, $hDll),6) both ways give the same result, but this is less code
-
ahhh you are correct, it is because of the UDF it seems. (I use it cause it makes PixelGetcolor roughly 1,000 times faster when working on a large number of pixels like 100x100) _PixelGetColor.au3 _PixelGetColor_GetPixelRaw I should have investigated this farther.
-
http://www.autoitscript.com/autoit3/docs/libfunctions/_ColorGetRGB.htm #include <Color.au3> _ColorGetRGB($nColor) Success: an array of values in the range 0-255: [0] Red component color [1] Green component color [2] Blue component color Failure: set @error to 1 its actually BRG, not RGB [0] Blue component color [1] Green component color [2] Red component color here is how I have been making use of it: $bgr = _ColorGetRGB("0x00"&Hex(_PixelGetColor_GetPixelRaw($vDC, $x, $y, $hDll),6))
-
PERFECT, and even easier to implement than I thought the suggested solution would be! Thank you
-
right now I have a script that I wrote that goes pixel by pixel using PixelGetColor() and then comparing the R, G, and B values. to find the pixel that has the highest values. The script is working, but anytime I am working with an area of more than say 100x100 pixels the processing speed is just too slow. It has to do with using PixelGetColor(). I was hoping somebody could drop a hint to me on what would be a more efficient method, like working with a cached image I am sure would be much quicker than working with the pixels displayed on the screen, or maybe there is a way to get pixel information for multiple pixels all at once. Any hints or suggestions are greatly appreciated. For $x = $L to $R;compare pixels RGB For $y = $T to $B $rgb = _ColorGetRGB("0x00"&Hex(PixelGetColor($x,$y),6)) For $i = 0 to UBound($rgb) - 1 If colorcheck($i) = 1 Then colorsave($x,$y) Next TrayTip("","x:"&$x&" y:"&$y,999) Next Next