Search the Community
Showing results for tags 'ScreenCapture'.
Found 6 results
-
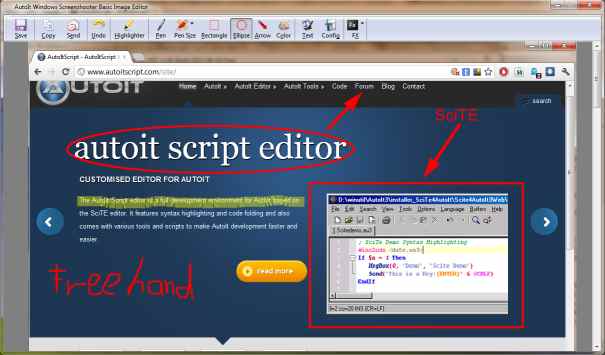
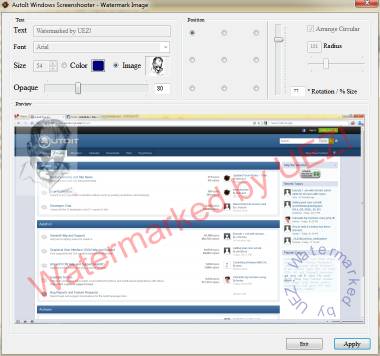
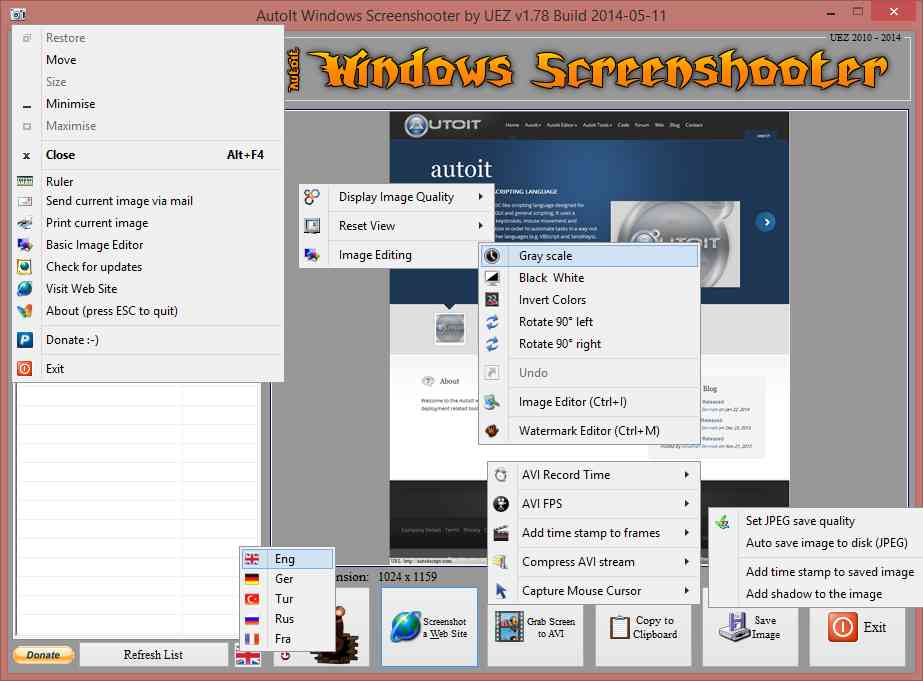
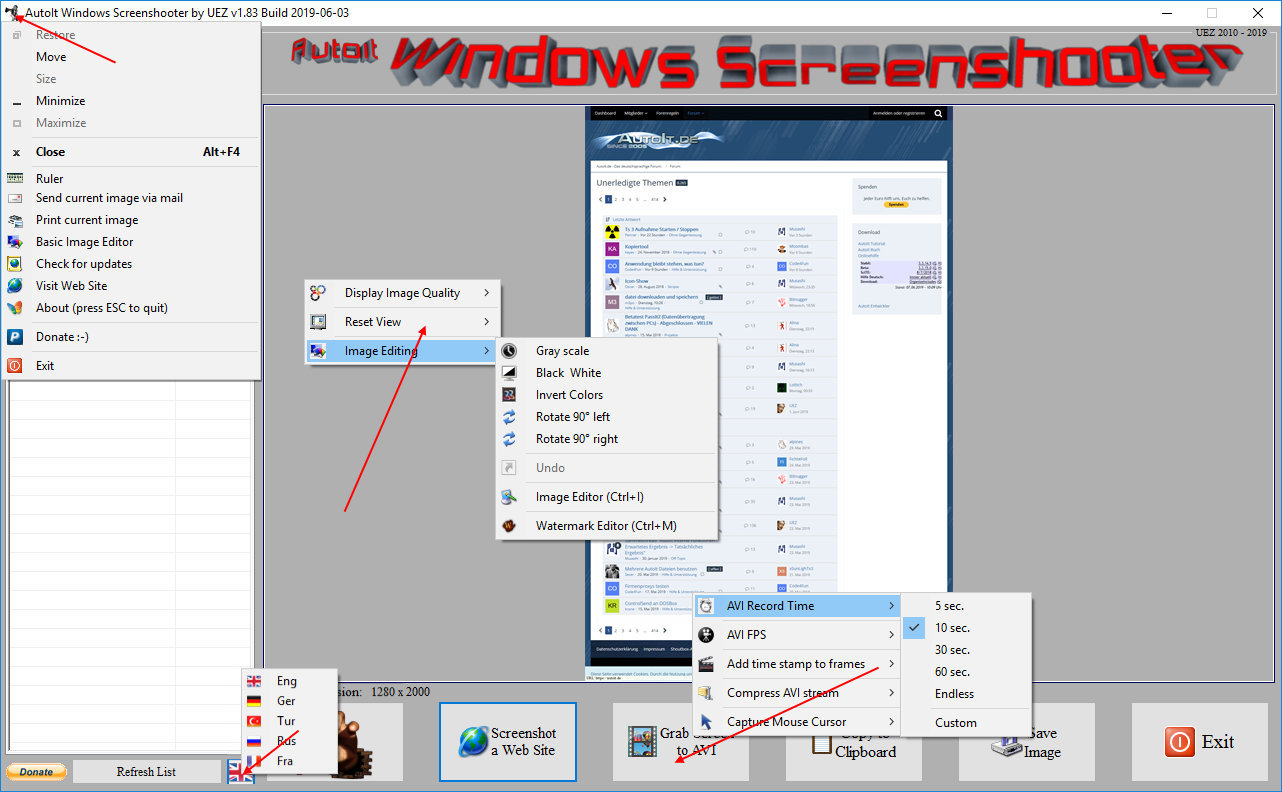
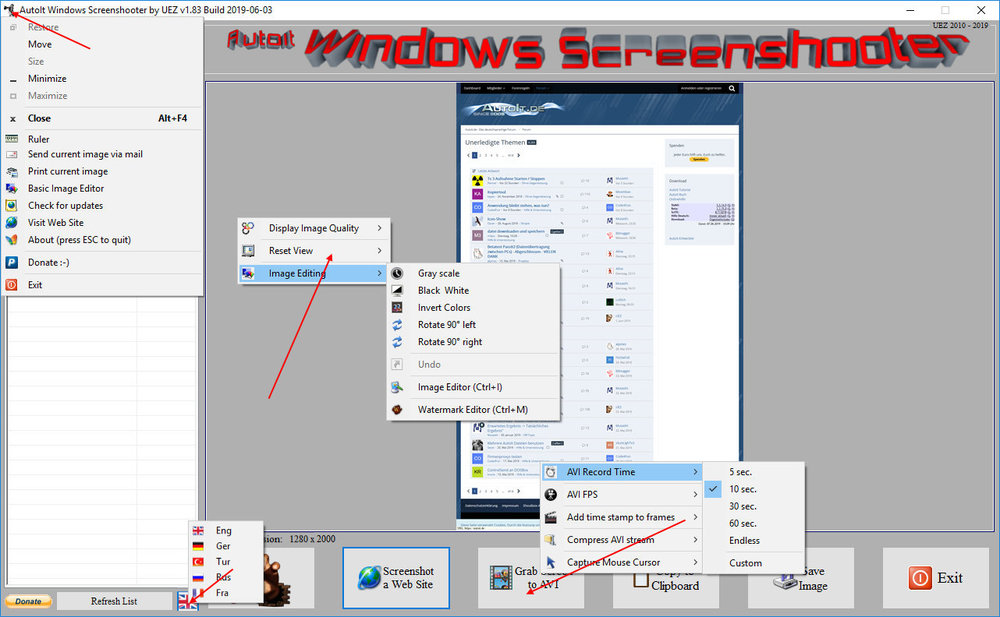
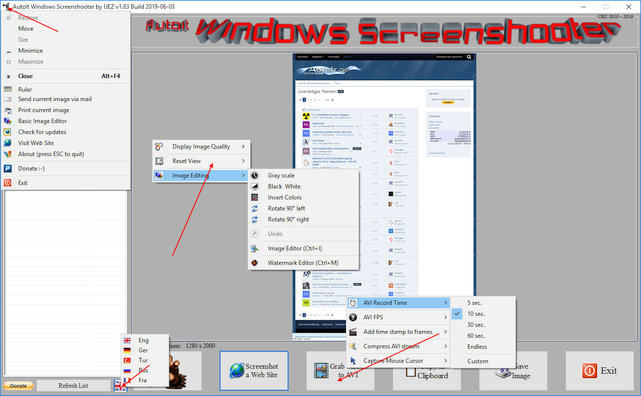
AutoIt Windows Screenshooter Key Features: takes easily a screenshot from any visible window capture any region of the desktop incl. freehand capturing capture GUI controls and GUI menus separately capture a marked area every x seconds for a duration of y seconds create a GIF animation from saved frames (Vista or higher os required) capture to AVI file (without audio!) takes a screenshot from web sites (available only on Win7+ os and when Aero is enabled) put images to clipboard to paste to other applications easily color picker save image in different formats and also to PDF! add timestamp to saved images simple image editing options: greyscale, b&w, invert, rotate +-90° send image to printer and default email client preview of captured screens incl. zoom option multi monitor support display pixel color under mouse ruler basic image editor (paint, highlight, ellipse, rectangle, text and some graphic FX) watermark captured image no 3rd party tools or DLLs used - pure AutoIt! fully portable - no installation is needed multi language feature (Eng, Ger, Tur, Fra and Rus only) drag'n'drop an image to the app for editing To do: capture content of scrollable window/control capture cascaded menus Due to DllCall("User32.dll", "int", "PrintWindow", "hwnd", $hWnd, "handle", $hMemDC, "int", 0) limitation some windows cannot be captured properly (GDI+, ProgDVB, etc.) but can take screenshots of hidden windows. One workaround is to use full screen capturing (F11/F12) or "Grab Screen" function! Or try double click with rmb on listview items (beta). Download source code (10489 downloads previously): AutoIt Windows Screenshooter v1.84 Build 2019-08-18.7z (version 3.3.12.0+ needed!) You are not allowed to sell this code or just parts of it in a commercial project or modify it and distribute it with a different name! Download compiled Exe only: 4shared / Media Fire / Softpedia (1.58mb) Distributing copies of the program in compiled format (exe) must be free of any fee! -----> click here to Donate! (Current donators: 1. Cuong N.) It is designed for Win7+ operating systems with AERO enabled! E.g. on WinXP machines some functions are not working properly and might crash the application! AV scanners may have a negative impact the execution of compiled exe and might report any malware. I guarantee that there is no malicious code in the source code / exe!!! Main GUI: About Intro: Basic Image Editor: Watermark: Click link for an enhanced version of Watermark Image. Credits: main code by UEZ additional code (alphabetical order) by Authenticity, AutoItObject Team, Eemuli, Eukalyptus, funkey, _Kurt, martin, monoceres, ProgAndy, taietel, trancexx, Ward, wolf9228 and Yashied! mesale0077 for turkish translation wakillon for french translation AZJIO for russian translation Keys: Main GUI: User your mouse to scroll preview window or Numpad 8: Scroll preview window up Numpad 2: Scroll preview window down Numpad 4: Scroll preview window left Numpad 6: Scroll preview window right Numpad +: zoom in preview window or mouse wheel down Numpad -: zoom out preview window or mouse wheel up F1: capture again on last position F5: refresh Windows Name list PRINTSCREEN: take screenshot from whole screen ALT+PRINTSCR: take a screenshot from active window F10: Undo made changes with Image Editing function F11: take screenshot from whole screen incl mouse cursor F12: take screenshot from whole screen Ctrl+Alt+F9 start "Grab Screen" mode Ctrl+Alt+F12: take a screenshot from active window using alternative screenshot functionality (beta)! Ctrl+r: call ruler Ctrl+s: save current displayed image Ctrl+x: exit program ctrl+w: call web grab input field (available only when Aero is enabled) Ctrl+i: call image editor Ctrl+m: call watermark editor Ctrl+z: undo Only available on Vista+ os: double click with rmb on list items to use alternative screenshot functionality (beta)! When 'Grab Screen' is clicked you can hold down the ctrl key to switch to 'grab controls' mode. Control under mouse will be framed red. ctrl + shift will take the screenshot of appropriate control. To capture GUI menus you can press rmb which simulates the lmb. When a menu is opened press shift additionally to capture it. Press and hold only the shift key to capture any region on the desktop using freehand capturing - release it so capture marked regions! Or just mark resize able area which you want to grab. Press CTRL key to grab marked area or right mouse button to capture the marked area every x seconds for a duration of y seconds. When saving the image just enter the extension you wish to use (*.jpg;*.png;*.bmp;*.gif;*.tif;*.pdf). Big thanks to taietel for his PDF UDF! Image Editor: s: save 😄 copy n: send h: highlighter p: pen r: rectangle e: ellipse a: arrow o: color t: text g: text config Ctrl+z: undo Watermark editor: Ctrl+z: undo To start the app minimized just call it "Windows Screenshooter.exe /min" Maybe it is useful for someone... Any kind of comment is welcome. Br, UEZ Change log:


- 129 replies
-
- 12
-

-

-
- gdi+
- image editor
- (and 3 more)
-
#include <ScreenCapture.au3> Local $hBmp ; Capture full screen $hBmp = _ScreenCapture_Capture("") _ScreenCapture_SaveImage("C:\Software\autoitscripts\scripts\images\prp\ocr\"&"ocr_01.PNG",$hBmp) Sleep(1000) _ScreenCapture_Capture("C:\Software\autoitscripts\scripts\images\prp\ocr\"&"ocr_02.PNG") Sleep(1000) ShellExecute("C:\Software\autoitscripts\scripts\images\prp\ocr\"&"ocr_01.PNG") Sleep(1000) ShellExecute("C:\Software\autoitscripts\scripts\images\prp\ocr\"&"ocr_02.PNG") Hi All, This is my first post and I have checked the forum. If this question has been asked and answered I apologise. The code above is intended to save the whole screen to a directory; it doesn't work. I have downloaded and copied and renamed the files referenced in https://www.autoitscript.com/forum/topic/192254-33143-fixes/ to my includes directory. Clearly there is some step that I am missing; do I need to download and register a dll? I know that I am using two different methods above but neither works for me.
-
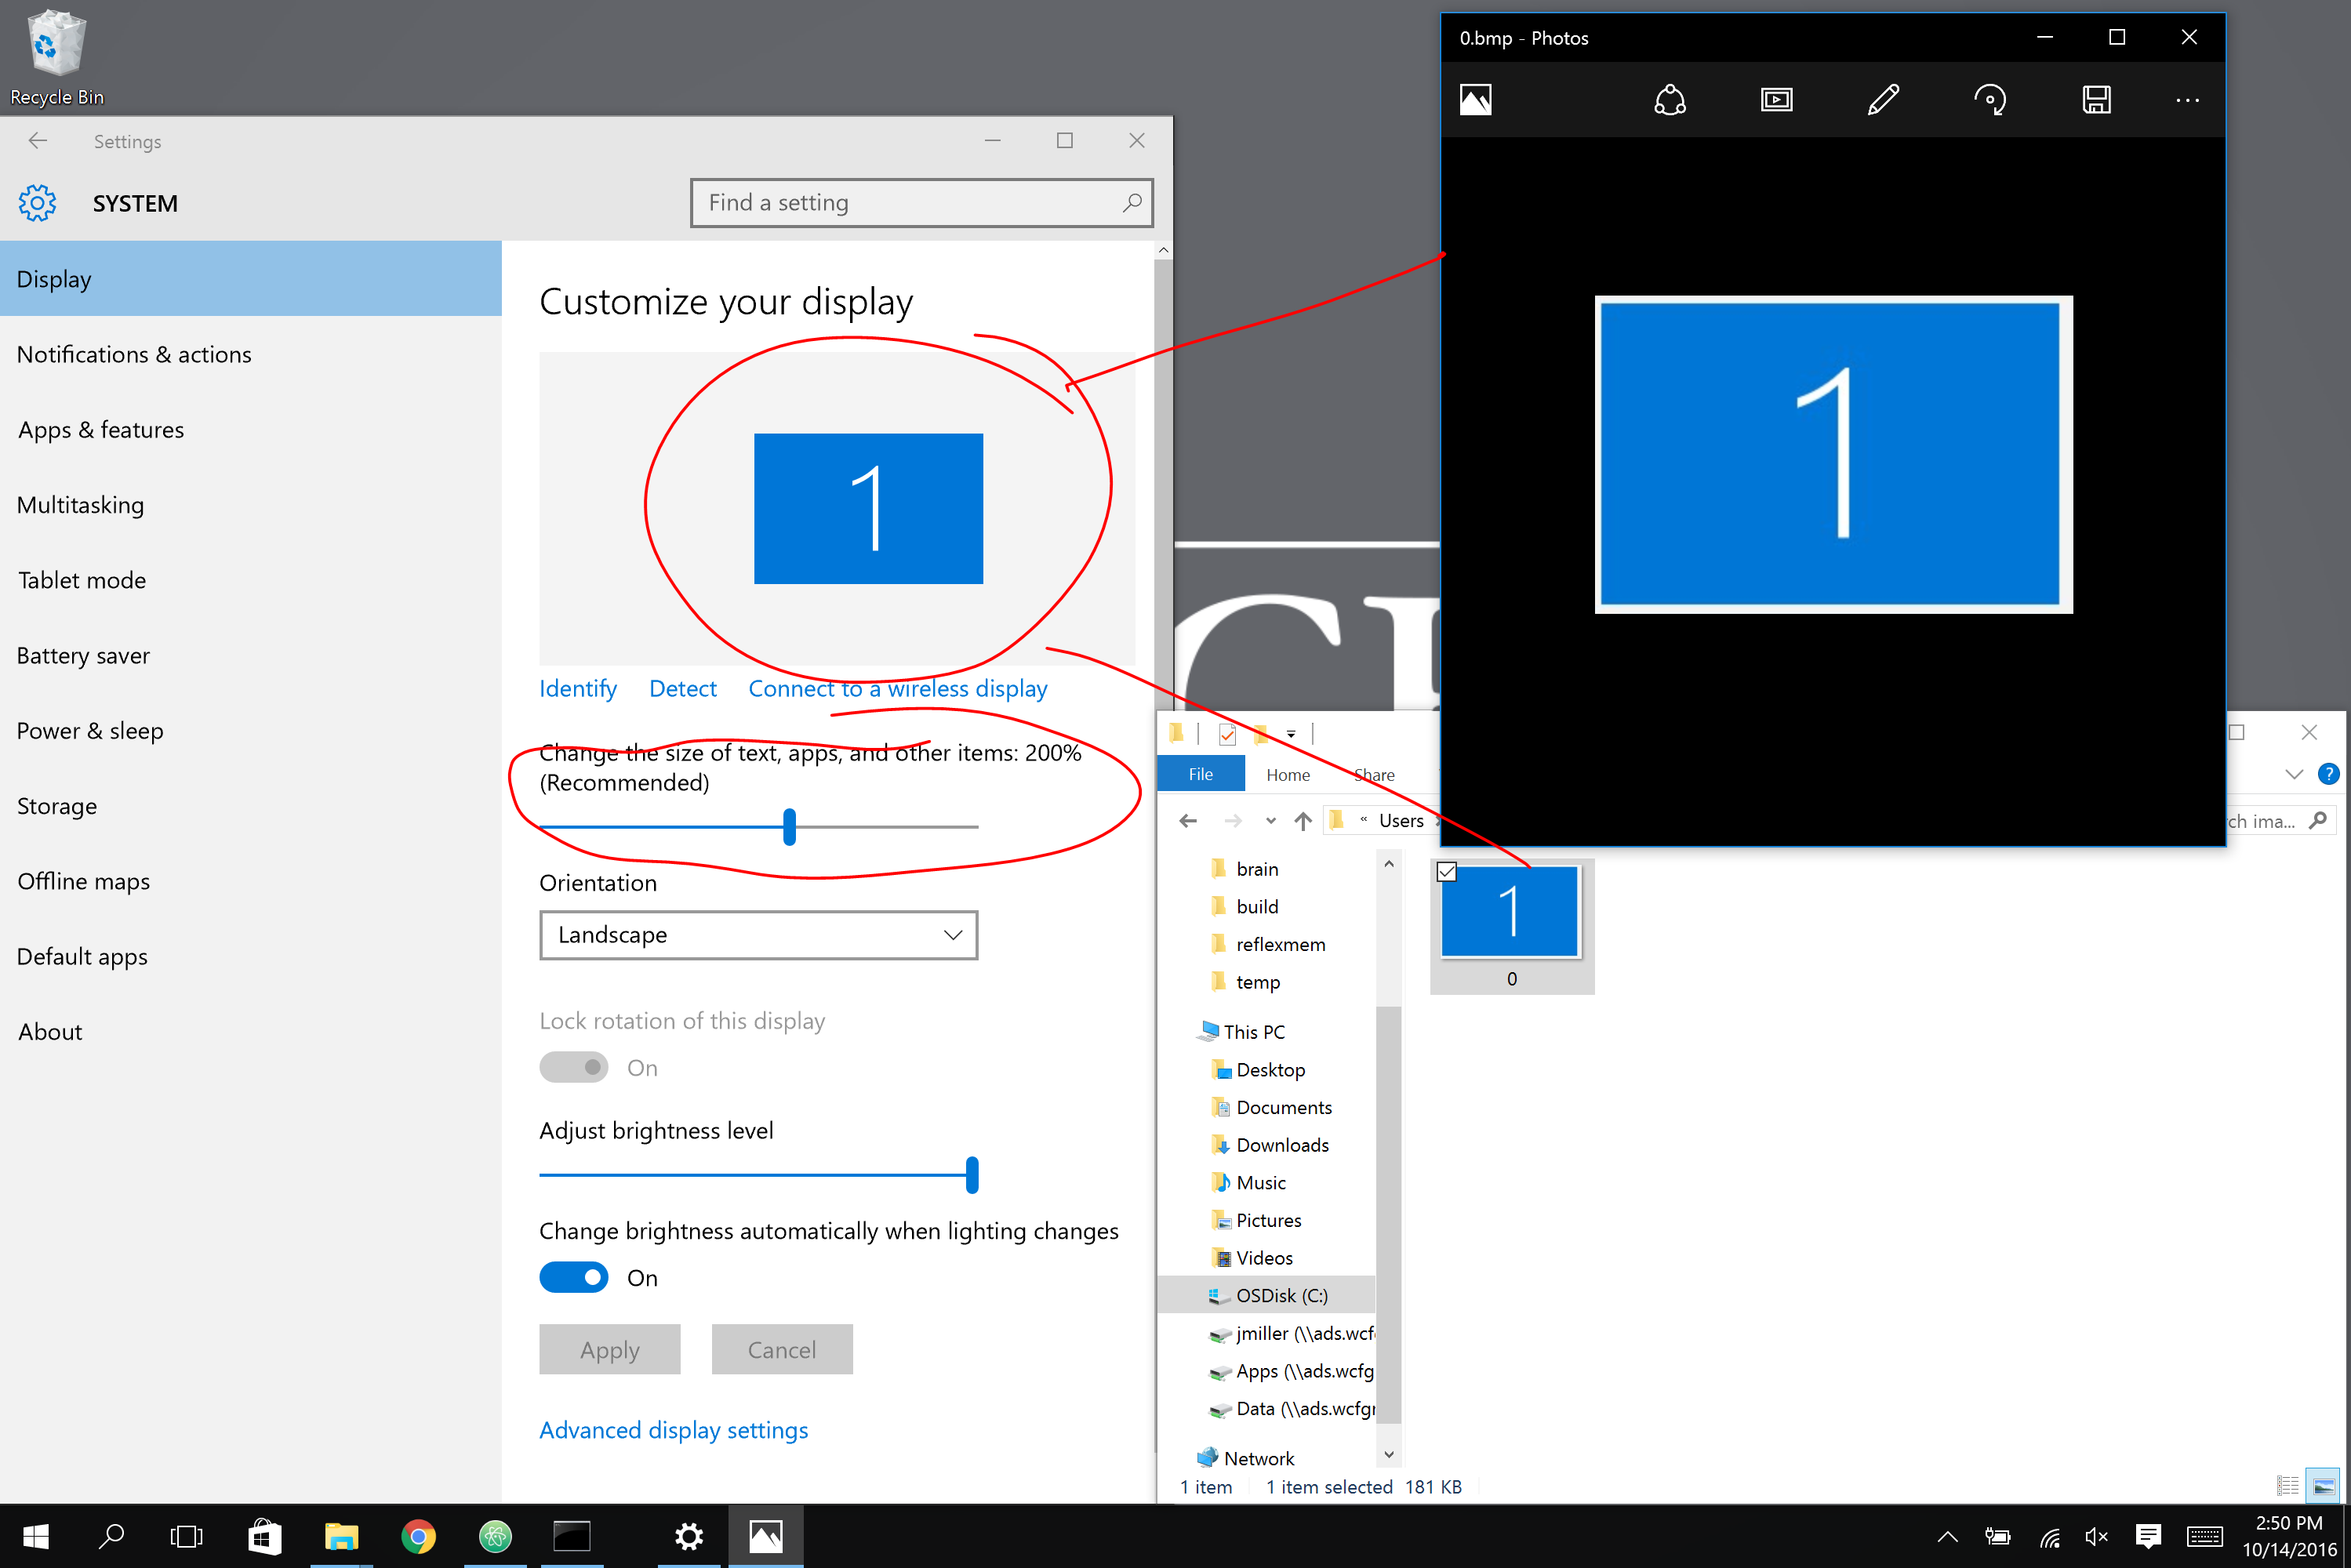
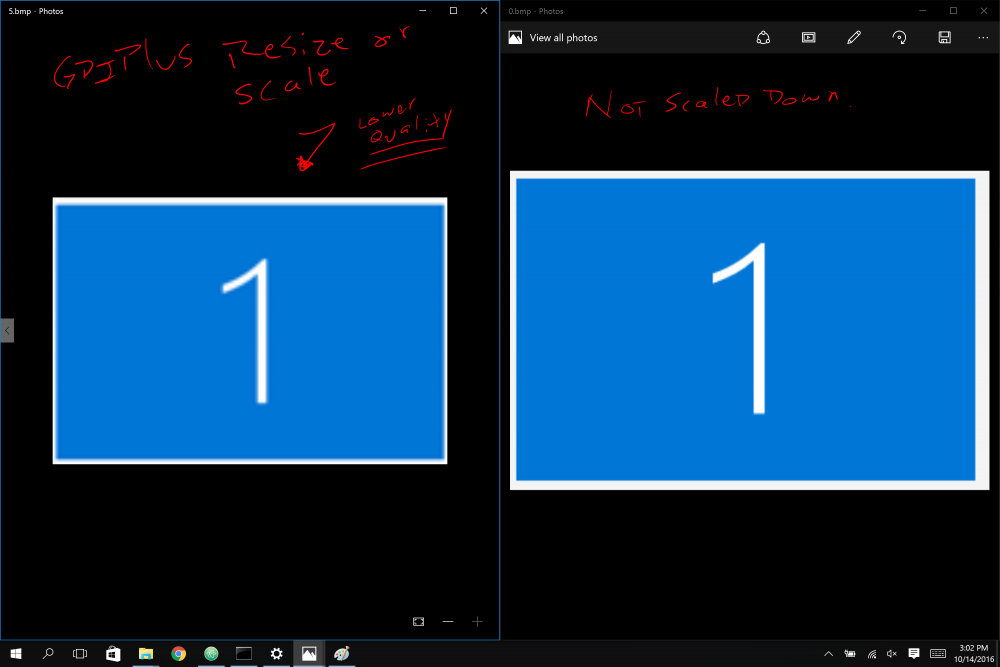
 Been struggling with this one for a while. when I do a _screencapture_capture call on a high resolution monitor (like my surface book) it gives me an image that has 2 problems: 1. its in the wrong location on the screen and 2. it gives me a picture that is larger than the area of the screen I selected, though it only has the content of what I selected. --------------------------- I was able to easily fix problem #1 by manually adjusting the x y coordinates to compensate for the amount of DPI scale I have. for instance if I'm 200% zoomed in the code looks like this: Local $bmp = _ScreenCapture_Capture("", $iX1*2, $iY1*2, $iX2*2, $iY2*2, false) it's problem #2 that is the big problem. I'd like to attach a screen shot of what I'm talking about (see capture.png) --------------------------- Now I basically understand why this is happening. ScreenCapture grabs each pixel of the screen. This screen, being a high resolution, when its zoomed in adds up several pixels to make one on the screen. This is a problem for me because I'm taking images of the screen and later looking for those exact images on the screen. if everything is blown up by an indeterminate amount (in my case 2x) then those images can't be found later on. Does anyone know what I can do? I tried resizing the images back down to no avail. _GDIPlus_ImageResize and _GDIPlus_ImageScale don't work because they don't compress the pixels correctly. quality is lost. and the exact image isn't preserved, so I can't search for it later. (see capture1.png) Anyway, I'm about to give up, been on this problem for too long! does anyone know what I can do? Seems to me that the ideal solution would be to eventually have autoit add an argument to _screencapture_capture that lets you specify a DPI scale amount or something. that can be pulled from the registry at HKEY_CURRENT_USER\control panel\desktop\windowmetrics\appliedDPI. But in the meantime, does anyone have any suggestions for how I can make my program compatible with 4k resolution monitors? I either need to take the screen capture like normal, then scale it down appropriately without losing quality, or I need to capture the screen in the first place like the human sees it. But I don't know how to do that either. I'll post my relevant code here: (in my project I call ScreenCapture_DPI_Aware) #include <Security.au3> Func _GetAppliedDPI() Local $aArrayOfData = _Security__LookupAccountName(@UserName) If IsArray($aArrayOfData) Then ;msgbox(64, "SID String = ", $aArrayOfData[0] & @CRLF) ;msgbox(64, "Domain name = ", $aArrayOfData[1] & @CRLF) ;msgbox(64, "SID type = ", _Security__SidTypeStr($aArrayOfData[2]) & @CRLF) ;Local $AppliedDPI = RegRead("HKEY_USERS\" & $aArrayOfData[0] & "\Control Panel\Desktop\WindowMetrics", "AppliedDPI") Local $AppliedDPI = RegRead("HKEY_CURRENT_USER\Control Panel\Desktop\WindowMetrics", "AppliedDPI") return $AppliedDPI EndIf EndFunc Func GetScale() $applied = _GetAppliedDPI() if $applied == "" then return 1 else return $applied / 96 EndIf EndFunc Func ScreenCapture_Capture_DPI_Aware($sBMP_Path, $iX1, $iY1, $iX2, $iY2, $bool) $R = GetScale() ;Raito Local $bmp = _ScreenCapture_Capture($sBMP_Path, $iX1*$R, $iY1*$R, $iX2*$R, $iY2*$R, $bool) ;Scaling didn't work: ;_ScaleImage($bmp, $sBMP_Path, abs($iX2 - $iX1), abs($iY2 - $iY1), $R) ;return _ScreenCapture_Capture($sBMP_Path, $iX1*$R, $iY1*$R, $iX2*$R, $iY2*$R, $bool) EndFunc ;Func _ScaleImage($bmp, $outimage, $w, $h, $scale) ; _GDIPlus_Startup() ;Get the encoder of to save the resized image in the format you want. ; Local $Ext = StringUpper(StringMid($outimage, StringInStr($outimage, ".", 0, -1) + 1)) ; $CLSID = _GDIPlus_EncodersGetCLSID($Ext) ; code found here : https://www.autoitscript.com/autoit3/docs/libfunctions/_GDIPlus_ImageSaveToStream.htm ; Local $sImgCLSID = _GDIPlus_EncodersGetCLSID("png") ;create CLSID for a JPG image file type ; Local $tGUID = _WinAPI_GUIDFromString($sImgCLSID) ;convert CLSID GUID to binary form and returns $tagGUID structure ; Local $tParams = _GDIPlus_ParamInit(1) ;initialize an encoder parameter list and return $tagGDIPENCODERPARAMS structure ; Local $tData = DllStructCreate("int Quality") ;create struct to set JPG quality setting ; DllStructSetData($tData, "Quality", 100) ;quality 0-100 (0: lowest, 100: highest) ; Local $pData = DllStructGetPtr($tData) ;get pointer from quality struct ; _GDIPlus_ParamAdd($tParams, $GDIP_EPGQUALITY, 1, $GDIP_EPTLONG, $pData) ;add a value to an encoder parameter list ; Local $gbmp = _GDIPlus_BitmapCreateFromHBITMAP($bmp) ; _WinAPI_DeleteObject($bmp) ; Local $gsbmp = _GDIPlus_ImageResize($gbmp, $w * $scale, $h * $scale) ;Local $ext = _GDIPlus_EncodersGetCLSID("PNG") ; _GDIPlus_ImageSaveToFileEx($gsbmp, $outimage, $sImgCLSID) ; _GDIPlus_BitmapDispose($gbmp) ; _GDIPlus_BitmapDispose($gsbmp) ; _GDIPlus_Shutdown() ;EndFunc Thanks for any help you can give me!!!
-
 Hello all. I'm trying to do something simple, but I can't manage to find where to start since I can have multiple possibilities and not sure what is the best one : Taking screen capture (I can do that) On this capture, I'll look for 10 particular regions that will give me 10 images of 40px * 40px (I can do that) Then what I want is for each of these regions, find on my library of ~140 images which one is the closest one to my region (= the match) What do you think is the best approach ? Ican easily do step 1 and 2, however for the third step : I can't use memcmp because they won't be exactly the same (original library can differ a very little bit from what I'll get from my screen capture) There is no text, only drawing Should I do a pixelSum of what I get on screen and do the same via GDIPlus for each of my images in the library? Thanks a lot, Tim
 -
I don't get why the images I take turns up like this, but it seems to me like the screenshot doesn't go from the actual positions specified. It's weird, cause what happends is that when I for example move the mouse over the number 25 on SciTE, the image shows that it's over 19... Anyone knows what I'm doing wrong? #include <screencapture.au3> #include <WindowsConstants.au3> Hotkeyset("{ESC}", "Terminate") $gui = GUICreate("", 100, 800, 100, 0, $WS_POPUP, $WS_EX_TOPMOST) _GDIPlus_Startup() $graphics = _GDIPlus_GraphicsCreateFromHWND($gui) GUISetState(@SW_SHOW, $gui) While 1 $scr = _ScreenCapture_Capture("", 0, 0, 100, 800) $bitmap = _GDIPlus_BitmapCreateFromHBITMAP($scr) _WinAPI_DeleteObject($scr) _GDIPlus_GraphicsDrawImage($graphics, $bitmap, 0, 0) WEnd Func Terminate() _GDIPlus_GraphicsDispose($graphics) _GDIPlus_BitmapDispose($bitmap) _GDIPlus_Shutdown() Exit EndFunc
-
Greetings, with the below code the Tooltip does not show in the captured image. Any hints? Thanks. #include <ScreenCapture.au3> ToolTip("BlaBla Tooltip", 500, 300) Sleep(1000) _ScreenCapture_Capture(@MyDocumentsDir &"\Image1.jpg", 0, 0, 1600, 1000, True) MsgBox(0, "TTT", "ScreenCapture done") ShellExecute(@MyDocumentsDir &"\Image1.jpg")